ZKTeco ML10 Series User Manual
Hide thumbs
Also See for ML10 Series:
- User manual (19 pages) ,
- Installation manual (10 pages) ,
- Installation instruction (10 pages)
Table of Contents
Advertisement
Advertisement
Table of Contents

Subscribe to Our Youtube Channel
Related Manuals for ZKTeco ML10 Series


Summary of Contents for ZKTeco ML10 Series
- Page 1 USER MANUAL ML10 / PL10 series Version: 2.2 Date: Jan. 2019...
-
Page 2: Table Of Contents
Table of Contents Read Before Use ......................4 Safety Precautions........................4 Structure ............................5 Basic Function ......................6 User Introduction ........................6 Button Function ........................6 Lock Indication .......................... 7 Lock Initialization ........................8 Using Mechanical Key ......................9 9V External Battery ....................... 10 Register First Administrator ..................... - Page 3 Register Normal User ......................13 Register Temporary User ....................14 Delete Temporary User Group ..................15 Delete Normal User Group ....................16 Delete Admin Group ......................17 Enable/Disable Normally Open Mode ..............18 Disabling Normally Open Mode: ................. 18...
-
Page 4: Read Before Use
Read Before Use Safety Precautions Factory setting of all new locks allows any verification to unlock them. The lock is equipped with mechanical keys for manually unlocking. Store the mechanical key in a safe place. Four alkaline AA batteries (not included) are required to power on the lock, Non-alkaline and rechargeable batteries ARE NOT RECOMMENDED. -
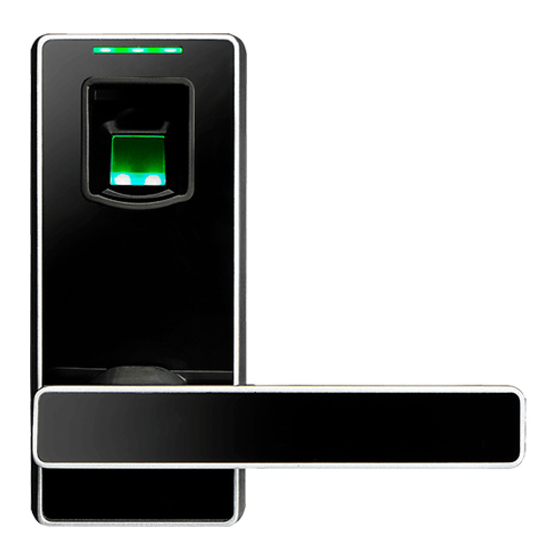
Page 5: Structure
Structure Front view Rear / Bottom view 1 LED 2 Fingerprint Sensor 3 Sensor Holder 4 ID Card Swiping Area 5 Handle 6 Mechanical Key Hole 7 Battery Box Cover 8 Battery Area 9 Button / Temporary User 10 Button ... -
Page 6: Basic Function
Basic Function User Introduction Group Verification Mode Function Add/delete fingerprint or ID card; Enable 20 (Fingerprint:10, ID Card: 10) Administrator Normally Open (NO) mode; Unlock the door Normal User 120 (Fingerprint:60, ID Card: 60) Unlock the door; Enable NO mode Temporary User 40 (Fingerprint:20, ID Card: 20) Unlock the door;... -
Page 7: Lock Indication
Lock Indication Lock Status Indication Successful Operation Single beep and green light blinks Failed Operation Two beeps and red light blinks Low battery Seven beeps and red light blinks 7 times One beep and the lock makes a rolling sound for the first Unlock time, which indicates the door is unlocked. -
Page 8: Lock Initialization
Lock Initialization Method 1 Method 2 Operating Steps Indication Operating Steps Press the "Reset" button with Delete all temporary users a pin Please refer “Delet Press the sensor holder to Green light blinks Temporary User” power up the lock Please refer “Delet Delete all normal users Normal User”... -
Page 9: Using Mechanical Key
Using Mechanical Key Hexagon Screw Pull the handle out Step: Using hex wrench, remove the screw. Insert the key and unlock. P a g e... -
Page 10: 9V External Battery
9V External Battery 9V external battery is used to operate the lock when the battery is fully discharged. P a g e | 10... -
Page 11: Register First Administrator
Register First Administrator Operating Steps Indication of the lock Press finger on to the sensor to wake up Green light blinks the lock Single beep Press "+" button Place a fingerprint three times on the One beep for the first two fingerprint sensor or swipe ID card one successful attempt;... -
Page 12: Register Other Administrators
Register Other Administrators Operating Steps Indication of the lock Press finger on to the sensor to wake up LED blinks green the lock One beep Press "+" button One beep Verify using admin fingerprint or card One beep Press button "1" to select admin group Place a fingerprint three times on the One beep for the first two fingerprint sensor or swipe ID card one... -
Page 13: Register Normal User
Register Normal User Operating Steps Indication of the lock Press finger on to the sensor to wake up LED blinks green the lock One beep Press "+" button Verify using admin fingerprint or card One beep Press button "2" to select normal user One beep group Place a fingerprint three times on the... -
Page 14: Register Temporary User
Register Temporary User Operating Steps Indication of the lock Press finger on to the sensor to wake up LED blinks green the lock One beep Press "+" button Verify using admin fingerprint or card One beep Press button "3" to select temporary One beep user group Place a fingerprint three times on the... -
Page 15: Delete Temporary User Group
Delete Temporary User Group Operating Steps Indication of the lock Press finger on to the sensor to wake up LED blinks green the lock One beep Press "-" button Verify using admin fingerprint or card One beep Long press button "3" to delete A long beep, LED blinks green for temporary user group one second... -
Page 16: Delete Normal User Group
Delete Normal User Group Operating Steps Indication of the lock Press finger on to the sensor to wake up LED blinks green the lock One beep Press "-" button Verify using admin fingerprint or card One beep Long press button "2" to delete normal A long beep, LED blinks green for user group one second... -
Page 17: Delete Admin Group
Delete Admin Group Operating Steps Indication of the lock Press finger on to the sensor to wake up LED blinks green the lock One beep Press "-" button Verify using admin fingerprint or card One beep Long press button "1" to delete admin A long beep, LED blinks green for user group one second... -
Page 18: Enable/Disable Normally Open Mode
Enable/Disable Normally Open Mode Operating Steps Indication of the lock Verify using any registered user LED blinks green fingerprint or card A long beep, LED blinks green for Long press "1" button for three seconds one second Note: Deleting operation is only valid for groups. Disabling Normally Open Mode: Verifying using any registered fingerprint or card on lock will disable Normally Open Mode. - Page 19 P a g e | 19...
Need help?
Do you have a question about the ML10 Series and is the answer not in the manual?
Questions and answers