Advertisement
Quick Links
DOS TYXAL +
Notice d'installation
FR
Installation guide
EN
DE
Installationsanleitung
Guida di installazione
IT
Manual de instalación
ES
PL
Instrukcja instalacji
NL
Installatiehandleiding
www.deltadore.com
3
Fixati on / Mounti ng / Montage / Fissaggio / Fijación / Mocowanie / Bevesti ging
1
2
D1
Ê Séparez les 2
Ë Tracez et percez
FR
parties du boîtier.
les trous D1 et D2.
Ê Open the unit.
Ë Mark and drill holes
EN
D1 and D2.
Ê Trennen Sie die
Ë Markieren Sie die
DE
Gehäusehälften.
Bohrstellen und
bohren Sie die Löch-
er D1 und D2.
Ê Separare le 2
Ë Segnare e fare i fori
IT
parti della scatola.
D1 e D2.
Ê Separe las 2
Ë Marque y taladre los
ES
partes de la caja.
agujeros D1 y D2.
Ê Oddzielić 2 części
Ë Zaznaczyć i
PL
obudowy.
wywiercić otwory
D1 i D2.
Ê Scheid de twee
Ë Markeer en boor de
NL
delen van de
gaten D1 en D2.
behuizing.
LS 14250 - 3,6 V - 1,2 Ah - Lithium
Consumption stand-by : 3,5 µA
Consumption : 14,2 mA max.
X3D alarme : [868 – 868.6] MHz et
[868.7 – 869.2] MHz 100 m
Maximum radio power < 10 mW,
receiver category: 2
-10°C / +70°C
+5°C / +40°C
IP
IP 30 - IK 02
75%
33 x 102 x 32 mm
89 x 38 x 38 mm
89 x 38 x 11 mm
EN 50131-3 / RTC 50131-3 / EN 50131-6 /
RTC 50131-6 / EN 50131-1 Grade 2
Environmental class II
Autoprotection à l'ouverture et à l'arrachement /
Tamper alarm on opening or removal of unit /
Sabotagekontakt : Auslösung beim Öffnen und
Abreißen / Autoprotezione all'apertura e alla rimo-
zione forzata / Autoprotección contra la apertura y
el vandalismo / Funkcja antysabotażowa w przypa-
dku próby wyrwania lub otwarcia / Automatische
bescherming tegen opening en losrukken
Important product information (Ë Ì)
* Jusqu'à 10 ans, valable dans les conditions d'utilisation précisées dans les notices
d'installation et les Conditions générales de Vente
* Up to 10 years valid under the conditions of use specifi ed in the installation instructions and
the General Conditions of Sale
*Hasta 10 años siempre y cuando se respeten las condiciones de uso especifi cadas en el
manual de instalación y en la Condiciones Generales de Venta
*Fino a 10 anni, in base alle condizioni di utilizzo precisate nelle istruzioni di installazione e
nelle Condizioni Generali di Vendita
*Bis zu 10 Jahren unter den in der Bedienungsanleitung und den AGB angegebenen
Nutzungsbedingungen
*Tot 10 jaar, geldig onder de gebruiksvoorwaarden gespecifi ceerd in de installatie-
handleidingen en de algemene verkoopsvoorwaarden
*aż do 10 lat, przy użytkowaniu zgodnym z opisem w instrukcji instalowania oraz Generalnymi
warunkami Sprzedaży
3
4
V1
Ø 4 mm max.
Ø 3,5 mm
D2
V2
Ø max = 3 mm
Ø 6 mm
Ì Fixez le socle de l'émet-
Í Fixez le capteur (À) au sol
teur avec les vis
sur le béton et la partie
V1 et V2.
aimant (Á) sur la porte de
garage.
Ì Attach the transmitter
Í Mount the sensor À) on
base with the V1 and V2
the concrete floor and the
screws.
magnetic part (Á) on the
garage door.
Ì Befestigen Sie den Sock-
Í Befestigen Sie den
el des Senders mit den
Alarmgeber (À) am
Schrauben V1 und V2.
Betonfußboden und
das Gegenstück (Á) am
Garagentor.
Ì Fissare il supporto
Í Fissare il sensore (À) al
dell'emettitore con le
pavimento sul cemento e la
viti V1 e V2.
parte magnetica (Á) sulla
porta del garage.
Ì Fije el zócalo del emisor
Í Fije el sensor (À) al suelo
con los tornillos V1 y
en el hormigón y la parte
V2.
de imán (Á) en la puerta de
garaje.
Ì Przymocować podstawę
Í Przymocować czujnik (À)
nadajnika śrubami V1
do podłoża na betonie, a
i V2.
część z magnesem (Á) na
bramie garażowej.
Ì Bevestig de basis van de
Í Bevestig de sensor (À) op
zender met de schroev-
de grond op het beton en
en V1 en V2.
het deel met de magneet
(Á) aan de garagedeur.
Contenu / Contents / Inhalt / Contenuto / Contenido / Spis treści / Inhoud
300m
Ý
1
Présentati on / Presentati on / Beschreibung / Presentazione / Presentación /
Prezentacja / Voorstelling
Le détecteur doit être associé à un système d'alarme DELTA DORE radio X3D.
FR
The detector must be associated with a DELTA DORE wireless X3D alarm system.
EN
Der Melder muss mit einer DELTA DORE Funk-Alarmanlage X3D verbunden werden.
DE
Il sensore deve essere associato ad un sistema d'allarme DELTA DORE radio X3D.
IT
El detector debe asociarse a un sistema de alarma DELTA DORE radio X3D.
ES
Detektor musi być skonfigurowany z radiowym systemem alarmowym DELTA DORE X3D.
PL
De detector moet worden gekoppeld aan een alarmsysteem DELTA DORE radio X3D.
NL
2
Emplacement / Locati on / Einbauort / Posizionamento / Ubicación / Lokalizacja /
Locati e
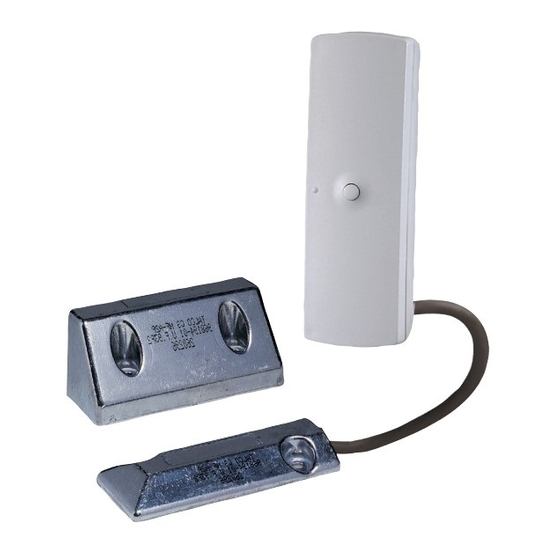
Le détecteur à ouverture contact de sol doit être placé en intérieur et fi xé sur une porte de garage.
FR
The fl oor contact door magnetic contact detector must be installed indoors and mounted on a garage door.
EN
Der Offnungskontakt-Bodensensor muss im Innenraum platziert und an einem Garagentor montiert werden.
DE
Il sensore con apertura a contatto col pavimento deve essere posizionato all'interno e fi ssato ad una porta
IT
del garage.
El detector de apertura de contacto para suelo se debe colocar en interior y fi jarse a una puerta de garaje.
ES
Detektor otwarcia mający kontakt z podłożem musi być umieszczony wewnątrz i zamocowany do bramy
PL
garażowej.
NL
De detector met opening contact moet binnen worden geplaatst en bevestigd aan een garagedeur.
Á
À
Distances de déclenchement (support ferreux ou support non ferreux).
FR
Triggering distances (ferrous or non ferrous mounts).
EN
Auslöseaabstände (eisenhaltige oder nicht eisenhaltige Träger).
DE
Distanza di azionamento (supporto ferroso o non ferroso).
IT
Distancias de activación (soporte ferroso o no ferroso).
ES
Odległości uruchamiania (nośnik żelazny lub nośnik nieżelazny).
PL
Afstanden activering (ferro of non-ferro drager).
NL
Ouverture /
Opening / Öffnen /
Apertura /
Apertura /
Otwieranie /
Opening
X
50 mm
Y
52 mm
Z
73 mm
Tolérance sur les distances de fonctionnement : +0% / -50%
FR
X : Déplacement de l'aimant vers la droite ou vers la gauche
Y : Déplacement vers le haut ou vers le bas
Z : Déplacement de l'aimant en avant ou en arrière
Tolerance for operating distances: +0% / -50%
EN
X: Magnet displacement left or right
Y: Magnet displacement upwards or downwards
Z: Magnet displacement forwards or backwards
Toleranzen bei Funktionsabständen: +0% / -50%:
DE
X: Versatz des Gegenstücks nach links oder rechts;
Y: Versatz des Gegenstücks nach oben oder unten;
Z: Versatz des Gegenstücks noch vorn oder hinten
Tolleranza sulle distanze di funzionamento: +0%/-50%
IT
X: spostamento dalla parte magnetica verso destra o sinistra
Y: spostamento verso l'alto o il basso
Z: spostamento della parte magnetica in avanti o indietro
Tolerancja odległości funkcjonalnych: +0% / -50%
ES
X: Przemieszczenie magnesu w prawo lub w lewo
Y: Przemieszczenie do góry lub do dołu
Z: Przemieszczenie magnesu do przodu lub do tyłu
Tolerancja odległości funkcjonalnych: +0% / -50%
PL
X: Przemieszczenie magnesu w prawo lub w lewo
Y: Przemieszczenie do góry lub do dołu
Z: Przemieszczenie magnesu do przodu lub do tyłu
Tolerantie op de werkingsafstanden: +0% / -50%
NL
X : Het verplaatsen van de magneet naar rechts of links
Y: Het verplaatsen van de magneet naar boven of onder
Z : Verplaatsing van de magneet naar voren of naar achteren
Instructions
Important
Product
Informations
Fermeture /
Ouverture /
Closing / Schließen /
Opening / Öffnen /
Chiusura / Cierre /
Apertura /
Zamykanie / Sluiting
Apertura /
Otwieranie /
Opening
44 mm
X
42 mm
Y
58 mm
Z
Y
Z
X
X
Z
Y
Fermeture /
Closing / Schließen /
Chiusura / Cierre /
Zamykanie / Sluiting
51 mm
46 mm
91 mm
84 mm
94 mm
88 mm
Advertisement

Related Manuals for DELTA DORE DOS TYXAL +


Summary of Contents for DELTA DORE DOS TYXAL +
- Page 1 Prezentacja / Voorstelling 33 x 102 x 32 mm Le détecteur doit être associé à un système d’alarme DELTA DORE radio X3D. The detector must be associated with a DELTA DORE wireless X3D alarm system. Der Melder muss mit einer DELTA DORE Funk-Alarmanlage X3D verbunden werden.
- Page 2 Mise en service / Acti vati on / Inbetriebnahme / Messa in funzione / Puesta en servi- Switchs / Switches / Schalter / Switch / Conmutadores / Wyłączniki / Schakelaars cio / Rozruch / Ingebruikname 1 2 3 • Le switch B2 permet le choix du mode de déclenchement (ON : retardé, OFF : immédiat). Ë...
Need help?
Do you have a question about the DOS TYXAL + and is the answer not in the manual?
Questions and answers