Table of Contents
Advertisement
Quick Links
Advertisement
Table of Contents

Related Manuals for AEG EDFDC46UX


Summary of Contents for AEG EDFDC46UX
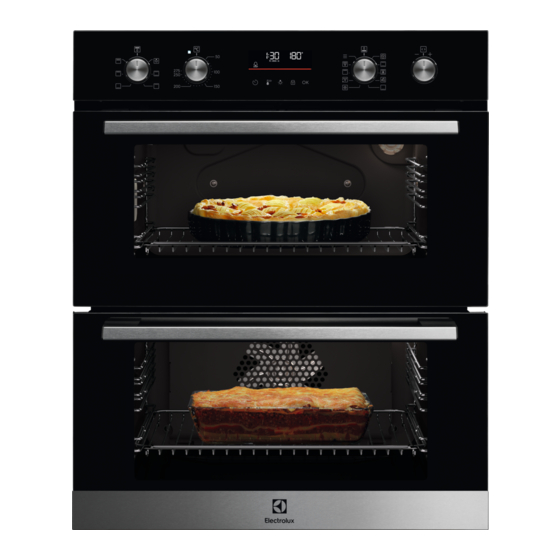
- Page 1 EDFDC46UX Built-In Double Oven User Manual...
-
Page 2: Table Of Contents
WE’RE THINKING OF YOU Thank you for purchasing an Electrolux appliance. You’ve chosen a product that brings with it decades of professional experience and innovation. Ingenious and stylish, it has been designed with you in mind. So whenever you use it, you can be safe in the knowledge that you’ll get great results every time. -
Page 3: Safety Information
SAFETY INFORMATION 8. USING THE ACCESSORIES.....15 11.2 How to remove: Shelf supports ...21 11.3 How to use: Catalytic cleaning ..22 8.1 Inserting accessories..... 15 11.4 How to remove and install: Door..23 8.2 Using Trivet and Grill- / 11.5 How to replace: Lamp....24 Roasting pan........16 12. -
Page 4: General Safety
SAFETY INFORMATION Keep all packaging away from children and dispose of it • appropriately. WARNING: The appliance and its accessible parts become • hot during use. Keep children and pets away from the appliance when in use and when cooling down. If the appliance has a child safety device, it should be •... -
Page 5: Safety Instructions
SAFETY INSTRUCTIONS Always use oven gloves to remove or insert accessories or • ovenware. To remove the shelf supports first pull the front of the shelf • support and then the rear end away from the side walls. Install the shelf supports in the opposite sequence. Do not use a steam cleaner to clean the appliance. -
Page 6: Electrical Connection
SAFETY INSTRUCTIONS Depth of the appliance 568 mm Built in depth of the appliance 547 mm Depth with open door 998 mm Ventilation opening minimum size. Opening placed 600x20 mm on the bottom rear side Mounting screws 3.5x25 mm 2.2 Electrical connection WARNING! Risk of fire and electric shock. -
Page 7: Care And Cleaning
SAFETY INSTRUCTIONS • Be careful when you open the appliance door while the appliance is in operation. Hot air can release. • Do not operate the appliance with wet hands or when it has contact with water. • Do not apply pressure on the open door. •... -
Page 8: Service
SAFETY INSTRUCTIONS • Concerning the lamp(s) inside this product and spare part lamps sold separately: These lamps are intended to withstand extreme physical conditions in household appliances, such as temperature, vibration, humidity, or are intended to signal information about the operational status of the appliance. -
Page 9: Product Description
PRODUCT DESCRIPTION 3. PRODUCT DESCRIPTION 3.1 General overview Knob for the top oven functions Knob for the top oven temperature Temperature indicator / symbol for the top oven Display Knob for the main oven functions Temperature indicator / symbol for the main oven Knob for the main oven temperature Heating element Lamp... -
Page 10: Control Panel
CONTROL PANEL 4. CONTROL PANEL 4.1 Retractable knobs To use the appliance press the knob. The knob comes out. 4.2 Control panel overview Fast Confirm Timer Light Lock Press Turn the knob Heat Up setting Select a heating function to turn on the appliance. Turn the knob for the heating functions to the off position to turn the appliance off. -
Page 11: Before First Use
BEFORE FIRST USE 5. BEFORE FIRST USE WARNING! Refer to Safety chapters. 5.1 Initial cleaning Before the first use, clean the empty appliance and set the time: 00:00 Set the time. Press 5.2 Initial preheating Preheat both ovens. Heat up one oven at a time. Set the functions listed below, if applicable. Step 1 Remove all accessories and removable shelf supports from the oven. -
Page 12: Main Oven Functions
DAILY USE 6.2 Main oven functions Heating function Application To bake on up to two shelf positions at the same time and to dry food. Set the temperature 20 - 40 °C lower than for Conventional Cooking. True Fan Cooking To bake and roast food on one shelf position. -
Page 13: Top Oven Functions
DAILY USE 6.3 Top oven functions Heating function Application To turn on the lamp. Light To bake and roast food on one shelf position. Refer to "Care and Cleaning" chapter for more information about Catalytic cleaning. Conventional Cooking / Clean‐ To brown bread, cakes and pastries. -
Page 14: Clock Functions
CLOCK FUNCTIONS 7. CLOCK FUNCTIONS 7.1 Clock functions Clock Function Application When the timer ends, the signal sounds. Minute minder When the timer ends, the signal sounds and the heating function stops. The function works only for the main oven. Cooking time To postpone the start and / or end of cooking. -
Page 15: Using The Accessories
USING THE ACCESSORIES How to set: Minute minder Timer starts counting down immediately. How to set: Cooking time Step 1 Step 2 Step 3 Step 4 The display shows: 0:00 Choose a heating Press repeated‐ Set the cooking function and set Press: time. -
Page 16: Using Trivet And Grill- / Roasting Pan
USING THE ACCESSORIES Wire shelf: Push the shelf between the guide bars of the shelf support. Deep pan: Push the tray between the guide bars of the shelf support. 8.2 Using Trivet and Grill- / Roasting pan WARNING! Be careful when you remove the accessories from a hot oven. There is a risk of burns. -
Page 17: Additional Functions
ADDITIONAL FUNCTIONS Step 1 Put the trivet into the deep pan so that the supports of the wire shelf point down. Step 2 Put the deep pan into the oven on the necessary shelf position. 9. ADDITIONAL FUNCTIONS 9.1 Lock This function prevents an accidental change of the appliance function. -
Page 18: Cooling Fan
HINTS AND TIPS (°C) 250 - maximum The Automatic switch-off does not work with the functions: Light, Time Delay. 9.3 Cooling fan When the appliance operates, the cooling fan turns on automatically to keep the surfaces of the appliance cool. If you turn off the appliance, the cooling fan can continue to operate until the appliance cools down. -
Page 19: Moist Fan Baking - Recommended Accessories
HINTS AND TIPS (°C) (min) Fish fillet, 0.3 kg pizza pan on wire shelf 25 - 35 Poached meat, baking tray or dripping 30 - 40 0.25 kg Cookies, 16 baking tray or dripping 25 - 35 pieces Macaroons, 24 baking tray or dripping 35 - 45 pieces... -
Page 20: Cooking Tables For Test Institutes
HINTS AND TIPS Ramekins Pizza pan Baking dish Flan base tin Ceramic Dark, non-reflective Dark, non-reflective Dark, non-reflective 8 cm diameter, 28 cm diameter 26 cm diameter 28 cm diameter 5 cm height 10.3 Cooking tables for test institutes Information for test institutes Tests according to: EN 60350-1, IEC 60350-1. -
Page 21: Care And Cleaning
CARE AND CLEANING ( °C) (min) Short True Fan Baking 20 - 30 bread Cooking tray Toast Grill Wire Preheat the oven shelf for 5 min 11. CARE AND CLEANING WARNING! Refer to Safety chapters. 11.1 Notes on cleaning Clean the front of the appliance only with a microfibre cloth with warm water and a mild detergent. -
Page 22: How To Use: Catalytic Cleaning
CARE AND CLEANING Step 1 Turn off the oven and wait until it is cold. Step 2 Pull the front of the shelf sup‐ port away from the side wall. Step 3 Pull the rear end of the shelf support away from the side wall and remove it. -
Page 23: How To Remove And Install: Door
CARE AND CLEANING Clean the top oven with catalytic cleaning After cleaning, turn When the oven is Set the maximum To clean the top oven the knob for the cold, clean the oven oven temperature. oven functions to floor with a wet soft set the function: Duration: 1 h the off position. -
Page 24: How To Replace: Lamp
CARE AND CLEANING Step 4 Hold the door trim (B) on the top edge of the door at the two sides and push inwards to release the clip seal. Step 5 Pull the door trim to the front to remove it. Step 6 Hold the door glass panels on their top edge one by one and... -
Page 25: Troubleshooting
TROUBLESHOOTING Step 3 Replace the lamp with a suitable 300 °C heat-resistant lamp. Step 4 Install the glass cover. 12. TROUBLESHOOTING WARNING! Refer to Safety chapters. 12.1 What to do if... In any cases not included in this table please contact with an Authorised Service Centre. The appliance does not turn on or does not heat up Problem Check if... -
Page 26: Service Data
Serial number (S.N.) ......... 13. ENERGY EFFICIENCY 13.1 Product Information and Product Information Sheet Supplier's name Electrolux Model identification EDFDC46UX 944171774 Top oven: 106.8 Energy Efficiency Index Main oven: 95.9 Top oven: A Energy efficiency class Main oven: A Energy consumption with a standard load, conventional Top oven: 0.78 kWh/cycle... -
Page 27: Energy Saving
ENERGY EFFICIENCY Heat source Electricity Top oven: 42 l Volume Main oven: 45 l Type of oven Built-In Oven Mass 45.8 kg For EU: IEC/EN 60350-1 - Household electric cooking appliances - Part 1: Ranges, ovens, steam ovens and grills - Methods for measuring performance. For UK: BS EN 60350-1 - Household electric cooking appliances - Part 1: Ranges, ovens, steam ovens and grills - Methods for measuring performance. -
Page 28: Menu Structure
MENU STRUCTURE 14. MENU STRUCTURE 14.1 Menu Step 1 Step 2 Step 3 Step 4 Step 5 Select the option from Menu struc‐ Adjust the value Select the set‐ - select to - press to ture and press ting. enter the Menu. confirm setting. - Page 32 www.electrolux.com/shop...
Need help?
Do you have a question about the EDFDC46UX and is the answer not in the manual?
Questions and answers