Table of Contents
Advertisement
Quick Links
Advertisement
Table of Contents

Related Manuals for AEG EES33101ZM


Summary of Contents for AEG EES33101ZM
- Page 1 EN User Manual | Oven EES33101ZM...
-
Page 2: Table Of Contents
FOR PERFECT RESULTS Thank you for choosing this AEG product. We have created it to give you impeccable performance for many years, with innovative technologies that help make life simpler – features you might not find on ordinary appliances. Please spend a few minutes reading to get the very best from it. -
Page 3: Safety Information
SAFETY INFORMATION Before the installation and use of the appliance, carefully read the supplied instructions. The manufacturer is not responsible for any injuries or damage that are the result of incorrect installation or usage. Always keep the instructions in a safe and accessible location for future reference. - Page 4 similar accommodation where such use does not exceed (average) domestic usage levels. • Only a qualified person must install this appliance and replace the cable. • Do not use the appliance before installing it in the built-in structure. • Disconnect the appliance from the power supply before carrying out any maintenance.
-
Page 5: Safety Instructions
2. SAFETY INSTRUCTIONS 2.1 Installation Depth with open door 1022 mm WARNING! Ventilation opening mini‐ 560x20 mm mum size. Opening placed Only a qualified person must install this on the bottom rear side appliance. Mounting screws 4x25 mm • Remove all the packaging. •... - Page 6 fuses removed from the holder), earth leakage trips and contactors. Cable types applicable for installation or re‐ • The electrical installation must have an placement for Europe: isolation device which lets you disconnect H07 RN-F, H05 RN-F, H05 RRF, H05 VV-F, H05 the appliance from the mains at all poles.
-
Page 7: Installation
– do not keep moist dishes and food in • Concerning the lamp(s) inside this product the appliance after you finish the and spare part lamps sold separately: cooking. These lamps are intended to withstand – be careful when you remove or install extreme physical conditions in household the accessories. - Page 8 3.1 Building in www.youtube.com/electrolux www.youtube.com/aeg How to install your AEG/Electrolux Oven with Hob - Built Under installation (*mm) min. 550 min. 560 3.2 Securing the oven to the cabinet ENGLISH...
-
Page 9: Product Description
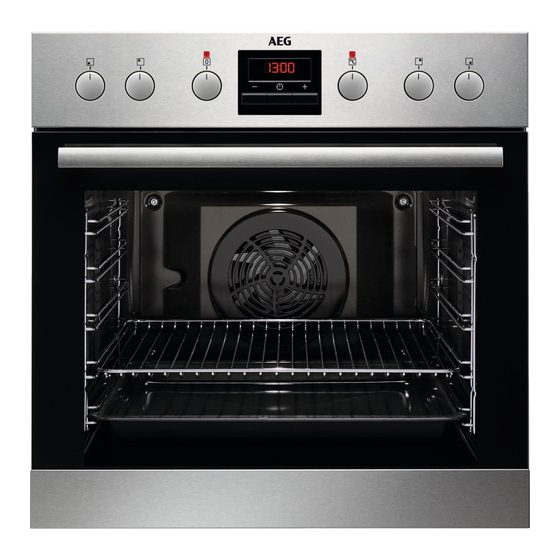
4. PRODUCT DESCRIPTION 4.1 General overview Control panel Knobs for the hob Power lamp / symbol Knob for the heating functions Display Control knob (for the temperature) Temperature indicator / symbol Heating element Lamp Shelf support, removable Shelf positions 4.2 Accessories For cakes and biscuits. -
Page 10: Before First Use
5.4 Retractable knobs 3. To set the necessary heat setting refer to "Heat settings". To use the appliance press the knob. The knob comes out. 5.5 Sensor fields / Buttons To set the time. To set a clock function. To set the time. 5.6 Display A. -
Page 11: Daily Use
Remove all accessories and re‐ Set the maximum temperature - press to set the time. movable shelf supports from After approximately 5 sec., the for the function: the oven. flashing stops and the display Time: 1 h. Clean the oven and the acces‐ shows the time. -
Page 12: Clock Functions
7.3 Notes on: Moist Fan Baking and the oven operates with the highest energy efficiency possible. This function was used to comply with the For the cooking instructions refer to "Hints energy efficiency class and ecodesign and tips" chapter, Moist Fan Baking. For requirements (according to EU 65/2014 and general energy saving recommendations EU 66/2014). -
Page 13: Using The Accessories
How to set: Duration Step 3 - press to set the duration. The display shows: - flashes when the set time ends. The signal sounds and the oven turns off. Step 4 Press any button to stop the signal. Step 5 Turn the knobs to the off position. -
Page 14: Additional Functions
Wire shelf: Push the shelf between the guide bars of the shelf support and make sure that the feet point down. Deep pan: Push the tray between the guide bars of the shelf support. 10. ADDITIONAL FUNCTIONS 10.1 Cooling fan 10.2 Safety thermostat When the appliance operates, the cooling fan Incorrect operation of the oven or defective... - Page 15 To prevent too much smoke in the oven Initially, monitor the performance when you during roasting, add some water into the cook. Find the best settings (heat setting, deep pan. To prevent the smoke cooking time, etc.) for your cookware, recipes condensation, add water each time after it and quantities when you use this appliance.
- Page 16 (°C) (min) Poached meat, 0.25 baking tray or dripping pan 35 - 45 Shashlik, 0.5 kg baking tray or dripping pan 40 - 50 Cookies, 16 pieces baking tray or dripping pan 30 - 45 Macaroons, 20 pieces baking tray or dripping pan 45 - 55 Muffins, 12 pieces baking tray or dripping pan...
-
Page 17: Care And Cleaning
( °C) (min) Fatless Conventional Wire shelf 40 - 50 Preheat the oven for sponge Cooking 10 min. cake, cake mould Ø26 Fatless True Fan Wire shelf 40 - 50 Preheat the oven for sponge Cooking 10 min. cake, cake mould Ø26 Fatless True Fan... - Page 18 Clean the cavity after each use. Fat accumulation or other residue may cause fire. Moisture can condense in the appliance or on the door glass panels. To decrease the con‐ densation, let the appliance work for 10 minutes before cooking. Do not store the food in the appliance for longer than 20 minutes.
- Page 19 Step 1 Open the door fully and hold both hinges. Step 2 Lift and pull the latches until they click. Step 3 Close the oven door halfway to the first opening position. Then lift and pull to remove the door from its seat. Step 4 Put the door on a soft cloth on a stable sur‐...
-
Page 20: Troubleshooting
Step 9 After cleaning, install the glass panel and the oven door. If the door is installed correctly, you will hear a click when closing the latches. The screen-printing zone must face the inner side of the door. Make sure that after the installation the sur‐ face of the glass panel frame on the screen-printing zones is not rough when you touch it. -
Page 21: Energy Efficiency
14. ENERGY EFFICIENCY 14.1 Product Information and Product Information Sheet according to EU Ecodesign and Energy Labelling Regulations Supplier's name Model identification EES33101ZM 949723469 Energy Efficiency Index 95.3 Energy efficiency class Energy consumption with a standard load, conventional mode 0.93 kWh/cycle Energy consumption with a standard load, fan-forced mode 0.81 kWh/cycle... -
Page 22: Environmental Concerns
Residual heat Keep food warm When the cooking duration is longer than 30 Choose the lowest possible temperature min, reduce the appliance temperature to setting to use residual heat and keep a meal minimum 3 - 10 min before the end of warm. - Page 24 867348142-C-162023...
Need help?
Do you have a question about the EES33101ZM and is the answer not in the manual?
Questions and answers