
Related Manuals for Vemer TUO Wi-Fi


Summary of Contents for Vemer TUO Wi-Fi
- Page 1 Cronotermostato Digitale TUO Wi-Fi Manuale d’Uso User Manual DIGITAL CHRONOTHERMOSTAT...
- Page 3 How to do in case of replacement of the Access Point Page How to transfer control of the device from one account (User) to another Page Technical characteristics Page Reference standards Page Winter programs Page Summer programs Page - 39 - TUO Wi-Fi Chronothermostat User Manual...
- Page 4 Tuo Wi-Fi Access Point Cloud Vemer The device connects to the Vemer Cloud to check if there are changes to the confi guration and programming created using the app, and if so, regulates the temperature according to the new confi guration.
-
Page 5: Safety Warnings
7) The device performs actions of 1B type and is suitable for environments with pollution degree 2 and overvoltage category III (EN 60730-1). DIMENSIONS - 41 - TUO Wi-Fi Chronothermostat User Manual... -
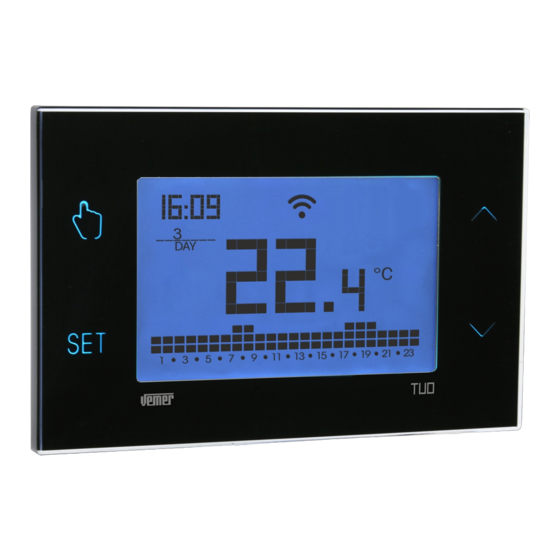
Page 6: Device Description
CLOCK date and time Local active operation. In this state the device is disconnected from the Cloud Vemer and any change in operation must be made using the keys on the chronothermostat. Local operation can be disabled by the app (see page. 52). -
Page 7: Connection Diagram
CONNECTION DIAGRAM Connection diagram for the supply Connection diagram for the control of circulation pumps, solenoid valves, of the boiler, heat pumps, etc. etc. at 230V ~ - 43 - TUO Wi-Fi Chronothermostat User Manual... -
Page 8: Installation And Initial Configuration
Avoid installation near doors or windows, in niches, behind doors and curtains or in positions with excess or total lack of ventilation, to avoid that the reading of the temperature measured by the probe is in some way offset. click - 44 - TUO Wi-Fi Chronothermostat User Manual... - Page 9 Preliminary operations process - 45 - TUO Wi-Fi Chronothermostat User Manual...
- Page 10 Important: before proceeding make sure that the icon on the device display is still on. Otherwise, access the Wi-Fi settings of the smartphone to manually reconnect to the “iwm ...” network. the app Tuo Wi-Fi - 46 - TUO Wi-Fi Chronothermostat User Manual...
- Page 11 Configuring the remote control device (for iOS) 1. Install and connect the device according to the connection diagrams shown in this manual. 2. On Tuo Wi-Fi , hold down the keys simultaneously until the display ” and the shows icon starts flashing (wait for it to become steady before proceeding with the next point).
-
Page 12: App Description
APP DESCRIPTION Thanks to the app you can control your TUO Wi-Fi device remotely, easily and intuitively. Page “Login” Access using the access credentials (email, password) chosen during registration phase of your account. Page “Devices list” identifi es a device or created group... - Page 13 Main page This screen shows the “TUO Wi-Fi” status: indicates the measured temperature (25.0°C), the operating mode (Heating), the system status: ( ) red = on ( ) gray = off indicates the set temperature and running program name: touch this area to access the program list...
- Page 14 It is also possible to set a switching delay by tapping on the desired time. Note: the image refers to the version of the app for smartphone. On the tablet the whole weekly programming is visible on a single screen. - 50 - TUO Wi-Fi Chronothermostat User Manual...
- Page 15 Voice Assistant via the voice activated speaker. “Tuo Wi-Fi settings set the name of “Tuo Wi-Fi ” modify the icon that identifies it set the themperature values TO, T1, T2 and T3...
- Page 16 In this way the device does not check if there are new settings on the Cloud and adjusts the temperature according to the settings entered from the keyboard (the programming and configuration on the Cloud are not changed). - 52 - TUO Wi-Fi Chronothermostat User Manual...
-
Page 17: Operating Mode
It is suitable when long periods of absence are expected. In this mode the device does not perform any regulation however, if it works in heating mode, it maintains a minimum temperature (antifreeze temperature) to prevent possible freezing of the system. - 53 - TUO Wi-Fi Chronothermostat User Manual... - Page 18 To switch from manual to automatic operation Manual Automatic Tm operation operation operation To switch from automatic operation (or manual) to the one switched off and vice versa Automatic operation operation - 54 - TUO Wi-Fi Chronothermostat User Manual...
-
Page 19: Configuration Menu Description
3 temperatures of the automatic operation (T1, T2, T3). The TIMER menu allows setting of one of the 3 timed operations. The ADV menu allows you to configure the general operating parameters of the device. - 55 - TUO Wi-Fi Chronothermostat User Manual... - Page 20 • to change the settings of the summer/winter time change, press and hold for a long time the key (see "Configuration of the summer/winter time change") - 56 - TUO Wi-Fi Chronothermostat User Manual...
- Page 21 For example, in Italy the summer time starts the last (LST) Sunday (7) of March (03) at 2:00 o' clock and the last (LST) Sunday (7) of October (10) at 3:00 o' clock. - 57 - TUO Wi-Fi Chronothermostat User Manual...
- Page 22 If no program meets the needs: • choose the one that is closest to you and press the key to customize the profile (see "How to customize the profile of a Px program") - 58 - TUO Wi-Fi Chronothermostat User Manual...
- Page 23 T2 from 12 to 13.30 and T3 from 13.30 to 14.00 It is possible to set delays of 15, 30, 45 minutes, independent for every hour of the day. - 59 - TUO Wi-Fi Chronothermostat User Manual...
- Page 24 (minimum value) (maximum value) are allowed. These factory values are: = 2°C, = 50°C but can be modified through the ADV menu. Note: the condition T1 ≤ T2 ≤ T3 must be respected. - 60 - TUO Wi-Fi Chronothermostat User Manual...
- Page 25 When a timing is in progress, the symbol is lit. Note: to cancel a timing in progress or to exit without activating the timer, set 00'. Note: the timing ends in the case of changes to the operating mode. - 61 - TUO Wi-Fi Chronothermostat User Manual...
- Page 26 Operating mode Setting up: • if the device is connected to a heating system (winter operation) • if the device is connected to an air conditioning system (summer operation) Factory value: (heating). - 62 - TUO Wi-Fi Chronothermostat User Manual...
- Page 27 Allowed values: 0.5°C ÷ 5°C (band), 10, 20 or 30 minutes (period). Factory value: 0.5 °C (band), 10 minutes (period). For more information on the parameters of the regulation logics, see "Regulation type" on page. 70. - 63 - TUO Wi-Fi Chronothermostat User Manual...
- Page 28 In this case, introduce an adjustment temperature with the menu. Allowed values: -5°C ÷ 5°C . Factory value: 0 °C. Note: the temperature value shown on the display during normal operation is inclusive of any adjustment introduced. - 64 - TUO Wi-Fi Chronothermostat User Manual...
- Page 29 - the status of the Wi-Fi connection: on fixed: device connected to the home network flashing: search for Wi-Fi network in progress - the association between the device and Vemer account: on fixed: associated with a Vemer account flashing: not associated with any Vemer account Note: during the first 20 seconds or so of this screen viewing...
- Page 30 ". When the keypad lock is active, the symbol appears on the display and, after pressing a key, the word appears. To find out how to unlock the keypad, see page 68. - 66 - TUO Wi-Fi Chronothermostat User Manual...
- Page 31 - red when the measured temperature is higher than the set temperature of at least 0.5 ° C colour 1 ..colour 48 The backlighting can also be activated/deactivated from the initial screen by keeping the key pressed for a long time. - 67 - TUO Wi-Fi Chronothermostat User Manual...
- Page 32 The keypad remains unlocked for about 45 seconds from the last press of a key, after which the keypad reactivates the lock. To remove the key lock, see page 66. - 68 - TUO Wi-Fi Chronothermostat User Manual...
-
Page 33: Device Reset
0.3 °C Hour meter operation Band (proportional) 0.5 °C active Automatic summer time change (according to EU rules) Period (proportional) 10 minutes Backlighting active Antifreeze temperature OFF 6 °C Key lock password deactivated - 69 - TUO Wi-Fi Chronothermostat User Manual... - Page 34 • 30 minutes for high thermal inertia systems (cast iron radiators) How to choose the band: • narrow band (0.5 °C) for systems with low thermal inertia • narrow band (5 °C) for systems with high thermal inertia - 70 - TUO Wi-Fi Chronothermostat User Manual...
- Page 35 Enter the name, device pin (see page 65 for the pin of your device) and an icon to help identify the device. Choose "Save" - If you do not have a personal Vemer account yet: c. Follow the "Device configuration" procedure on pages 46-47...
-
Page 36: Technical Characteristics
• Maximum power of transmitted radiofrequency: 18.3 dBm • Operating temperature: 0°C ÷ +50°C • Operating humidity: 20% ÷ 90% non condensing • Storage temperature: -20°C ÷ +65°C • Degree of protection: IP: XXD - 72 - TUO Wi-Fi Chronothermostat User Manual... -
Page 37: Reference Standards
EN 60730-2-7, EN 60730-2-9 ETSI EN 300 328, ETSI EN 301 489-1, ETSI EN 301 489-17 The full text of the EU Conformity Declaration is available at www.vemer.it address. information to users pursuant to art. 14 of the directive 2012/19 / EU of the european parliament and of the council... -
Page 38: Winter Programs
0 1 2 3 4 5 6 7 8 9 10 11 12 13 14 15 16 17 18 19 20 21 22 23 0 1 2 3 4 5 6 7 8 9 10 11 12 13 14 15 16 17 18 19 20 21 22 23 - 74 - TUO Wi-Fi Chronothermostat User Manual... -
Page 39: Summer Programs
0 1 2 3 4 5 6 7 8 9 10 11 12 13 14 15 16 17 18 19 20 21 22 23 0 1 2 3 4 5 6 7 8 9 10 11 12 13 14 15 16 17 18 19 20 21 22 23 - 75 - TUO Wi-Fi Chronothermostat User Manual... - Page 40 Vemer S.p.A. I - 32032 Feltre (BL) Via Camp Lonc, 16 e-mail: info@vemer.it - web site: www.vemer.it 04-2023...
Need help?
Do you have a question about the TUO Wi-Fi and is the answer not in the manual?
Questions and answers