Advertisement
Quick Links
Wheelbarrow
Shovel
Digging Bar or Pick
Allen Wrench (Provided)
Marker Pen
PLEASE READ AND UNDERSTAND ALL INSTRUCTIONS BEFORE BEGINNING
*Before digging, please obey local laws by notifying your local utilities marking
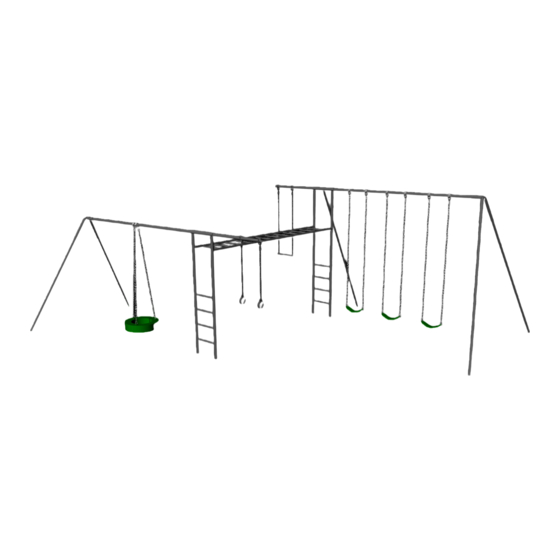
1. Select an area in your yard that is reasonably level and meets the space requirements for your
equipment. Ground Space: 28' x 25', Play Space: 30' x 34'.
2. Please refer to the Top Rail/Out Rigger assembly sheet and assemble your top rails as instructed.
3. Using the measurements from the top view diagram, measure and mark the position of the swing
hangers and ladders on each of the outriggers. Set aside.
4. Place over head ladder onto the ground in the desired location. Measure and adjust as necessary to
allow for the proper play space.
5. With the Horizontal ladder in its proper position in the yard, mark the location for the holes where the
two vertical ladders with sleeves will stand.
6. Move the horizontal ladder and dig the holes. (See installation instruction diagrams for hole
dimensions.)
7. Lay the 8' vertical ladder on the ground near the hole where it will eventually stand. Make a mark 15" from
the top of the ladder onto each ladder rail. Move the adjustable sleeves to these marks and position them
to receive the overhead ladder by turning them to point at a 90 degree angle (towards what will become
the inside of the structure) away from the upright ladder. Repeat this process with the 10' ladder making
your marks at 39". Secure the set screws.
8. Lay the 10' ladder on the ground with the bottom of the ladder just over the hole where they will
eventually stand.
9. Place the 16' outrigger (for the swings side) about 12' away from the hole.
10. Assemble and attach the swing hangers.
11. Position the outrigger upside down on the ground. Assemble the "A" frame legs. (See installation
instructions for "A" frame leg assembly.) Slide the outrigger into the top sleeve of the vertical ladder. Using
two strong adults, stand the structure up and allow the ladder to fall into the hole previously dug. Check
and make sure that the outrigger is still properly positioned inside of the ladder top sleeves. The out rigger
can be adjusted as follows: While securely holding the ladder, take hold of the "A" frame portion and push
or pull as necessary. When you are satisfied that the outrigger is properly positioned inside the ladder top
sleeve, secure the set screws. Note: The unit will not be level at this point.
12. Adjust the "A" frame legs in the play space as desired.
13. Mark the holes for the "A" frame legs. Move the legs out of the way and dig the holes. Hint: Keep
most of the hole to the inside of the leg.
14. Place the legs into the holes.
15. Repeat this process with the other 16' outrigger (tire swing side).
Installation Instructions
SS47-10
Required Tools
Ratchet Handle & Sockets: 5/8", 9/16", ½", 17mm
organization*
Open End or Box Wrenches: 5/8", 9/16", ½"
Tape Measure
Level
Ladder
Advertisement

Related Manuals for Component Playgrounds SS47-10


Summary of Contents for Component Playgrounds SS47-10
- Page 1 Installation Instructions SS47-10 Required Tools Wheelbarrow Tape Measure Shovel Level Digging Bar or Pick Open End or Box Wrenches: 5/8”, 9/16”, ½” Allen Wrench (Provided) Ratchet Handle & Sockets: 5/8”, 9/16”, ½”, 17mm Marker Pen Ladder PLEASE READ AND UNDERSTAND ALL INSTRUCTIONS BEFORE BEGINNING...
- Page 2 16. Using two strong adults, lift and slide the horizontal ladder onto the adjustable sleeves and secure the set screws. (See overhead ladder to upright ladder assembly.) Hint: Do not push the overhead ladder tight against the vertical ladders. Leave a ½” - 1” gap between the vertical ladder rails and the overhead ladder.
- Page 3 Top Rail Assembly Step 1: Slide the Swing Hangers and tighten onto the Top Rail during the Top Rail Assembly process. (Refer to spacing diagram and graphic found above) Step 2: Slide the ends of the 10’ Top Rail as far as it will go into the Sleeve of the Triple End. Step 3: Insert and tighten (4) 3/8”...
-
Page 4: Installation Instructions
Installation Instructions Model SS47-10 Ground Space 28’ x 25’ Minimum Residential Play Space 30’ x 34’... - Page 5 Model SS47-10 Continued (C) 3 A-Frame Leg attachment (B) A-Frame (A) Upright Legs Ladder to Triple End 3/8” x 2 ¾” Hex Bolt with 3/8” Nyloc Nut 20” (1 each per leg) 28” Triple End 12” 24” 3/8” x 3/8” Set Screw (1 each per leg) 18”...
- Page 6 #3 Third Leg Sleeve Tighten 3/8” x 3/8” set screws on Tighten 3/8” x1/2” set screws on the top top sleeve of ladder (2 set screws) sleeve of the ladder (2 set screws) Leg Sleeve Slide ½” x 2 ¾” bolt through the two holes and secure Nyloc Nut...
- Page 7 Note: We recommend you check the pendulum in the swing hangers at least every 6 months for normal wear.
-
Page 9: Read Before Use
While every attempt is made by Component Playgrounds to ensure the highest degree of safety in all of our equipment, we cannot guarantee freedom from injury. The user assumes all risk of injury due to use. - Page 10 We hope that you and your family will enjoy many of hours of great family fun while using your Component Playgrounds Products. We appreciate your business. Our goal is to provide safe, durable and fun products using the best materials available. Your product should be mostly maintenance free.
- Page 11 (“spray paint”) at most hardware stores and at Component Playgrounds.) 5. Plastic Lumber Platforms: If you have purchased a structure which includes a platform, the plastic lumber does not need to be finished or stained. It is 100% maintenance free.
- Page 12 To Help Prevent Injuries from Falls & Other Hazards 1. Never attach, or allow children to attach the following items to your swing set: Ropes, jump ropes, clotheslines, pet leashes or any similar type of item to your swing set. Any item such as these may present a strangulation hazard.
- Page 13 Residential Products Limited Lifetime Warranty Component Playgrounds works to build heavy duty products that will stand up to the heavy use of active children. You can trust Component Playgrounds because of the way we design and build our products. We make products that are simple to own, and easy to maintain. This adds up to the best value on playground products that you can count on, and that kids will play on time after time.
- Page 14 Return this form via e-mail to: Contact Person:_____________________________________ sales@componentplaygrounds.com Address:___________________________________________ Or via U.S. mail to: City: ____________________State:______Zip:_________ Phone: ____________________________________________ Component Playgrounds Purchase Date: __________Completion Date: ____________ 1630 North Beck Street Salt Lake City, UT 84116 SALES REPRESENTATIVE/DEALER INFORMATION Today’s Date:_____________________________________ (If different from manufacturer)
Need help?
Do you have a question about the SS47-10 and is the answer not in the manual?
Questions and answers