Advertisement
Quick Links
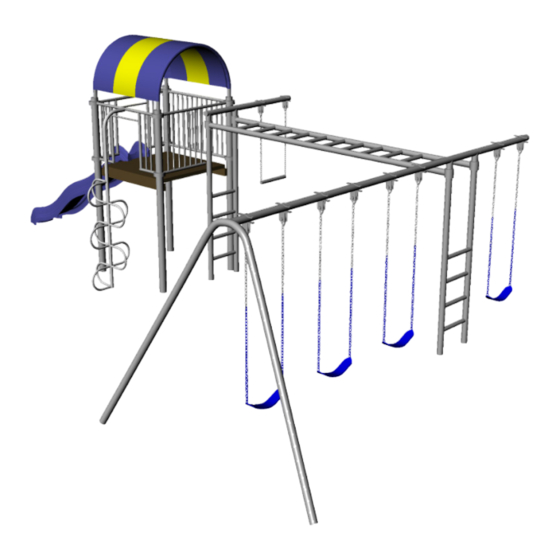
MODEL PH45
_____ 1 - 11'7" top rail, one drill
_____ 1 - triple end with socket
_____ 1 - 4' x 4' Deck package
_____ 4 - 9' 6" Playhouse legs
_____ 1- 5'6" Top rail with insert
_____ 1 - Side Barriers
_____ 1 - Entrance Barrier
_____ 2 - Exit Barrier
_____ 2 - 8' 4 rung ladder with adj. sleeves
_____ 1 - 12'6" horizontal ladder
_____ 2 - 8' A-frame legs
_____ 1 - 5'6" x 2⅜" top rail
_____ 1 - 10' Plastic Rail Slide __________
_____ 2 - PH Canopy Arches
_____ 1 - CH/PH Wild Climber
_____ 4 - 5" swing seats _________________
_____ 1 - trapeze bar _________________
_____ 10 -2 ⅜" Brass Bushing Hangers
_____ 2 - 3½' chains _________________
_____ 8 - 5½' chains _________________
_____ 1 - Steering wheel _____________
_____ 1 - Steering wheel hardware pkg
_____ 1 - Telescope _______________
_____ 1 - Telescope hardware pkg
_____ 1 - PH Canopy Tarp _________________
NAME: __________________________________
INV #: __________________________________
DATE: ___________________________________
BOX PULLED BY: __________________________
STAGED BY: ______________________________
SHIPPING PIECES: 24
WEIGHT: 721 lbs
_____ 1- HL Bolt Pack
_____ 1 -MT Bolt Pack
_____ 1 - Playhouse bolt pack
_____ 1 - Spring Clip 16 Pack
_____ 2 - 1⅜" Plugs
_____ 4 - Panel Clamps (2 pair)
_____ 2 - ⅜" x 2" Carriage Bolts
_____ 2 - ⅜" Hex Nuts
_____ 4 - Spring Clips
_____ 2 - ⅜" nyloc nuts
_____ 4 - ⅜" x ⅜" set screws
_____ 2 - 2 ⅜" plastic plugs
_____ 1 - Can of ____________ touch up paint
_____ 1 - Set of Instructions
Last Modified: 6/1/2009
Advertisement

Related Manuals for Component Playgrounds PH45


Summary of Contents for Component Playgrounds PH45
- Page 1 MODEL PH45 NAME: __________________________________ INV #: __________________________________ DATE: ___________________________________ BOX PULLED BY: __________________________ STAGED BY: ______________________________ SHIPPING PIECES: 24 WEIGHT: 721 lbs _____ 1 - 11’7” top rail, one drill _____ 1 - triple end with socket _____ 1- HL Bolt Pack _____ 1 - 4’...
- Page 4 EXAMPLE...
- Page 5 Installation Instructions PH45 Required Tools Wheelbarrow Level Shovel Open end or box wrench’s: Digging Bar or Pick 5/8”, 9/16”, 3/4”, 1/2” Allen Wrench (provided) Ratchet Handle & Sockets: Hammer or Mallet 5/8”, 9/16”, 3/4”, 1/2” Marker Pen Cordless or electric drill w/bits as Follows: Ladder Phillips, 3/8”...
- Page 6 23. Measure the height of the top rail to insure proper swing height. 24. Check the level of the entire structure and adjust as necessary. 25. When you are satisfied that the structure is level, mix and pour the concrete according to the package directions. You will use approximately seven 80# bags in the ladder hole and 1 ½...
- Page 7 OUTRIGGER ASSEMBLY Step 1: Slide the end of the drilled Top Rail into the Sleeve of the Triple End. Step 2: Align the hole in the Top Rail with hole in the Sleeve of the Triple End and join together using a 7/16” x 3 1/2” Hex Bolt and 7/16”...
- Page 8 Model PH45 GROUND SPACE 18’ X 32’ RESIDENTIAL PLAY SPACE 22’ X 41’...
- Page 9 Model PH45 Continued DO NOT USE POSTMIX USE GOOD QUALITY CONCRETE MIX! (B) A-Frame (C) PH (A) Upright (D) Wild Legs Legs Ladder Climber 20” 28” 24” Hole 12” x 12” Holes 18” x 12” Holes 18” x 12” Hole 28”x20”x24” (approx. one 80 lb. bag (approx.
- Page 10 5’ Playhouse Assembly and Installation Instructions 1.Assemble the platform. a. Mark the support plates as shown in Side View. b. Drill 3/8” pilot holes at each mark. c. Assemble des supports as shown in Deck Support View. d. Attach boards A and B fi rst. Evenly space the remaining boards (about ¾” apart) and attach to the support plates using the 2 ½”...
- Page 11 2.Locating the footings for the playhouse structure a. Place the assembled platform next to the upright ladder. b. Line up the support plates of the assembled platform with the inside rail of the vertical ladder. Make sure that the platform is straight against the vertical ladder.
- Page 12 Layout illustration with TWO EXITS 4 (Under) 4 (Under) 3 (Over) 3 (Over) 2 (Under) 2 (Under) Playhouse Leg Playhouse Leg 1 (Over) 1 (Over) Optional Optional Horizontal Horizontal Ladder Ladder “Left Handed” Layout “Right Handed” Layout Layout illustration with ONE EXIT 4 (Under) 4 (Under) 3 (Over)
- Page 13 Layout illustration with THREE EXITS 4 (Under) 4 (Under) 3 (Over) 3 (Over) 2 (Under) 2 (Under) Playhouse Leg Playhouse Leg 1 (Over) 1 (Over) Optional Optional Horizontal Horizontal Ladder Ladder “Left Handed” Layout “Right Handed” Layout Layout illustration with OPEN BARRIER 4 (Under) 4 (Under) 3 (Over)
- Page 14 f. Slide three playhouse legs into the sleeves as shown in the layout illustration. The mark previously made at 4 ½” on each post should be positioned in between the two sleeves at the top of the barriers. g. Stand the platform into the third position (each barrier has a numbered position in each layout illustration). Line up the holes in the legs with the holes previously drilled into the platform support plates.
- Page 15 j. Once the playhouse is completely assembled and laying on its side, carefully roll the playhouse until the entrance barrier will line up with the vertical ladder component of the swing set structure. The two legs that are on the ground should be laying just over the ladder hole and the adjacent leg hole as shown in fi gure 4d. k.
-
Page 17: Installation Instructions
INSTALLATION INSTRUCTIONS CH/PH Fire Pole, Tree Climber, Wild Climber or Triangle Climber Add On CH/PH Tree Wild Triangle Fire Pole Climber Climber Climber • Position the Fire Pole or Climber in the center of the opening of the CH or PH Barrier. • Determine location of hole and dig hole as shown below. •... -
Page 18: Deck Mount
Plastic Slide Mounting Instructions Ladder Mount Plastic Slide Step 1: Attach angle iron mounting bracket to ladder using 3/8” x 3” carriage bolt, 3/8” Ladder fl at washer, 3/8” lock washer and 3/8” nut. 1½ “x 2¾” x 19” Step 2: Center and attach wood block with Wood Block two #14 x 1½”... - Page 19 Playhouse Canopy STEP 1: Slide Arches into Canopy Pockets. Top of Arches should curve away from each other. STEP 2: Slide all four Arch Legs into Playhouse Legs at the same time. Tighten Set Screws. ***Canopy may be positioned either direction over the 4’x4’ deck.*** Canopy Pocket Canopy Arch...
-
Page 20: Steering Wheel
INSTALLATION INSTRUCTIONS Steering Wheel Steering Wheel Bracket with welded bolt. Push two 1-3/8” Plugs in the ends 3/8” Nyloc 7/16” Plastic Pivot Washer Pivot Plug Assemble Steering Wheel as shown above. Then attach Bracket to the Barrier with panel clamps and 3/8” x 2” Carriage Bolts and Hex Nuts. ©2003 Swings & Things Inc. - Page 21 INSTALLATION INSTRUCTIONS Telescope Using a small phillips head screw driver and a 1/4” socket. Use 4-40 x 3/4” Machine Screws and 4-40 Nyloc Nuts to attach one side of the plastic ring to the Bracket with welded washer. Place the Base of the Telescope under the lip of the plastic ring and attach the other half of the plastic ring. Telescope Base Plastic Ring Halves Bracket with welded washer (Push 1-3/8” Plugs into both ends) Assemble Telescope as shown above. Then attach the Bracket to the Barrier with Panel Clamps, 3/8” x 2” Carriage Bolts and Hex Nuts. ©2003 Swings & Things Inc.
- Page 22 While every attempt is made by Component Playgrounds to ensure the highest degree of safety in all of our equipment, we cannot guarantee freedom from injury. The user assumes all risk of injury due to use. All...
- Page 23 We hope that you and your family will enjoy many of hours of great family fun while using your Component Playgrounds Products. We appreciate your business. Our goal is to provide safe, durable and fun products using the best materials available. Your product should be mostly maintenance free.
- Page 24 To Help Prevent Injuries from Falls & other Hazards Never attach, or allow children to attach the following items to your swing set: Ropes, jump ropes, clotheslines, pet leashes or any similar type of item to your swing set. Any item such as these may present a strangulation hazard.
- Page 25 Limited Lifetime Warranty Component Playgrounds works to build heavy duty products that will stand up to the heavy use of active children. You can trust Component Playgrounds because of the way we design and build our products. We make products that are simple to own, and easy to maintain.
Need help?
Do you have a question about the PH45 and is the answer not in the manual?
Questions and answers