Table of Contents
Advertisement
Quick Links
ASSEMBLY INSTRUCTIONS
RTS 2T17 REIMS-GUEUX COMMENTATORS LOOKOUT
CONGRATULATIONS
Congratulations in choosing a unique product to enhance your slot car track
diorama. This can truly be described as a product born from a love for slot cars.
Buying this product have made you a member of a very special family, yes you are
not dealing with a faceless business, but rather a family of slot car fanatics.
We put hours of research and skill and more importantly love into our products and it
is wonderful to share our love for slot cars with you. May you enjoy the build and
have years of joy having it as part of your trackside diorama.
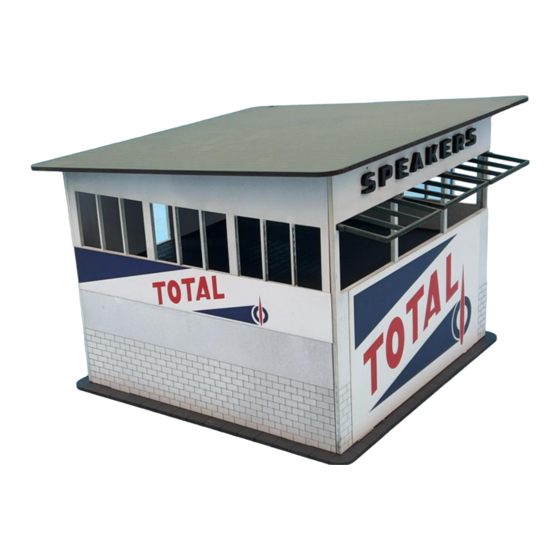
This product is a replica of the Reims-Gueux Raceway Commentators Lookout, or
the SPEAKERS building as it is also known, dating back to the middle years of the
previous century. The circuit was closed in 1972 and soon the buildings and
structures started to deteriorate and most, including this building, was unfortunately
demolished. Luckily we could find a number of photos to help us in recreating this
iconic structure. This building was positioned at the Start/Finish line directly opposite
the Timekeepers Building and was occupied by the radio commentators.
We believe that we have captured the ambiance of this iconic structure and is proud
that we can also give it a second life on many a slot car trackside. We believe that
this structure is one of the best replicas produced to date and a valuable contribution
to the slot car diorama world.
WARRANTY
This product is covered by a comprehensive money-back warranty to ensure your
absolute satisfaction with your purchase.
1
Advertisement
Table of Contents

Related Manuals for RTS 2T17 REIMS-GUEUX COMMENTATORS LOOKOUT


Summary of Contents for RTS 2T17 REIMS-GUEUX COMMENTATORS LOOKOUT
- Page 1 ASSEMBLY INSTRUCTIONS RTS 2T17 REIMS-GUEUX COMMENTATORS LOOKOUT CONGRATULATIONS Congratulations in choosing a unique product to enhance your slot car track diorama. This can truly be described as a product born from a love for slot cars. Buying this product have made you a member of a very special family, yes you are not dealing with a faceless business, but rather a family of slot car fanatics.
- Page 2 WHO ARE WE? This product is brought to you by racetrackscenics.com. If you have not done so already, please visit our website today. You are also most welcome to visit the Facebook pages “Race Track Scenics Slot Car Scenery” and “Johan Malan” to keep up to date with the latest developments and the launching of exciting new products that may be in the pipeline.
- Page 3 Using a toothpick is a handy way to apply glue and an earbud can be used to dab away any excess of glue (especially if you use wood glue). If parts must be at a right angle, you can use any object to assist you in obtaining a square finished product in the end.
- Page 4 FAMILIARIZE YOURSELF Have a look at two photos of the finished product.
- Page 5 Now have a look at the diagram where all the laser cut parts are shown and numbered from A to Q. Next, we will identify which is which and where they fit in. You will notice the four walls (B), (C), (D) and (E) that fits into the foundation plate (A).
- Page 6 PREPARING THE CUT PIECES Firstly, remove all the laser cut parts from the sheets. The sheets can be discarded. Clean the edges of the parts if there are any tiny bits where the parts were fixed to the sheets. This can be done with your knife or even your thumb nail. We recommend that you start by sanding your finished product with a very light sandpaper to ensure a smooth finish for the end product.
- Page 7 LET’S GET STARTED WITH THE ASSEMBLY The assembly of this structure is really fairly straight forward and should not take too long. We can start by putting the side (D) on your working surface with the engraving facing downwards. Proceed to glue the two nubs of the floor (F) into the slots of side (D).
- Page 8 Lastly, the roof (H) can be assembled. Note that the engraving must face upwards. The ring beam (G) must be glued in the centre of the underside of the roof (H). The roof can now be positioned on top of the walls. The ring beam will ensure that the roof stays in position without gluing the roof to the walls.
Need help?
Do you have a question about the 2T17 REIMS-GUEUX COMMENTATORS LOOKOUT and is the answer not in the manual?
Questions and answers