Advertisement
Quick Links
ASSEMBLY INSTRUCTIONS
RTS 10D3 REIMS-GUEUX BLOC HABITAT
CONGRATULATIONS
Congratulations in choosing a unique product to enhance your slot car track
diorama. This can truly be described as a product born from a love for slot cars.
Buying this product have made you a member of a very special family, yes you are
not dealing with a faceless business, but rather a family of slot car fanatics.
We put hours of research and skill and more importantly love into our products and it
is wonderful to share our love for slot cars with you. May you enjoy the build and
have years of joy having it as part of your trackside diorama.
Soon after the iconic Circuit de Reims-Gueux in France was closed in 1972 most of
the buildings and structures were demolished one after the other. Luckily sanity
prevails and some of buildings and structures were left as abandoned structures and
not demolished. The Bloc Habitat was one of these buildings and soon it was totally
dilapidated.
A couple of years ago a local group of volunteers came together and started to
restore these buildings one after the other and they truly did an amazing job. This
process is still ongoing and Bloc Habitat is once again the graceful building of years
gone bye.
Advertisement

Subscribe to Our Youtube Channel
Related Manuals for RTS 10D3 REIMS-GUEUX BLOC HABITAT


Summary of Contents for RTS 10D3 REIMS-GUEUX BLOC HABITAT
- Page 1 ASSEMBLY INSTRUCTIONS RTS 10D3 REIMS-GUEUX BLOC HABITAT CONGRATULATIONS Congratulations in choosing a unique product to enhance your slot car track diorama. This can truly be described as a product born from a love for slot cars. Buying this product have made you a member of a very special family, yes you are not dealing with a faceless business, but rather a family of slot car fanatics.
-
Page 2: Warranty
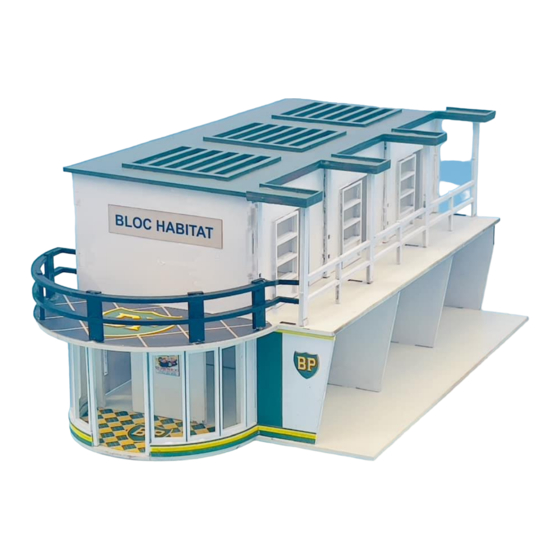
This building should feature in each and every Reims-Gueux inspired slot car race track and therefore we decided to design and produce scaled versions of this building. For practical reasons we have limited the scaled version to the rotunda and three units. -
Page 3: What Is In The Kit
WHO ARE WE? This product is brought to you by racetrackscenics.com. If you have not done so already, please visit our website today. You are also most welcome to visit the Facebook pages “Race Track Scenics Slot Car Scenery” and “Johan Malan” to keep up to date with the latest developments and the launching of exciting new products that may be in the pipeline. - Page 4 You will only need a small amount of glue and remember to look for the surfaces that will be in contact in the end and do not only apply glue to the lugs and sleeves. The latter restrict movement in one plane, but the glue fix it in the perpendicular plane. Using a toothpick is a handy way to apply glue and an earbud can be used to dab away any excess of glue (especially if you use wood glue).
- Page 5 Applying a base or undercoat normally makes life easier afterwards. Two coats of primer are advisable because the MDF absorbs a lot of paint. Using a single colour for the undercoat of all parts works quite well from personal experience. You can choose the paint of your preference, whether it is oil or water based.
-
Page 6: Familiarize Yourself
FAMILIARIZE YOURSELF Have a look at the photo of the finished painted product. The kit contains of almost 100 pieces and therefore we will do the instructions in stages. First, we will do the main structure. Now have a look at the next diagram where these laser-cut parts are shown and numbered from A to P. - Page 7 LET’S GET STARTED WITH THE ASSEMBLY All that is needed for a proper sturdy assembly is some glue where any two parts touch each other. The lugs that fit into the slots stop any movement, but the glue holds all the parts together. The walls must therefore have glue at the bottom and the sides where the parts touch each other (only a little bit of glue is required).
- Page 8 To complete this stage of the construction we need to fix the roof (P) to the walls. We must allow the glue to fully sets before we proceed to the next stage. Now have a look at the next diagram where the second set of laser-cut parts are shown and numbered from AA to AG.
- Page 9 Now have a look at the next diagram where the fourth set of laser-cut parts are shown and numbered from CA to CE. In each of the three units there are a staircase from the lower level to the higher level.
- Page 10 curvature of the foundation floor (A) and connects with wall (B) at the back. The third layer is made up of 2 pieces (DB 1-2), again 1 to the left and 1 to the right of the door opening. These pieces have slots where the nubs of the wall-and window- panels will fit in from above.
- Page 11 CONCLUSION We sincerely hoped you have enjoyed this assembly and finishing. Please remember to give us some feedback and either send or post some pictures of this product on your track.
Need help?
Do you have a question about the 10D3 REIMS-GUEUX BLOC HABITAT and is the answer not in the manual?
Questions and answers