Table of Contents
Advertisement
Quick Links
ASSEMBLY INSTRUCTIONS
RTS 1S18 VINTAGE SPECTATOR OUTLOOK
CONGRATULATIONS
Congratulations in choosing a unique product to enhance your slot car track
diorama. This can truly be described as a product born from a love for slot cars.
Buying this product have made you a member of a very special family, yes you are
not dealing with a faceless business, but rather a family of slot car fanatics.
We put hours of skill and more importantly love into our product and it is wonderful to
share our love for slot cars with you. May you enjoy the build and have years of joy
having it as part of your trackside diorama.
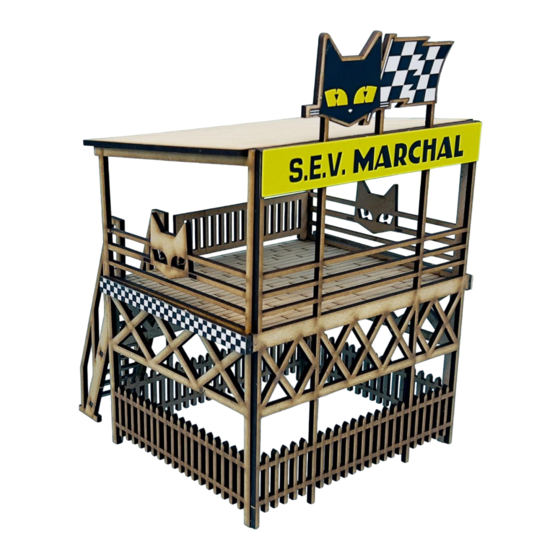
This product is inspired by a billboard at the Le Mans 24Hour race, but instead of just
another billboard we decided to combined the billboard with an imaginary VIP
Spectator outlook. These outlooks were quite common in the golden years of racing.
As you can see from the photo below, we did not have a lot to work from, but we
believe that we have captured the unique ambiance of the tracksides of the time. We
believe that this structure will bring a lot of character to any slot car trackside
diorama.
WARRANTY
This product is covered by a comprehensive money-back warranty to ensure your
absolute satisfaction with your purchase.
1
Advertisement
Table of Contents

Related Manuals for RTS 1S18 VINTAGE SPECTATOR OUTLOOK


Summary of Contents for RTS 1S18 VINTAGE SPECTATOR OUTLOOK
- Page 1 ASSEMBLY INSTRUCTIONS RTS 1S18 VINTAGE SPECTATOR OUTLOOK CONGRATULATIONS Congratulations in choosing a unique product to enhance your slot car track diorama. This can truly be described as a product born from a love for slot cars. Buying this product have made you a member of a very special family, yes you are not dealing with a faceless business, but rather a family of slot car fanatics.
- Page 2 WHO ARE WE? This product is brought to you by racetrackscenics.com. If you have not done so already, please visit our website today. You are also most welcome to visit the Facebook pages “Race Track Scenics Slot Car Scenery” and “Johan Malan” to keep up to date with the latest developments and the launching of exciting new products that may be in the pipeline.
- Page 3 You will only need a small amount of glue and remember to look for the surfaces that will be in contact in the end and do not only apply glue to the lugs and sleeves. The latter restrict movement in one plane, but the glue fix it in the perpendicular plane. Using a toothpick is a handy way to apply glue and an earbud can be used to dab away any excess of glue (especially if you use wood glue).
- Page 4 Now have a look at the next diagram where all the laser cut parts are shown and numbered from A to J and try to identify which is which and where they fit in. The structure consists of four legs (A), (B 1-2) and (C) that support the floor deck (D).
- Page 5 Our laser cut parts are specifically cut to very fine tolerances to ensure a snug fit and therefore it is wise to check all fits before gluing parts together. You may need to trim a lug here and there to make assembly easier. PAINTING YOUR PRODUCT We would strongly advise you to finish the product with paint or wood stain to make them as appealing as possible.
- Page 6 Next the roof (E) can be glued onto the top of the side legs (B 1-2). The high front posts of the legs will ensure a perfect alignment for the roof. Again, apply some glue where the roof comes in contact with the sides. NB: Ensure that the engraving of the roof faces upwards.
Need help?
Do you have a question about the 1S18 VINTAGE SPECTATOR OUTLOOK and is the answer not in the manual?
Questions and answers