Advertisement
Quick Links
Advertisement

Related Manuals for Perlegear PGTVMC03


Summary of Contents for Perlegear PGTVMC03
- Page 1 V2.0 Model: PGTVMC03 Thank you for choosing this Perlegear product! At Perlegear we strive to provide you with the best quality products and services in the industry. Should you have any issues, please don't hesitate to contact at support@perlegear.com (US/CA)
-
Page 2: Important Safety Information
• Check package contents against Supplied Parts and Hardware List to assure that all components were received undamaged. Do not use damaged or defective parts. lf you require replacement parts, contact customer service at support@perlegear.com • Not all parts and hardware included will be used. -
Page 3: Supplied Parts And Hardware
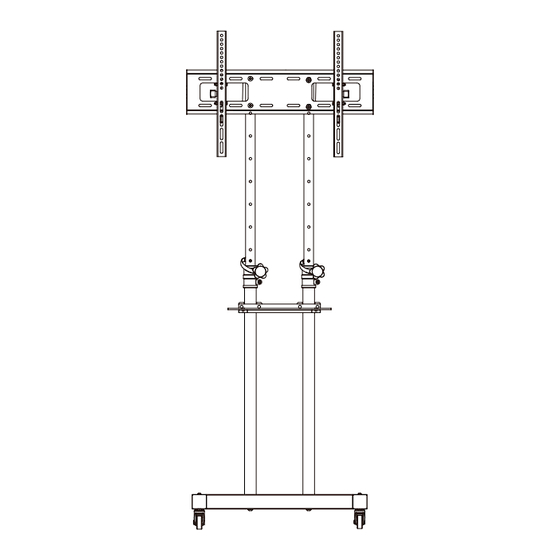
TOOLS NEEDED (NOT lNCLUDED) Phillips Screwdriver SUPPLIED PARTS AND HARDWARE Supplied Parts The upper pole can be stretched from the lower pole. Tube and Square Tube Caster Pole Assembly Glass Shelf Support Pole Connector B2 (2pcs) C2 (1pc) D2 (2pcs) F2 (1pc) A2 (2pcs) Glass Shelf... - Page 4 Assemble the Base STEP 1 A2(2pcs) B2(2pcs) C2(1pc) A1(4pcs) I1(1pc) STEP 1-1 Slide the tube and pole connector [C2] onto the square tubes [A2]. Back Front Secure the base using bolts and washers [A1]. Attach casters [B2] STEP 1-2 to the square tubes [A2] using the provided allen key [I1]. Back Please tighten the bolts [A1]...
- Page 5 Secure Pole Assembly to Base STEP 2 D2(2pcs) B1(2pcs) C1(2pcs) J1(1pc) Step 2-1 Adjust the height of the pole assembly. Step 2-1-1 Loosen the knobs then stretch the upper poles from the lower poles. Step 2-1-2 Adjust the upper poles to your desired height. Note:Please note that the height of the two upper poles should be the same.
- Page 6 Step 2-2 Secure the 2pcs poles assemblies [D2] to the tube and pole connector [C2] using bolts and ring [B1], washers with 3 holes [C1] and Allen key [J1]. Back Front 13/64in. (5mm) [J1] Allen Key...
- Page 7 Install the Square Plate to Upper Poles STEP 3 E1(4pcs) H2(1pc) I2(1pc) D1(4pcs) J1(1pc) Secure the square plate [I2] to the support plate [H2] via the holes on the upper poles using bolts and washers [D1] and nuts [E1]. Back Front 13/64in.
- Page 8 Select TV Bolts If the provided bolts are not compatible with your TV, or if you need the M4 or M5 bolts, please contact us at: support@perlegear.com. Only one bolts size fits your TV. Bolt length: Verify adequate thread engagement with bolts or bolts/spacers combination.
- Page 9 For Flat TV For Flat TV with: Spacer not necessary Inset Holes Cable Interference For Rounded TV Secure the Knobs [H1] to the Brackets [J2] STEP 4C Note: The preassembled nuts [S] on the brackets can be loosened by hand. Note: Remove the pre-assembled nuts [S] on the brackets, then secure...
- Page 10 Secure the TV onto the Square Plate STEP 5 Step 5-1 Hang the TV with brackets to the square plate. Step 5-2 Push the bottom of the TV to square plate. Step 5-3 Tighten the bolts preassembled on the brackets until the bolts touch the square plate.
- Page 11 Secure the Glass Shelf Support to the Lower Poles STEP 6 F1(4pcs) F2(1pc) K2(2pcs) Secure the glass shelf support [F2] to the lower poles using shelf support connector [K2] and nuts [F1]. Back Front Socket Wrench...
- Page 12 Install the Glass Shelf STEP 7 G1(2pcs) F2(1pc) G2(1pc) Tighten bolts [G1] to secure glass shelf [G2] to glass shelf support [F2]. Note: Please do not over-tighten the bolts [G1] or use electric drill to prevent the glass shelf [G2] from breaking.
-
Page 13: Tilt Adjustment
Adjustment 1 Tilt Adjustment NOTE: DO NOT OVER-LOOSEN THE KNOBS. 1. Loosen the tilt knobs [H1] on both sides. 2. Adjust the TV tilt position. 3. Tighten tilt knobs [H1] until the TV can stay at the desired tilt angle. Tighten Loosen... -
Page 14: Height Adjustment
Adjustment 2 Height Adjustment Warning: The TV should be removed from the square plate before adjusting the height of the poles. 1. Take off the latches [L] and loosen the knobs [K]. HEAVY! You may need Phillips assistance with this step. Screwdriver... - Page 15 2. Adjust the two upper poles to your desired height. Please note that the two upper poles should be adjusted at the same time. 3. Insert the latches [L] into the holes nearest to the connecting part of upper pole and lower pole, then tighten the knobs [K] and to fix the two upper poles in place.
- Page 16 Perlegear All of us at Perlegear do appreciate your product purchase. We hope that you are as happy with your product as we are designing and manufacturing it for you it for you. We strive to provide you with the best quality products and services in the industry.
Need help?
Do you have a question about the PGTVMC03 and is the answer not in the manual?
Questions and answers