Table of Contents
Advertisement
Quick Links
Advertisement
Table of Contents

Subscribe to Our Youtube Channel
Related Manuals for Ubiquiti UVC-G3-PRO-3


Summary of Contents for Ubiquiti UVC-G3-PRO-3
- Page 1 Questo manuale d’istruzione è fornito da trovaprezzi.it. Scopri tutte le offerte per Ubiquiti Networks UVC-G3-PRO-3 cerca il tuo prodotto tra le migliori offerte di Videosorveglianza 1080p Indoor/Outdoor IP Camera with Infrared and Optical Zoom Model: UVC-G3-PRO...
-
Page 2: Package Contents
Introduction Thank you for purchasing the Ubiquiti Networks® UniFi Video® G3 Pro Camera. This Quick Start Guide is designed to guide you through installation and also includes warranty terms. Package Contents UVC-G3-PRO Tightening Tool Screw Anchors Self-Tapping Screws (Qty. 2) (Qty. -
Page 3: Installation Requirements
We recommend that you protect your networks from harmful outdoor environments and destructive ESD events with industrial-grade, shielded Ethernet cable from Ubiquiti Networks. For more details, visit www.ubnt.com/toughcable • Surge protection should be used for all outdoor installations. We recommend that... - Page 4 UVC-G3-PRO US-8-150W ETH-SP ETH-SP To LAN Diagram Showing Use of Ethernet Surge Protectors TERMS OF USE: All Ethernet cabling runs must use CAT5 (or above). Shielded Ethernet cable and earth grounding must be used for outdoor installations as conditions of product warranty.
-
Page 5: Hardware Overview
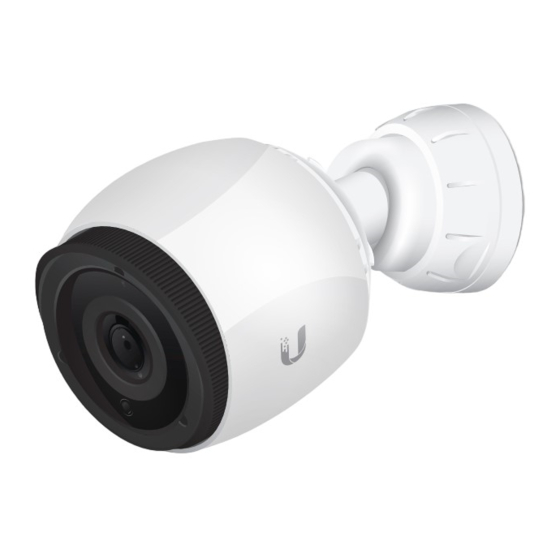
Hardware Overview Ambient Light Sensor Camera Lens Microphone Reset Button Ethernet Port M/N: UVC-G3-PRO 48V 0.5A PoE RESET Camera RoHS Compliant Ring Tilt/Mount Ring Adjustable Base Cable Gland Mounting Base Cable Slot... -
Page 6: Before You Begin
Ethernet 10/100 RJ45 port connects to an 802.3af/802.3at PoE switch for PoE power and data. Reset Button To reset to factory defaults, press and hold the Reset button for more than 10 seconds while the camera is powered on. Before You Begin Remove the sticker from the bottom of the Mounting Base. -
Page 7: Wall/Ceiling Mount
Wall/Ceiling Mount 1. Remove the Mounting Base from the camera by turning the Tilt/Mount Ring counterclockwise. 2. Mark the mounting holes on the wall or ceiling. - Page 8 Note: If you are running the cable along the wall or ceiling, position the Cable Slot towards the direction you want the cabling to run. For outdoor installations, position the Cable Slot downward. 3. Use a 7 mm (¼") drill bit to drill the mounting holes in the wall or ceiling.
- Page 9 5. If you are feeding the Ethernet cable through the wall or ceiling, do so now and feed it through the Mounting Base. If not, feed the Ethernet cable through the Mounting Base and place the cable in the Cable Slot.
- Page 10 IMPORTANT: If you are installing your camera outdoors, create a drip loop for the cable below the camera to prevent water ingress. 6. Fasten the Mounting Base to the wall or ceiling using two Self-Tapping Screws. 7. Remove the camera from the Adjustable Base by turning the Camera Ring in the direction shown.
- Page 11 8. Remove the Cable Gland from the Adjustable Base. 9. Feed the Ethernet cable through the Cable Gland and Adjustable Base. Seal the Cable Gland in place by firmly pressing around its edges. Then connect the cable to the Ethernet Port on the camera. M/N: UVC-G3-PRO 48V 0.5A PoE RESET...
- Page 12 IMPORTANT: For proper weather sealing, the Cable Gland must fit securely within the Adjustable Base when the camera is mounted. Ensure that the Cable Gland is securely seated during installation and cable routing. 10. Connect the camera back to the Adjustable Base by turning the Camera Ring in the direction shown.
- Page 13 11. Orient the camera to the desired position while connecting the Adjustable Base to the Mounting Base. Note: You will fine-tune and then lock the positioning after you check the camera view in the UniFi Video software. 12. Proceed to the Connecting Power over Ethernet section.
- Page 14 Pole Mount To mount the camera on a pole, two metal straps are required (not included). 1. Feed the metal straps through the slots on the Pole Mount Bracket. 2. Wrap a metal strap around the pole and tighten it by turning the screw clockwise. Repeat for the second strap.
- Page 15 3. Remove the Mounting Base from the camera by turning the Tilt/Mount Ring counterclockwise. 4. Feed the Ethernet cable through the Mounting Base.
- Page 16 5. Fasten the Mounting Base to the Pole Mount Bracket using two Machine Screws. 6. Remove the camera from the Adjustable Base by turning the Camera Ring in the direction shown.
- Page 17 7. Remove the Cable Gland from the Adjustable Base. 8. Feed the Ethernet cable through the Cable Gland and Adjustable Base. Seal the Cable Gland in place by firmly pressing around its edges. Then connect the cable to the Ethernet Port on the camera. M/N: UVC-G3-PRO 48V 0.5A PoE RESET...
- Page 18 IMPORTANT: For proper weather sealing, the Cable Gland must fit securely within the Adjustable Base when the camera is mounted. Ensure that the Cable Gland is securely seated during installation and cable routing. 9. Connect the camera back to the Adjustable Base by turning the Camera Ring in the direction shown.
- Page 19 10. Orient the camera to the desired position while connecting the Adjustable Base to the Mounting Base. Note: Fine-tune and then lock the positioning after you check the camera view in the UniFi Video software.
-
Page 20: Connecting Power Over Ethernet
Connecting Power over Ethernet The camera features auto-sensing 802.3af/802.3at PoE and can be powered by any 802.3af/802.3at PoE compliant switch, such as a UniFi PoE Switch. Connect the Ethernet cable from the camera directly to a PoE port on the switch. *640-00316-06* 640-00316-06... - Page 21 UniFi Video Ensure that you are running UniFi Video software version 3.9 or newer. The latest version of the UniFi Video software is available at www.ubnt.com/download/unifivideo The UniFi Video auto-management feature should automatically detect your new camera(s). To manage the camera: 1.
- Page 22 3. The Camera Details window will appear on the right side of the screen. Enter ubnt in the Username and Password fields and click Manage. 4. UniFi Video will automatically update the camera’s firmware (this may take up to five minutes). Then the camera will appear in the Managed cameras list.
- Page 23 UniFi Video App The UniFi Video app is available from the App Store (iOS) or Google Play (Android). ™ For details on using the UniFi Video software, refer to the User Guide at: www.ubnt.com/download/unifivideo...
-
Page 24: Adjusting The Camera View
Adjusting the Camera View 1. Fine-tune the positioning as you check the camera preview in the software. 2. Ensure that the arrow side of the included Tightening Tool faces the camera. Then insert the Tightening Tool between the camera and Adjustable Base. Arrow 3. - Page 25 4. Turn the Tightening Tool to tighten the Camera Ring. 5. Move the Tightening Tool to fit the Tilt/Mount Ring. 6. Secure the Tilt/Mount Ring to lock the positioning and complete installation.
-
Page 26: Specifications
Specifications UVC-G3-PRO Ø 86 x 153 mm (Ø 3.39 x 6.02") Dimensions (Without Mounting Plate) Weight 700 g (1.54 lb) (Without Mounting Plate) Enclosure UV Stabilized Polycarbonate and Die-Cast Aluminum Networking (1) 10/100 Ethernet Port Interface Sensor Sony IMX290, 1/2.8" Lens 3-9 mm, f/1.2-f/2.1 Powered Zoom Lens... - Page 27 Image Settings Flip, Brightness, Contrast, WDR, Hue, Infrared, Sharpness, Saturation, Denoise, 50/60 Hz Flicker Reduction Management Interface Managed Mode UniFi Video v3.9 or Newer Standalone Mode Camera Integrated Web UI Microphone Max. Power 12.5W Consumption Power Method IEEE 802.3af/802.3at PoE Power Supply 802.3af/802.3at PoE Switch Buttons...
-
Page 28: Safety Notices
Safety Notices Read, follow, and keep these instructions. Heed all warnings. Only use attachments/accessories specified by the manufacturer. WARNING: This product may become hot during operation. Exercise caution when handling. WARNING: Do not use this product in a location that can be submerged by water. -
Page 29: Limited Warranty
(the “Product(s)”) shall be free from defects in material and workmanship for a period of one (1) year from the date of shipment by UBIQUITI NETWORKS under normal use and operation. UBIQUITI NETWORKS’ sole and exclusive obligation and liability under... - Page 30 No Products will be accepted for replacement or repair without obtaining a Return Materials Authorization (RMA) number from UBIQUITI NETWORKS during the warranty period, and the Products being received at UBIQUITI NETWORKS’ facility freight prepaid in accordance with the RMA process of UBIQUITI NETWORKS. Products returned without an RMA number will not be processed and will be returned freight collect or subject to disposal.
-
Page 31: Limitation Of Liability
CONTENT CORRUPTION, PACKET LOSS, OR OTHER DAMAGE RESULTING FROM ANY OF THE FOREGOING. In addition, UBIQUITI NETWORKS does not warrant that the operation of the Products will be error-free or that operation will be uninterrupted. In no event shall UBIQUITI NETWORKS... - Page 32 Note Some countries, states and provinces do not allow exclusions of implied warranties or conditions, so the above exclusion may not apply to you. You may have other rights that vary from country to country, state to state, or province to province.
-
Page 33: Australia And New Zealand
reasonable protection against harmful interference when the equipment is operated in a commercial environment. This equipment generates, uses, and can radiate radio frequency energy and, if not installed and used in accordance with the instruction manual, may cause harmful interference to radio communications. -
Page 34: Rohs/Weee Compliance Statement
RoHS/WEEE Compliance Statement English European Directive 2012/19/EU requires that the equipment bearing this symbol on the product and/or its packaging must not be disposed of with unsorted municipal waste. The symbol indicates that this product should be disposed of separately from regular household waste streams. It is your responsibility to dispose of this and other electric and electronic equipment via designated collection facilities appointed by the government or local authorities. - Page 35 für Umwelt und die menschliche Gesundheit zu vermeiden. Wenn Sie weitere Informationen zur Entsorgung Ihrer Altgeräte benötigen, wenden Sie sich bitte an die örtlichen Behörden oder städtischen Entsorgungsdienste oder an den Händler, bei dem Sie das Produkt erworben haben. Español La Directiva 2012/19/UE exige que los equipos que lleven este símbolo en el propio aparato y/o en su embalaje no deben eliminarse junto con otros residuos urbanos no...
- Page 36 bonne et due forme ont pour but de lutter contre l’impact néfaste potentiel de ce type de produits sur l’environnement et la santé publique. Pour plus d’informations sur le mode d’élimination de votre ancien équipement, veuillez prendre contact avec les pouvoirs publics locaux, le service de traitement des déchets, ou l’endroit où...
-
Page 37: Declaration Of Conformity
English Hereby, UBIQUITI NETWORKS, declares that this UVC-G3-PRO device, is in compliance with the essential requirements and other relevant provisions of Directives 2014/30/EU, 2014/35/EU. The full text of the EU declaration of conformity is available at the following internet address: www.ubnt.com/compliance... - Page 38 EU-vaatimustenmukaisuusvakuutuksen täysimittainen teksti on saatavilla seuraavassa internetosoitteessa: www.ubnt.com/compliance Français [French] Par la présente UBIQUITI NETWORKS déclare que l’appareil UVC-G3-PRO, est conforme aux exigences essentielles et aux autres dispositions pertinentes des directives 2014/30/UE, 2014/35/UE. Le texte complet de la déclaration UE de conformité est disponible à...
- Page 39 Latviešu valoda [Latvian] Ar šo, UBIQUITI NETWORKS, deklarē, ka UVC-G3-PRO ierīce, ir saskaņā ar būtiskajām prasībām un citiem attiecīgiem noteikumiem Direktīvās 2014/30/ES, 2014/35/ES. Pilns ES atbilstības deklarācijas teksts ir pieejams šādā interneta vietnē: www.ubnt.com/compliance Lietuvių kalba [Lithuanian] UBIQUITI NETWORKS deklaruoja, kad šis UVC-G3-PRO įrenginys atitinka esminius reikalavimus ir kitas 2014/30/ES,...
-
Page 40: Online Resources
Ubiquiti beam logo, UniFi, and UniFi Video are trademarks or registered trademarks of Ubiquiti Networks, Inc. in the United States and in other countries. Apple and the Apple logo are trademarks of Apple Inc., registered in the U.S. and other countries. App Store is a service mark of Apple Inc.
Need help?
Do you have a question about the UVC-G3-PRO-3 and is the answer not in the manual?
Questions and answers