Table of Contents
Advertisement
Quick Links
1 Safety information ································································································································ 1-1
1.1 General operating safety ··················································································································· 1-1
1.2 Electrical safety ································································································································· 1-1
1.3 ESD prevention ································································································································· 1-1
2 About the NIC ······································································································································· 2-1
2.1 Overview ··········································································································································· 2-1
2.2 Appearance ······································································································································· 2-1
2.3 Specifications ···································································································································· 2-1
2.3.1 Product Specifications ············································································································ 2-2
2.3.2 Specifications ························································································································· 2-2
3 Feature Introduction ····························································································································· 3-1
3.1 Supported Features ·························································································································· 3-1
3.2 Function Introduction························································································································· 3-1
4 Software and Hardware Compatibility Relationship············································································· 4-1
4.1 Supported Operating Systems ·········································································································· 4-1
4.2 Blade Servers Supported by the NIC ································································································ 4-1
4.3 ICMs Supported by NIC ···················································································································· 4-3
4.3.1 Compatibility between the NIC and ICM ················································································ 4-3
4.3.2 Connection Between the NIC and ICM ·················································································· 4-4
4.4 Network Application Logic Diagram ·································································································· 4-6
5 Configuring the NIC ······························································································································ 5-1
5.1 Port Correspondence between the NIC and ICM ············································································· 5-1
5.2 Identifying NIC Ports under OS ········································································································· 5-1
5.2.1 Linux Operating Systems ······································································································· 5-1
5.2.2 Windows Operating Systems ································································································· 5-2
5.3 Installing and Uninstalling the NIC Driver under OS ········································································· 5-2
5.3.1 Linux Operating Systems ······································································································· 5-3
5.3.2 Windows Operating Systems ································································································· 5-4
5.4 Configuring FC SAN·························································································································· 5-7
5.4.1 Linux Operating Systems ······································································································· 5-7
5.4.2 Windows Operating Systems ································································································· 5-8
5.4.3 Installing a Linux OS ············································································································ 5-14
Contents
i
Advertisement
Table of Contents

Related Manuals for H3C NIC-FC730i-Mb-2-32G


Summary of Contents for H3C NIC-FC730i-Mb-2-32G
-
Page 1: Table Of Contents
Contents 1 Safety information ································································································································ 1-1 1.1 General operating safety ··················································································································· 1-1 1.2 Electrical safety ································································································································· 1-1 1.3 ESD prevention ································································································································· 1-1 2 About the NIC ······································································································································· 2-1 2.1 Overview ··········································································································································· 2-1 2.2 Appearance ······································································································································· 2-1 2.3 Specifications ···································································································································· 2-1 2.3.1 Product Specifications ············································································································... - Page 2 5.5 Configuring NPIV ···························································································································· 5-18 5.5.1 Installing the elxocm Tool ····································································································· 5-18 5.5.2 NPIV Configuration Steps ···································································································· 5-20 6 Acronyms and Abbreviations ··············································································································· 6-1...
-
Page 3: Safety Information
To avoid bodily injury or damage to the device, follow these guidelines when you operate the network adapter: • Only H3C authorized or professional engineers are allowed to install or replace the network adapter. • Before installing or replacing the network adapter, stop all services, power off the blade server, and then remove the blade server. - Page 4 • Put away the removed network adapter in an antistatic bag immediately and keep it secure for future use. 2. Grounding methods to prevent electrostatic discharge The following are grounding methods that you can use to prevent electrostatic discharge: • Wear an ESD wrist strap and make sure it makes good skin contact and is reliably grounded.
-
Page 5: About The Nic
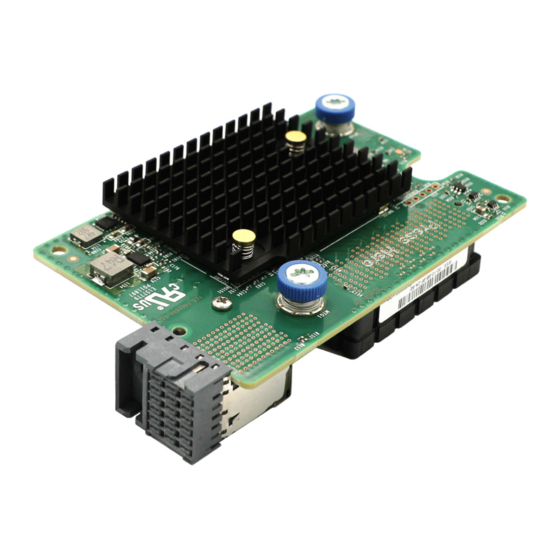
About the NIC Note Figures in this manual are for illustration purposes only. The actual product may vary. 2.1 Overview NIC-FC730i-Mb-2*32G (hereinafter referred to as FC730i) is an FC NIC with two 32G FC ports. It provides network interfaces for blade servers to connect to ICM slots, and is applicable to B16000 blade enclosure. -
Page 6: Product Specifications
2.3.1 Product Specifications Table 2-1 Product Specifications Properties Description Basic properties NIC type FC NIC Chip model LPe32002 Max. power 20 W consumption Input voltage 12 V DC Data channel bus PCIe3.0 x8 Network properties Number and type of 2*32G user ports User port transfer rate 32 Gb/s... -
Page 7: Feature Introduction
Feature Introduction 3.1 Supported Features This section introduces the features supported by the FC730i NIC. Table 3-1 NIC features Feature Supported √ FC SAN √ FC Boot √ N_Port_ID Virtualization (NPIV) 3.2 Function Introduction 1. FC SAN The FC730i NIC supports FC SANs. FC SAN is a remote high-speed storage technology. - Page 8 The main function of NPIV is to virtualize multiple interface N_Port IDs on one physical port N of the FC NIC, and to associate any F_Port on the FC switch to these multiple N_Port IDs. In this way, systems in different partitions on the virtualization platform can share one FC NIC physical port.
-
Page 9: Software And Hardware Compatibility Relationship
Model of Mezz NIC Installation Position Diagram Server Blade Server Slots 2-way NIC installation position on H3C UniServer half-width Mezz 1, Mezz 2 and Mezz 3 a 2-way half-width blade B5700 G3 blade server server 2-way NIC installation position on... - Page 10 Figure 4-1 NIC installation position on a 2-way half-width blade server Figure 4-2 NIC installation position on a 2-way full-width blade server...
-
Page 11: Icms Supported By Nic
• OM: Version 1.02.05 or later • HDM: Version 2.xx • BIOS: Version 2.00.35 or later The FC730i NIC supports the following ICMs: • H3C UniServer BT716F • H3C UniServer BX608FE... -
Page 12: Connection Between The Nic And Icm
4.3.2 Connection Between the NIC and ICM Note This section only introduces the connection between the Mezz NIC and ICM. Please refer to the actual position of the product for the arrangement order of NICs. For the detailed connection between the Mezz NIC and ICM, you can query with Networking query tool. - Page 13 Figure 4-5 Logical diagram of the connection relationship between the Mezz NIC slots and ICMs for 4-way full-width blade servers LOM P1 LOM P2 Embedded Mezz1 Mid-plane Mezz2 Mezz3 Mezz4 Mezz5 Mezz6 Blade...
-
Page 14: Network Application Logic Diagram
Figure 4-6 ICM slot 4.4 Network Application Logic Diagram FC730i can be connected to the internal ports of the ICM, and each port provides 32G FC service applications. The external port of the ICM connects to the FC SAN, enabling blade servers with Mezz NICs to communicate with the storage network. -
Page 15: Configuring The Nic
Configuring the NIC Note The software UI shown in this manual is specific to a certain software version. The software UI may be updated from time to time. Please refer to the actual product UI. • The FC function requires remote network storage devices. The configuration methods of the network storage devices are different. -
Page 16: Windows Operating Systems
of Emulex Lpm32002, it means the ports of FC730i NIC are identified correctly, as shown in Figure 5-3. If the corresponding two host folders cannot be found, then update the driver and identify them again. Figure 5-3 Identifying ports 5.2.2 Windows Operating Systems Click the Windows button to enter the Start menu. -
Page 17: Linux Operating Systems
5.3.1 Linux Operating Systems 1. Checking the Current NIC Driver Run the modinfo lpfc command to check the current driver version of the system, as shown in Figure 5-5. Figure 5-5 Checking the driver version 2. Installing the Driver • Installing the source package in .tar.gz format If the obtained driver is a source code zip package, you need to compile and install it. -
Page 18: Windows Operating Systems
After the driver installation is finished, reboot the system to make the new driver take effect. a. Run the modinfo lpfc command again to check the driver version and make sure the new driver has taken effect. 3. Uninstalling the Driver To uninstall the driver installed with the source package, go to the elx-lpfc-dd-rhel7-<ver>... - Page 19 Figure 5-9 Checking the driver version 2. Installing the Driver Obtain the relevant driver from H3C website. Double-click to run the driver in .exe format. Follow the prompts to execute the next step to start installing the driver, as shown in Figure 5-10.
- Page 20 Figure 5-10 Installing the driver After the installation is complete, reboot the system to make the driver take effect. 3. Uninstalling the Driver Click the Windows button to enter the Start menu. Choose Control Panel > Hardware > Device Manager to access Device Manager. Right-click the NIC from which you want to uninstall the driver, select the Properties/Driver tab, and click the Uninstall button, as shown in Figure...
-
Page 21: Configuring Fc San
5.4 Configuring FC SAN 5.4.1 Linux Operating Systems Configure the FC function on the FC storage device and ICM to ensure that the FC links are available and that the relevant port WWPN can be registered correctly. For the method of configuring FC on the ICM, see the related configuration command manual. -
Page 22: Windows Operating Systems
5.4.2 Windows Operating Systems Configure the FC function on the FC storage device and ICM to ensure that the FC links are available and that the relevant port WWPN can be registered correctly. For the method of configuring FC on the ICM, see the related configuration command manual. Choose Control Panel >... - Page 23 As shown in Figure 5-17, right-click the disk name and select Online to bring the disk online. Figure 5-17 Bringing the disk online As shown in Figure 5-18, right-click the disk name again and select Initialize Disk to initialize the disk. Figure 5-18 Initializing the disk 错误!未找到引用源。, right-click the Unallocated area of the disk As shown in...
- Page 24 Figure 5-19 Splitting a disk When volume-splitting is complete, the disk status is as shown Figure 5-20. Figure 5-20 Volume-splitting is completed As shown in Figure 5-21, open My Computer, and you can see the new partition. FC SAN configuration is complete. 5-10...
- Page 25 During the server boot process, press Delete or Esc when prompted to enter the BIOS Setup interface. a. As shown in Figure 5-22, choose Advanced > H3C LPm32002-H3C 2-Port 32Gb Fibre Channe Mezz Ca – FC. Select one of the ports and press Enter to display the FC730i NIC configuration page. 5-11...
- Page 26 Figure 5-22 Entering the FC730i NIC configuration page (10) Select Configure HBA and Boot Parameters and press Enter to display the parameter configuration page, as shown in Figure 5-23. Select the Boot Target Scan Method column and select Boot Path Discovered Targets, as shown in Figure 5-24.
- Page 27 Figure 5-24 Configuring Boot Target Scan Method (11) After reboot, go to the BIOS page again and select Scan for Fibre Devices. Check if the storage device has been scanned. If not scanned, check if the links are available. Figure 5-25 Scanning the storage device 5-13...
-
Page 28: Installing A Linux Os
Figure 5-26 Identified storage device (12) After scanning the storage device, go back to the NIC configuration page. Select Add BootDevice to add the device, and press Enter. The device will be automatically added after 30 seconds. Figure 5-27 Adding the scanned storage device (13) Press F4 to save the settings and reboot the system. - Page 29 default. Therefore, you can find that the network disks on the FC SAN storage server have been identified by the system. Select the SAN disk and continue to complete the system installation. Figure 5-28 Installing a Linux OS Installing a Windows OS Mount the system image to install the OS (for example, Windows Server 2012 R2).
- Page 30 Figure 5-29 Installing a new OS If the OS comes with the FC730i NIC driver ( such as Windows Server 2016), then the SAN disk assigned by the storage server will be displayed in the disk list, as shown in Figure 5-30.
- Page 31 If the OS lacks the FC730i NIC driver, the SAN disk assigned by the storage server cannot be identified. Follow the steps below to load the driver. a. Mount the NIC driver file to the host. b. Click Load driver on the page shown in Figure 5-30.
-
Page 32: Configuring Npiv
After driver installation is complete, the SAN storage disk will be identified. Continue to install the OS. 5.5 Configuring NPIV 5.5.1 Installing the elxocm Tool Obtain the elxocm tool from the H3C website. Copy the elxocm tool to the OS and install it. • Linux Operating Systems a. - Page 33 Figure 5-34 Selecting default installation c. After installation, run the /usr/sbin/ocmanager/ocmanager command to start the tool. Figure 5-35 Starting the elxocm tool 2. Windows Operating Systems a. Double-click the .exe program to install the elxocm tool, as shown in the following figure. 5-19...
-
Page 34: Npiv Configuration Steps
Figure 5-36 Installing the elxocm tool on Windows b. After the installation is complete, go to the installation directory to start the OneCommandManager startup tool, as shown in Figure 5-37. Figure 5-37 Starting the OneCommandManager startup tool 5.5.2 NPIV Configuration Steps Note After the elxocm tool is started, the configuration steps under the Linux OS are almost the same as those under the Windows OS. - Page 35 Figure 5-38 Selecting Group Adapters by Virtual Port After option selection, the page shown in Figure 5-39 is displayed. You can create a virtual port in the right pane and choose to set wwpn automatically or manually. Click Create Virtual Port to create a virtual port.
- Page 36 Figure 5-40 Created virtual port To delete a virtual port, select it in the left pane, and then click Remove Virtual Port in the right pane. Figure 5-41 Deleting a virtual port 5-22...
-
Page 37: Acronyms And Abbreviations
Acronyms and Abbreviations Table 6-1 Acronyms and Abbreviations Acronyms and Explanation Abbreviations Fiber Channel FCoE Fiber Channel Over Ethernet NPIV N_Port_ID Virtualization Operating System PCIe Peripheral Component Interconnect Express RAID Redundant Arrays of Independent Drives Storage Area Network...
Need help?
Do you have a question about the NIC-FC730i-Mb-2-32G and is the answer not in the manual?
Questions and answers