Table of Contents
Advertisement
Available languages
Available languages
Advertisement
Table of Contents

Related Manuals for Oster 2384


Summary of Contents for Oster 2384
-
Page 2: Important Safeguards
IMPORTANT SAFEGUARDS When using electrical appliances, basic safety precautions should always be followed, including the following: • READ ALL INSTRUCTIONS BEFORE USING THE MIXER. Failure to follow these warnings and safety instructions may result in serious personal injury and/or property damage. •... - Page 3 If it still does not fit, contact a qualified electrician. Do not attempt to defeat this safety feature. Thank you for choosing the OSTER we have been helping cooks prepare moist cakes, light and fluffy meringue and chewy cookies. You can even make bread dough ®...
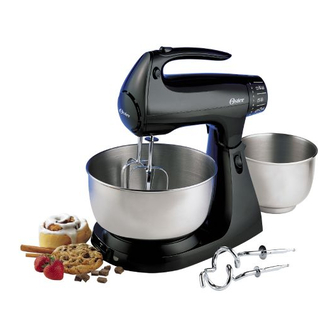
- Page 4 FEATURES 1. Beater Ejector 2. BURST OF POWER Feature 3. Speed Control Dial 4. Mixer-Release Trigger features 5. Headlock 6. Stand ® 7. Dough Hooks 8. Turntable Locator Switch 9. Turntable 10. Bowl-Fit Beaters 11a.Large Mixing Bowl 11b.Small Mixing Bowl...
-
Page 5: Stand Mixer
The Stand Mixer Assembling the Stand Mixer Before assembling the mixer, be sure the speed control dial is in the OFF position and the electric cord is unplugged. Attaching the Turntable Place the revolving turntable into the base... -
Page 6: Mixing Bowl
mixing bowl Mixing Bowl Adding the Mixing Bowl Move the turntable locator switch to the proper setting – the large bowl icon if you are using the large bowl; the small bowl icon if you are using a small bowl. Place the desired mixing bowl onto the turntable. -
Page 7: Dough Hooks
dough hooks Dough Hooks Attaching the Dough Hooks Set the speed dial in the OFF position and unplug the electric cord from the electrical outlet. Lift mixer head up and back to tilt it out of the way of the bowl, while holding it in an upright position. -
Page 8: Operating Instructions
operating Operating Instructions About the Speed Control Dial PEED The speed control dial is used for turning ONTROL the mixer ON and OFF and for selecting its PEED NDICATOR 12 mixing speeds. Rotate the speed control dial in a clockwise direction to increase mixing speed;... -
Page 9: Mixing Guide
mixing guide Mixing Guide The speed control guide on your mixer has been designed to help you take the guess work out of preparing foods. Use the chart below to determine the best setting to use when preparing your favorite recipes. PEED IXING ETTING... -
Page 10: Cleaning Your Mixer
Wind the electric cord into a coil, secure it with a twist fastener. Maintenance The motor of your stand mixer has been carefully lubricated at the factory and does not require any additional lubricant. Other than the recommended cleaning, no further user maintenance should be necessary. - Page 11 care Mixing and Baking Suggestions • Ingredients should be added to the mixing bowl as they are specified in the recipe. When combining dry and wet ingredients, you may wish to moisten ingredients on Speed 1 or 2, then turn to the desired mixing speed.
- Page 12 breads Breads Special Instructions for Making Kneaded Breads When making kneaded breads, your mixer will require more care than when making ordinary mixtures, such as cake batter and cookie dough. The elasticity of the bread dough and the shape of the dough hooks may cause your mixer to do some unusual things.
- Page 13 breads DO NOT attempt to scrape the bowl while the mixer is operating. Stop the mixer and scrape the sides of the bowl as necessary. Use a rubber or plastic spatula only. DO NOT attempt to feed dough into the dough hooks with your hands, a spatula or any other utensil while the mixer is plugged into an outlet or in operation.
- Page 14 shaping dough How to Punch Down Yeast Dough 1. Plunge fist into center of risen dough to punch out excess air. 2. Fold outer edges over into center. Turn dough over and let rise until doubled, if recipe directions so specify. How To Shape Dough for a Loaf Pan 1.
- Page 15 Giant Cinnamon Sticky Buns OUGH 3 cups all-purpose flour, divided 1 pkg. (1/4 oz.) rapid-rise (not bread machine) yeast 3 Tbsp. granulated sugar 1/2 tsp. salt 1/2 cup water 1/4 cup milk 3 Tbsp. butter or margarine, cut into pieces 1 egg 1.
- Page 16 Cool mixture slightly, then pour into baked pie crust. 2. Insert clean, dry beaters into OSTER small mixer bowl. In small mixer bowl, beat egg whites and cream of tartar on Speed 10 until mixture is foamy.
- Page 17 1. Preheat oven to 375ºF. Adjust mixer turntable for large mixer bowl. Insert clean, dry beaters into OSTER with non-stick cooking spray; set aside 2. In small mixer bowl, stir together flour, soda, cinnamon, ginger, nutmeg and salt;...
- Page 18 1/4 cup flaked coconut 1. Preheat oven to 325ºF. Spray cookie sheets with nonstick cooking spray; set aside. Adjust mixer turntable for the large mixer bowl. Insert clean, dry beaters into OSTER ® mixer head. 2. In large mixer bowl, beat egg whites and cream of tartar on Speed 10 until mixture is foamy.
-
Page 19: How To Obtain Warranty Service
How to Obtain Warranty Service Take the product to an Authorized Sunbeam Service Center. You can find the nearest Authorized Sunbeam Service Center by calling 1-800-334-0759 or visit our Website at www.oster.com. DO NOT RETURN THIS PRODUCT TO THE PLACE OF PURCHASE... - Page 20 ©2001 Sunbeam Products, Inc. All rights reserved. OSTER ® and BURST OF POWER Printed in China RODUCT TO THE For product questions contact: Sunbeam Consumer Service P. O. Box 948389 Maitland, FL 32794-8389 1.800.334.0759 www.oster.com RODUCT TO THE ® are registered trademarks of Sunbeam Products, Inc.
-
Page 22: Precauciones Importantes
PRECAUCIONES IMPORTANTES Al utilizar aparatos eléctricos, siempre siga precauciones básicas de seguridad, incluyendo las siguientes: • LEA TODAS LAS INSTRUCCIONES ANTES DE USAR LA BATIDORA. El no leer las siguientes advertencias e instrucciones de seguridad, puede resultar en serias lesiones personales y/o daños materiales. •... - Page 23 De ninguna manera intente modificar esta medida de seguridad. ARACTERÍSTICAS ® Gracias por seleccionar la Batidora OSTER por generaciones hemos ayudado en la cocina a preparar pasteles, merengues esponjosos y galletas deliciosas. Usted incluso puede hacer pan con su Batidora.
- Page 24 características CARACTERÍSTICAS 1. Botón Expulsor 2. Botón BURST OF POWER 3. Disco de Control de Velocidades 4. Palanca para Liberar la Batidora 5. Seguro de la Cabeza 6. Pedestal ® 7. Ganchos para Masa 8. Interruptor en la Plataforma Giratoria 9.
- Page 25 la Batidora de Pedestal Ensamblando la Batidora de Pedestal Antes de ensamblar la Batidora, asegurese de que el Disco para Señalar el Mezclado esté en la posición APAGADO/OFF y que el cordón eléctrico esté desconectado. Armado de la Plataforma Giratoria Coloque la plataforma giratoria en la base del pedestal presionando la plataforma dentro del orificio central de la ranura de ajuste hasta...
- Page 26 Tazón de Mezclado Agregando el Tazón de Mezclado Coloque el tazón de mezclado deseado en la plataforma giratoria de manera que la ranura abajo del tazón se ajuste en la ranura correcta que está en la plataforma giratoria. Los tazones de mezclado NUNCA deben de usarse dentro de hornos convencionales, microondas, sobre las hornillas, o sobre cualquier superficie caliente.
- Page 27 ganchos Ganchos para Masa Ensamblando los Ganchos para Masa Ponga el Disco para Señalar el Mezclado en la posición APAGADO/OFF y desconecte el cordón eléctrico de la toma de corriente. Levante la cabeza de la Batidora y reclínela atrás fuera de los tazones, mientras que la sostiene en una posición vertical.
-
Page 28: Operación
Instrucciones de Operación Sobre el Disco para Señalar el Mezclado El Disco para Señalar el Mezclado se usa para ENCENDER Y APAGAR la Batidora y para usar sus 12 velocidades de mezclado. Rote el Disco para Señalar el Mezclado en el sentido de las manecillas del reloj, para aumentar la velocidad de mezclado, y en dirección contraria al sentido de las manecillas... - Page 29 Guía de Mezclado La guía de mezclado en su Batidora ha sido diseñada para ayudar a decidir qué tipo de trabajo necesitan los alimentos que desea preparar. Use aquellas descripciones como una guía de mezclado cuando prepare sus recetas favoritas. UÍA DE EZCLADO Amasar...
- Page 30 cuidado Cuidados de Su Batidora Explusando los Batidores o los Ganchos para Masa Después de que ha terminado de mezclar, gire el Disco para Señalar el Mezclado a APAGADO/OFF y desconecte el cordón eléctrico de la toma de corriente. Presione el botón expulsor localizado cerca de el mango para remover los batidores o los ganchos para masa.
- Page 31 Sugerencias para el Mezclado y el Horneado • Los ingredientes deben ser agregados al tazón de mezclado de la forma que lo indica la receta. Cuando se combinen ingredientes secos y líquidos, deberá humedecerlos lentamente mezclando en la Velocidad 1 ó 2, y después puede usar la velocidad deseada de mezclado.
- Page 32 panes Panes Instrucciones Especiales para Hacer Masa para Pan Cuando prepare masas para pan, su batidora requerirá más cuidado que cuando hace otras mezclas, como las de batidos y galletas. La elasticidad de la masa para pan y la forma de los ganchos para masa pueden causar que la Batidora haga cosas inusuales.
- Page 33 panes NO INTENTE usar la espátula para limpiar el tazón mientras la Batidora está en operación. Detenga la Batidora y limpie con la espátula si es necesario. Use una espátula de plástico solamente. NO INTENTE agregar masa a los ganchos con sus manos, use una espátula o cualquier utensilio mientras la Batidora esté...
- Page 34 shaping dough Como Bajar la Masa de Levadura 1. Sumerja su mano en el centro de la masa para eliminar el exceso de aire. 2. Doble los bordes exteriores para dentro. Volteé la masa y permita que se eleve hasta el doble de su tamaño original, si es que la receta así...
- Page 35 Rollos de Canela Gigantes 3 tazas de harina, divididas 1 paquete (1/4 oz) de levadura de rápida acción (que no sea para máquinas para hacer pan) 3 Cu. de azúcar granulada 1/2 cuta. de sal 1/2 taza de agua 1/4 taza de leche 3 Cu.
- Page 36 Pay de Lima-Limón y Merengue 1 limón mediano 1 lima mediana 1 1/3 tazas de azúcar, divididas 3 cucharadas de maicena Agua 3 huevos, separada la yema de la clara, a temperatura ambiente 1 cucharada de mantequilla o margarina Una base o corteza para pay horneada de 9 pulgadas 1/8 cucharadita de cremor tártaro 1.
- Page 37 1. Caliente previamente el horno a 375ºF. Ajuste el plato giratorio de la batidora para colocar el tazón grande. Inserte los batidores limpios y secos dentro de la batidora OSTER. ® Rocíe las bandejas para hornear galletas con un spray antiadherente;...
- Page 38 Ajuste el plato giratorio de la batidora para colocar el tazón grande. Inserte los batidores limpios y secos dentro de la batidora OSTER. 2. En el tazón grande de la batidora, bata las claras de huevo y el cremor tártaro usando la velocidad 10 hasta que la mezcla esté...
- Page 39 garantía Garantía Limitada de Dos Años Sunbeam Products Inc. (“Sunbeam”) garantiza que, por un período de DOS años a partir de la fecha de compra, este producto estará libre de defectos en el material y en su fabricación. Bajo la opinión de Sunbeam, reparará o repondrá este producto o cualquier componente del mismo si se encuentra defectuoso durante el periodo de garantía.
- Page 40 UGAR ONDE LO OMPRÓ Para preguntas sobre los productos llame: Sunbeam Consumer Service P. O. Box 948389 Maitland, FL 32794-8389 1.800.334.0759 www.oster.com NVÍE EL RODUCTO A LA IRECCIÓN NTERIOR ©2001 Sunbeam Products, Inc. Todos los derechos reservados. OSTER ® y BURST OF POWER ®...
Need help?
Do you have a question about the 2384 and is the answer not in the manual?
Questions and answers