
Related Manuals for Meritor MM-0170


Summary of Contents for Meritor MM-0170
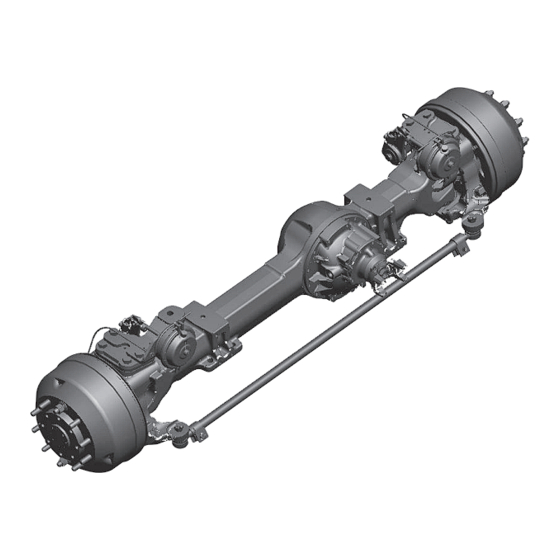
- Page 1 MAINTENANCE MANUAL MM-0170 MEDIUM-DUTY FRONT DRIVE STEER AXLES MX-120 AND MX-120-EVO SERIES APPLIES TO STANDARD 120 AND 120-HR HIGH-RETARDATION CARRIERS Revised 03-23...
-
Page 2: About This Manual
If Tools and Supplies are Specified in This Manual Contact Meritor’s Commercial Vehicle Aftermarket at 888-725-9355. For assistance with parts, you may also contact the Meritor Parts Center in Florence, KY at CustCareCntr.Florence@Meritor.com 859-525-3500. MM-0170 / Revised 03-23 (16579) Page ii Copyright Meritor, Inc., 2023... -
Page 3: Table Of Contents
Install the Bushings and Seals in the Housing ..36 Steering Knuckle ..........19 Install the Axle Shaft and Assemble the Steering Remove the Axle Differential Carrier ....19 Knuckle ............37 (16579) MM-0170 / Revised 03-23 Printed in USA Copyright Meritor, Inc., 2023 Page iii... - Page 4 Axle Shaft Seal Driver ........81 Adjustment ............57 Hub Seal Driver ..........82 Check and Adjust Wheel Bearings ..... 58 Bushing Driver ..........83 Maximum Turn Angle ........59 MM-0170 / Revised 03-23 (16579) Page iv Copyright Meritor, Inc., 2023 Printed in USA...
-
Page 5: Section 1: Safety Information
• Use only wheels and valve stems approved by the vehicle provided in this publication. Failure to follow procedures manufacturer for use with Meritor air disc brakes. Use of and alerts as directed can result in death, serious injury and unapproved wheels and valve stems can result in valve stem damage to components. - Page 6 fiber dust, a cancer and lung disease should be applied with low pressure to prevent dust from hazard. Material Safety Data Sheets are available from Meritor. becoming airborne. Allow the solution to flow between the brake drum and the brake support or the brake rotor and caliper.
- Page 7 fiber dust, a cancer and lung disease hazard. Material Safety Data Sheets are available from Meritor. to wash the brake drum or rotor and other brake parts. The solution should be applied with low pressure to prevent dust Hazard Summary from becoming airborne.
-
Page 8: Section 2: Exploded Views
Exploded Views Exploded Views MX-120 and MX-120-HR Series 4000017g MM-0170 / Revised 03-23 (16579) Page 4 Copyright Meritor, Inc., 2023 Printed in USA... - Page 9 Grease Fitting Lower Knuckle Cap Washer Tie Rod Assembly Shim Capscrew Lower Knuckle Cap ABS Cable Grommet Steering Knuckle Grease Seal, Upper Cap / Steering Arm (16579) MM-0170 / Revised 03-23 Printed in USA Copyright Meritor, Inc., 2023 Page 5...
-
Page 10: Mx-120-Evo Series
Exploded Views MX-120-EVO Series 4011512c MM-0170 / Revised 03-23 (16579) Page 6 Copyright Meritor, Inc., 2023 Printed in USA... - Page 11 Oil Fill / Drain Plug Steering Knuckle Shim Grease Seal, Upper Cap / Steering Arm Steering Arm Chamber Bracket, LH Washer Capscrew Air Brake Chamber Steering Stop Adjusting Screw (16579) MM-0170 / Revised 03-23 Printed in USA Copyright Meritor, Inc., 2023 Page 7...
-
Page 12: Brake Assembly
Small Clevis Pin Brake Shoe and Lining Assembly Brake Spider Assembly Camshaft Seal Snap Ring Anchor Pin Bushing Brake Shoe Anchor Pin Dust Shield Capscrew Dust Shield MM-0170 / Revised 03-23 (16579) Page 8 Copyright Meritor, Inc., 2023 Printed in USA... - Page 13 Outer Camshaft Bushing ABS Sensor Capscrew Sensor Sleeve Dust Shield Spring Grease Fitting Brake Shoe Roller Knuckle Steering Assembly Inner Camshaft Seal Flat Washer Flat Washer (16579) MM-0170 / Revised 03-23 Printed in USA Copyright Meritor, Inc., 2023 Page 9...
-
Page 14: Automatic Slack Adjuster
Exploded Views Automatic Slack Adjuster 4011543c Item Description Slack Adjuster Assembly Slack Adjuster Clevis Offset Clevis Large Clevis Pin Small Clevis Pin Large Clip Small Clip MM-0170 / Revised 03-23 (16579) Page 10 Copyright Meritor, Inc., 2023 Printed in USA... -
Page 15: Section 3: Introduction
MX-120-HR carriers are available with these axles. The axles are designed specifically for use with the MTC-4210 and -4213 transfer cases as part of the Meritor medium-duty part-time 4x4 or 6x6 system. To obtain maintenance and service information on the MTC Series transfer cases, refer to the Service Notes page on the inside front cover of this manual. -
Page 16: Model Nomenclature
H = Unitized Spindle/Other Differential T = T Series Cam Brake S = Bolt on Conventional Spindle/No Differential W = W Series Cam Brake 4011814c Figure 3.1 MM-0170 / Revised 03-23 (16579) Page 12 Copyright Meritor, Inc., 2023 Printed in USA... -
Page 17: Section 4: Removal And Disassembly
Mark the position that each tie rod end is installed into the cross tube. Count and record the number of threads that appear outside of the cross tube. Figure 4.2. (16579) MM-0170 / Revised 03-23 Printed in USA Copyright Meritor, Inc., 2023 Page 13... -
Page 18: Remove The Hub From The Axle
Remove the hubcap. Figure 4.4. 4000029b Figure 4.6 Remove the drive flange from the hub. If necessary, use a puller to remove the drive flange. Figure 4.7. MM-0170 / Revised 03-23 (16579) Page 14 Copyright Meritor, Inc., 2023 Printed in USA... -
Page 19: Disassemble The Bearing Cups And Grease Seal
Figure 4.10. If a press is not available: Use a brass hammer or drift. INNER ADJUSTING 4000033a PRESS Figure 4.8 DRIVER WHEEL STUD 4019240a Figure 4.10 (16579) MM-0170 / Revised 03-23 Printed in USA Copyright Meritor, Inc., 2023 Page 15... -
Page 20: Remove The Automatic Slack Adjuster From The Steering Knuckle
Use a suitable tool to remove the grease seal sleeve from slack adjuster. Figure 4.16. the spindle. Discard the grease seal sleeve. Figure 4.13. SPINDLE GREASE SEAL SLEEVE 4000026a 4021425a Figure 4.13 Figure 4.16 MM-0170 / Revised 03-23 (16579) Page 16 Copyright Meritor, Inc., 2023 Printed in USA... -
Page 21: Remove The Brake Assembly And Spindle From The Knuckle
Figure 4.20 and Figure 4.21. If the vehicle is equipped with ABS: Push the ABS sensor into the steering knuckle cavity. Figure 4.19. 4000038a 4000036a Figure 4.20 Figure 4.18 (16579) MM-0170 / Revised 03-23 Printed in USA Copyright Meritor, Inc., 2023 Page 17... -
Page 22: Remove The Steering Knuckle From The Axle Housing
Remove the lower knuckle cap and inspect the thrust bushings. bearing for wear or damage. Replace a worn or damaged thrust bearing at reassembly. Figure 4.23. MM-0170 / Revised 03-23 (16579) Page 18 Copyright Meritor, Inc., 2023 Printed in USA... -
Page 23: Remove The Axle Shaft From The Axle Housing
If the bushing of the carrier housing. Do not disassemble the universal must be replaced, install a new oil seal at the same time. joints, which will void the Meritor warranty. Figure 4.27. Figure 4.28. Remove the Axle Differential Carrier... -
Page 24: Section 5: Removal And Disassembly
TIE ROD END CROSS TUBE Remove the rim and tire. Remove the wheel and drum assembly. MARKS TUBE SLOT 1000027a Figure 5.2 MM-0170 / Revised 03-23 (16579) Page 20 Copyright Meritor, Inc., 2023 Printed in USA... -
Page 25: Remove The Hub From The Axle
DRAIN PLUG PLUG 4011518a Figure 5.7 4011694a Figure 5.4 Remove the capscrews and washers that connect the hubcap to the drive flange. Remove the hubcap. Figure 5.5. (16579) MM-0170 / Revised 03-23 Printed in USA Copyright Meritor, Inc., 2023 Page 21... - Page 26 Figure 5.10. Use a 4-inch socket Figure 5.12 wrench to remove the adjusting nut. Figure 5.11. 10. Remove the outer bearing cone from the hub. MM-0170 / Revised 03-23 (16579) Page 22 Copyright Meritor, Inc., 2023...
-
Page 27: Disassemble The Bearing Cups And Oil Seal From The Hub
Figure 5.17. 4019240a Figure 5.14 PINS Remove the oil seal from the hub with a suitable tool. Discard the oil seal. Figure 5.15. CLIPS 4011520a Figure 5.17 (16579) MM-0170 / Revised 03-23 Printed in USA Copyright Meritor, Inc., 2023 Page 23... -
Page 28: Remove The Brake Assembly And Spindle From The Knuckle
Remove the capscrews that secure the spindle to the steering knuckle. Figure 5.23. If the vehicle is equipped with ABS: Push the ABS sensor into the steering knuckle cavity. Figure 5.24. MM-0170 / Revised 03-23 (16579) Page 24 Copyright Meritor, Inc., 2023... -
Page 29: Remove The Steering Knuckle From The Axle Housing
Figure 5.27 Remove the lower knuckle cap and inspect the thrust bearing for wear or damage. Replace a worn or damaged thrust bearing at reassembly. Figure 5.28. (16579) MM-0170 / Revised 03-23 Printed in USA Copyright Meritor, Inc., 2023 Page 25... -
Page 30: Remove The Axle Shaft From The Axle Housing
STRAIGHT out Figure 5.30 of the carrier housing. Do not disassemble the joints, which will void the Meritor warranty. Figure 5.33. Remove the steering knuckle from the axle housing. The bushings will remain in the housing sockets. -
Page 31: Remove The Axle Shaft Without Removing The Steering Knuckle
Figure 5.34. Remove the Axle Differential Carrier Refer to Maintenance Manual 5A, Single Reduction Rear Differential Carriers for differential carrier maintenance and service information. (16579) MM-0170 / Revised 03-23 Printed in USA Copyright Meritor, Inc., 2023 Page 27... -
Page 32: Section 6: Prepare Parts For Assembly
• Use a knife, if required, to remove gasket material from parts. Be preventive material to all machined surfaces. Store the parts in a careful not to damage the ground or polished surfaces. special paper or other material that prevents corrosion. MM-0170 / Revised 03-23 (16579) Page 28 Copyright Meritor, Inc., 2023... -
Page 33: Oil Seals And O-Rings
• Deep cracks or breaks appear in the surfaces of the cup, cone, 1003020a inner race, or rollers. Figure 6.2. Figure 6.4 • The cup and cone inner race surfaces touching the roller are damaged. Figure 6.5. (16579) MM-0170 / Revised 03-23 Printed in USA Copyright Meritor, Inc., 2023 Page 29... - Page 34 A bent axle beam reduces axle strength, affects in the driveline assembly. Imbalance or vibration can cause vehicle operation, and voids Meritor’s warranty. Death or serious component wear, which can result in separation of the driveline personal injury and damage to components can result.
-
Page 35: Repair Or Replace Parts
A bent axle beam reduces axle strength, affects • If tie rod ends have grease fittings, check fittings for wear and vehicle operation, and voids Meritor’s warranty. Death or serious damage. Replace worn or damaged fittings. If a grease fitting is personal injury and damage to components can result. -
Page 36: Fasteners
® , Meritor The silicone gasket products listed in the table below or their adhesive, or Loctite 277 adhesive, use the following procedure. ® equivalent can be used on Meritor components. CAUTION Table A: Silicone Gasket Products Product Name Description Use a heat gun to slowly heat fasteners for removal. -
Page 37: Yoke Cleaning And Inspection
Use a correct yoke puller tool to remove the yoke. NOTE: The unitized seal features a rubber inner sleeve designed All current Meritor axles feature helical splines at the yoke to seal and rotate with the yoke. This feature allows the yoke to be interface. -
Page 38: Carrier-To-Housing Joint Cleaning Procedure
0.003” dry and free of foreign matter. The surfaces must not be oily (0.076 mm) or greater. Figure 6.16. to the touch. Figure 6.13, Figure 6.14, and Figure 6.15. MM-0170 / Revised 03-23 (16579) Page 34 Copyright Meritor, Inc., 2023... - Page 39 Dry the housing and carrier faces. Use a M12 x 1.75 bottoming tap to clean all old Dri-Loc ® from the threaded holes in the axle housing. (16579) MM-0170 / Revised 03-23 Printed in USA Copyright Meritor, Inc., 2023 Page 35...
-
Page 40: Section 7: Assembly And Installation - Mx-120 And Mx-120-Hr Series
Use a correct size sleeve or driver. Refer to Section 13 Special Tools on page 81 for seal driver tool specifications. UPPER WELCH PLUG NOTCH SEAL 4018586a Figure 7.2 BUSHING 4000045b Figure 7.1 MM-0170 / Revised 03-23 (16579) Page 36 Copyright Meritor, Inc., 2023 Printed in USA... -
Page 41: Install The Axle Shaft And Assemble The Steering Knuckle
Install the axle shaft double-cardan joint assembly into the housing. Carefully align the inner shaft splines with the splines of the differential side gear. Figure 7.7. (16579) MM-0170 / Revised 03-23 Printed in USA Copyright Meritor, Inc., 2023 Page 37... - Page 42 (420-542 N m). b. Tighten the upper knuckle cap bolt to 500-600 lb-ft (678-881 N m). Turn the knuckle back and forth to verify that it travels freely. MM-0170 / Revised 03-23 (16579) Page 38 Copyright Meritor, Inc., 2023 Printed in USA...
-
Page 43: Check Steering Knuckle Rotational Torque
Figure 7.12 through the steering knuckle. The following procedure has been developed to aid in the installation process. (16579) MM-0170 / Revised 03-23 Printed in USA Copyright Meritor, Inc., 2023 Page 39... -
Page 44: Assemble The Spindle, Brake Assembly And Dust Shield On The Steering Knuckle
Install the brake spider onto the spindle. Fasten all parts to the knuckle with 12 capscrews and washers. Tighten to specification. Refer to Section 12 Specifications on page 77. Figure 7.17 and Figure 7.18. MM-0170 / Revised 03-23 (16579) Page 40 Copyright Meritor, Inc., 2023... -
Page 45: Install The Wheel Bearings Into The Hub
If a press is not available: Use a brass hammer. Inspect the wheel bearings for wear or damage. Refer to Section 6 for instructions. (16579) MM-0170 / Revised 03-23 Printed in USA Copyright Meritor, Inc., 2023 Page 41... -
Page 46: Install The Hub Onto The Axle
Check the end play with a dial indicator. Refer to Check and Adjust Wheel Bearings on page 58. Perform one of the following actions based on the end play result. MM-0170 / Revised 03-23 (16579) Page 42 Copyright Meritor, Inc., 2023... -
Page 47: Adjust The Wheel Speed Sensors On Units Equipped With Abs
Install the drive flange onto the hub and fasten with washers and capscrews. Figure 7.25. Tighten to specification. Refer to Section 12 Specifications on For complete maintenance and service procedures for Meritor anti-lock braking systems, refer to Maintenance Manual 28, Anti- page 77. -
Page 48: Assemble The Slack Adjuster
Install the slack adjuster washers at the adjuster end of the camshaft. Figure 7.30. Use as many washers as required to For complete maintenance and service procedures for Meritor’s keep slack end play at 0.060-inch (1.5 mm) maximum. automatic slack adjusters, refer to... -
Page 49: Adjust The Brakes
Figure 7.32. Refer to Maintenance Manual 4, Cam Brakes and Automatic Slack Adjusters for complete brake adjustment procedures. 4000064b Figure 7.32 (16579) MM-0170 / Revised 03-23 Printed in USA Copyright Meritor, Inc., 2023 Page 45... -
Page 50: Section 8: Assembly And Installation - Mx-120-Evo Series
Use a correct size sleeve or driver. Refer to Section 13 Special Tools on page 81 for a tool drawing. UPPER WELCH NOTCH PLUG 4018586a BUSHING Figure 8.2 SEAL 4021423a Figure 8.1 MM-0170 / Revised 03-23 (16579) Page 46 Copyright Meritor, Inc., 2023 Printed in USA... -
Page 51: Install The Axle Shaft And Assemble The Steering Knuckle
Install the axle shaft double-cardan joint assembly into the housing. Carefully align the inner shaft splines with the splines of the differential side gear. Figure 8.7. (16579) MM-0170 / Revised 03-23 Printed in USA Copyright Meritor, Inc., 2023 Page 47... - Page 52 (0.127-0.381 mm). Remove or add shims from between the upper knuckle cap/steering arm and the axle housing to obtain the correct end play. Figure 8.12. 4000040a Figure 8.9 MM-0170 / Revised 03-23 (16579) Page 48 Copyright Meritor, Inc., 2023 Printed in USA...
-
Page 53: Check Steering Knuckle Rotational Torque
Turn the knuckle back and forth. Check the torque again. b. Check the trunnion for damage. c. Check the knuckle assembly end play. (16579) MM-0170 / Revised 03-23 Printed in USA Copyright Meritor, Inc., 2023 Page 49... -
Page 54: Assemble The Spindle, Brake Assembly And Dust Shield To The Steering Knuckle
Figure 8.19 On units equipped for ABS, route the ABS cable to the back side of the knuckle. Install the ABS sensor into the clip in the spindle Figure 8.20. MM-0170 / Revised 03-23 (16579) Page 50 Copyright Meritor, Inc., 2023... -
Page 55: Install The Wheel Bearings Into The Hub
BOTTOM. Figure 8.24. a. Align the grooves on the studs with the grooves in the stud holes in the hub. b. Press the studs into position. (16579) MM-0170 / Revised 03-23 Printed in USA Copyright Meritor, Inc., 2023 Page 51... -
Page 56: Install The Hub Onto The Axle
Install the adjusting nut. Use a torque wrench to tighten the Tools on page 81 for seal driver tool specifications. adjusting nut to 100 Ib-ft (136 N m). Figure 8.27. MM-0170 / Revised 03-23 (16579) Page 52 Copyright Meritor, Inc., 2023... -
Page 57: Adjust The Wheel Speed Sensors On Units Equipped With Abs
Assembly and Installation – MX-120-EVO Series Adjust the Wheel Speed Sensors on Units Equipped with ABS For complete maintenance and service procedures for Meritor anti-lock braking systems, refer to Maintenance Manual 28, Anti- Lock Braking Systems (ABS) for Trucks, Tractors and Buses — C... -
Page 58: Assemble The Slack Adjuster
Add oil to the hub per the Hub Fill Procedure in Wheel Hub Oil Fill on page 66. WASHER Assemble the Slack Adjuster CAPSCREW For complete maintenance and service procedures for Meritor’s automatic slack adjusters, refer to Maintenance Manual 4, Cam Brakes and Automatic Slack Adjusters. - Page 59 Tighten the nut on the push rod to the clevis pin to specification. Refer to Section 12 Specifications on page 77. Connect the air lines to the brake chambers. 4000062b Figure 8.35 (16579) MM-0170 / Revised 03-23 Printed in USA Copyright Meritor, Inc., 2023 Page 55...
-
Page 60: Adjust The Brakes
Maintenance Manual 1, Preventive Maintenance and Lubrication for lubricant specifications. Adjust the Brakes Refer to Maintenance Manual 4, Cam Brakes and Automatic Slack Adjusters for complete brake adjustment procedures. MM-0170 / Revised 03-23 (16579) Page 56 Copyright Meritor, Inc., 2023 Printed in USA... -
Page 61: Section 9: Adjustment
Verify that the leaf springs are not worn or damaged. pressure relief in the power steering system. Verify that the bushings in the leaf springs are not worn or damaged. (16579) MM-0170 / Revised 03-23 Printed in USA Copyright Meritor, Inc., 2023 Page 57... -
Page 62: Check And Adjust Wheel Bearings
A bent axle beam reduces axle strength, affects vehicle Figure 9.1 operation and voids Meritor’s warranty. Serious personal injury and damage to components can result. Measure the end play by pushing and pulling on each side of the hub or drum while looking at the indicator. -
Page 63: Maximum Turn Angle
Remove the jam nut and lock ring. Tighten the adjusting nut 1/16 turn by turning the adjusting nut to align with the next hole. Do not flip the lock ring. (16579) MM-0170 / Revised 03-23 Printed in USA Copyright Meritor, Inc., 2023 Page 59... -
Page 64: Turning Radius Angle
A bent axle beam reduces axle strength, affects vehicle Check the turning radius angle with the radius plates on the operation and voids Meritor’s warranty. Serious personal injury alignment equipment. To determine the correct turning radius angle and damage to components can result. -
Page 65: Caster Angle
The table above shows the specifications Meritor’s warranty. Death or serious personal injury and damage Meritor builds into an axle, but always use the vehicle to components can result. manufacturer’s specifications. - Page 66 Repeat Step 6 for the front of the tires. To obtain the toe measurement, subtract the distance between the front of the tires from the distance between the back of the tires. Figure 9.9. MM-0170 / Revised 03-23 (16579) Page 62 Copyright Meritor, Inc., 2023...
-
Page 67: Section 10: Troubleshooting
Severe operating conditions Increase the frequency of inspection and lubrication intervals. Damaged boot on tie rod end Replace the boot. (16579) MM-0170 / Revised 03-23 Printed in USA Copyright Meritor, Inc., 2023 Page 63... - Page 68 Vibration or shimmy of front axle during Caster out-of-adjustment Adjust the caster. operation. Wheels or tires out-of-balance Balance or replace the wheels and tires. Worn shock absorbers Replace the shock absorbers. MM-0170 / Revised 03-23 (16579) Page 64 Copyright Meritor, Inc., 2023 Printed in USA...
-
Page 69: Section 11: Lubrication And Maintenance
Damage to components can result. Magnets and Magnetic Drain Plugs Many Meritor axles have a tapped hole in the housing for the Meritor front driving axles are equipped with magnetic drain plugs installation of a lubricant temperature indicator that will help reduce that have a minimum pickup capacity of 1.5 pounds... -
Page 70: Drain And Replace The Axle Oil
Install the drain/fill plug and tighten to 51-59 lb-ft Park the vehicle on a level surface. Place blocks under (69-80 Nm). the wheels not being serviced to prevent the vehicle from moving. MM-0170 / Revised 03-23 (16579) Page 66 Copyright Meritor, Inc., 2023 Printed in USA... -
Page 71: Knuckle King Pins
150 psi (1035 kPa). Grease should purge from the holes near the boot crimp or bellows area, usually at three or more places. Wipe away excess grease. Figure 11.5. (16579) MM-0170 / Revised 03-23 Printed in USA Copyright Meritor, Inc., 2023 Page 67... -
Page 72: Wheel Bearings And Hub Seal
If new grease still does not purge at the seal, replace the tie rod end. If the tie rod assembly has been in operation on the vehicle (not new), replace both tie rod ends as a set. MM-0170 / Revised 03-23 (16579) Page 68 Copyright Meritor, Inc., 2023... -
Page 73: Front Drive Axle Greasing Intervals And Specifications
See note above. *For continuous heavy-duty operation, check the oil level every 1,000 miles (1600 km). Add the correct type and amount of oil as required. (16579) MM-0170 / Revised 03-23 Printed in USA Copyright Meritor, Inc., 2023 Page 69... -
Page 74: Lubricant Specifications
A bent axle beam reduces axle strength, affects Axle vehicle operation and voids Meritor’s warranty. Death or serious personal injury and damage to components can result. Inspect the axle for oil and grease leaks daily. Repair as necessary. -
Page 75: Checking The Steering Knuckle Vertical End Play
Figure 11.8. Use a jack to raise the vehicle until the front wheels are off the ground. Support the front axle with safety stands. (16579) MM-0170 / Revised 03-23 Printed in USA Copyright Meritor, Inc., 2023 Page 71... - Page 76 Raise the vehicle so that the wheels to be serviced are off the ground. Support the vehicle with safety stands. Remove the wheel and tire. Remove the hubcap. MM-0170 / Revised 03-23 (16579) Page 72 Copyright Meritor, Inc., 2023...
- Page 77 Check for cracking or tears in the boot. Also check the boot seals for damage. Replace the entire tie rod end if the boot is damaged or missing. Figure 11.11. (16579) MM-0170 / Revised 03-23 Printed in USA Copyright Meritor, Inc., 2023 Page 73...
- Page 78 The tie rod end must be visible the entire length of the cross tube slot. Figure 11.13. MM-0170 / Revised 03-23 (16579) Page 74 Copyright Meritor, Inc., 2023...
- Page 79 If either clamp has become welded to the cross tube: Replace the entire cross tube assembly. Use original equipment parts of the same length, diameter and threads. (16579) MM-0170 / Revised 03-23 Printed in USA Copyright Meritor, Inc., 2023 Page 75...
- Page 80 PIVOT WEAR (406 N m): Remove the bolts, clean all threads and install BALL/STUD new Loctite 680 sealant, Meritor part number 2297-K- ® 5523. Tighten the bolts to 300-450 lb-ft (406-610 Nm). Check the steering arm bolt torque every 200,000 miles (320 000 km) or 24 months, whichever comes first.
-
Page 81: Section 12: Specifications
Specifications Specifications MX-120 and MX-120-HR Series 4000017d Figure 12.1 (16579) MM-0170 / Revised 03-23 Printed in USA Copyright Meritor, Inc., 2023 Page 77... - Page 82 Housing Drain Plug 3/4-14 35 minimum (47.5) Spring Plate Bolt 1/2-13 100-115 (136-156) Carrier Bolts 1/2-13 110-120 (149-165) Pinion Nut M32 x 1.5 (metric) 700-900 (950-1220) MM-0170 / Revised 03-23 (16579) Page 78 Copyright Meritor, Inc., 2023 Printed in USA...
-
Page 83: Mx-120-Evo Series
Specifications MX-120-EVO Series 4011512d Figure 12.2 (16579) MM-0170 / Revised 03-23 Printed in USA Copyright Meritor, Inc., 2023 Page 79... - Page 84 3/4-14 35 minimum (47.5) Carrier Bolts 1/2-13 110-120 (149-163) Pinion Nut M32 x 1.5 (metric) 700-900 (950-1220) Hub Oil Fill/Drain Plug M22 x 1.5 51-59 (69-80) MM-0170 / Revised 03-23 (16579) Page 80 Copyright Meritor, Inc., 2023 Printed in USA...
-
Page 85: Section 13: Special Tools
R 0.062" (1.515 MM) 0.350" (8.89 MM) 0.0313" (0.795 MM) 0.925" (23.495 MM) x 45° CHAMFER ±0.015" (0.381 MM) 1.375" (34.925 MM) ±0.031" (0.788 MM) 4003601a Figure 13.1 (16579) MM-0170 / Revised 03-23 Printed in USA Copyright Meritor, Inc., 2023 Page 81... -
Page 86: Hub Seal Driver
IN THIS LOCATION (12.7 MM) 5.62" 0.06" X 45° (142.748 MM) USE FOR SEAL, PART NUMBER A-1205-P-2434 SECTION X-X SEAL DRIVER TOOL 3256-M-1287 4011329a Figure 13.2 MM-0170 / Revised 03-23 (16579) Page 82 Copyright Meritor, Inc., 2023 Printed in USA... -
Page 87: Bushing Driver
45° X 0.06" (1.5 MM) 1.97" 2.62 ± 0.004" 3.54" Ø(50 MM) Ø(66.500 ± 0.100 MM) Ø(90.00 MM) NO RADIUS ALLOWED 4007956b UNDERCUT ALLOWED Figure 13.3 (16579) MM-0170 / Revised 03-23 Printed in USA Copyright Meritor, Inc., 2023 Page 83... - Page 88 Information contained in this publication was in effect at the time the publication was approved for printing and is subject to change without notice or liability. 2135 West Maple Road Meritor Heavy Vehicle Systems, LLC, reserves the right to revise the information presented or to discontinue the production of parts described at any time. Troy, MI 48084 USA...
Need help?
Do you have a question about the MM-0170 and is the answer not in the manual?
Questions and answers