Opentrons Heater-Shaker Module GEN1 Quick Start Manual
Hide thumbs
Also See for Heater-Shaker Module GEN1:
- Manual (17 pages) ,
- Instruction manual (22 pages) ,
- Quick start manual (16 pages)

Subscribe to Our Youtube Channel
Related Manuals for Opentrons Heater-Shaker Module GEN1


Summary of Contents for Opentrons Heater-Shaker Module GEN1
- Page 1 Heater-Shaker Module GEN1 Quickstart Guide Opentrons Labworks Inc. Edition GEN1, August 2022...
- Page 2 — to ensure that it does not dislodge itself from the deck of your robot. See the “Attaching to deck” section of this Quickstart Guide or the on-screen instructions in the Opentrons App for details on how to anchor the module.
-
Page 3: Table Of Contents
Table of Contents Product Elements – Included Box Contents / Parts & Accessories – Thermal Adapters Setup Instructions Resources – Maintenance – Support – App Download Product and Manufacturer Description – Product Description – Manufacturer Description... -
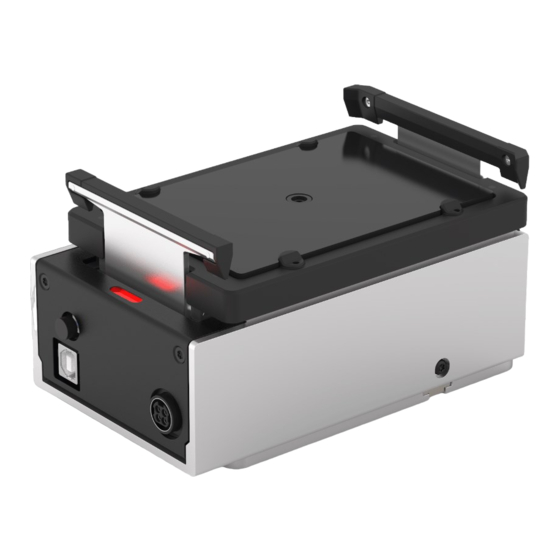
Page 4: Product Elements
INCLUDED BOX CONTENTS / PARTS & ACCESSORIES ◾ (1) Power Supply ◾ (1) Power Cable ◾ (1) USB Cable ◾ (1) T10 Torx Screwdriver ◾ (1) T10 Torx L Key ◾ (1) M3x7 Thermal Adapter Screw (plus spares) HEATER-SHAKER MODULE GEN1... -
Page 5: Thermal Adapters
THERMAL ADAPTOR SCREW (plus spares) THERMAL ADAPTERS A compatible thermal adapter is required for adding labware to the Heater-Shaker Module. Adapters can be purchased directly from Opentrons at https://shop.opentrons.com. Universal Flat PCR Adapter Deep Well Flat Bottom UNIVERSAL FLAT PLATE ADAPTOR... -
Page 6: Setup Instructions
The screws should come out of the module. ATTACHING TO DECK Choose which slot you will place the Heater-Shaker Module in. Slots 1, 3, 4, 6, 7, and 10 are supported. HEATER-SHAKER MODULE GEN1... - Page 7 Setup Instructions Place the module in the slot such that the power and USB ports are facing outward, i.e. to the left in slot 1, 4, 7, or 10; to the right in slot 3 or 6. Hold the module flat against the deck and turn the screws clockwise to extend the anchors.
- Page 8 Using a different screw can damage the module. Check the alignment of the thermal adapter. If properly attached, it will sit evenly on the module. Check that the adapter is firmly attached by rocking it back and forth. HEATER-SHAKER MODULE GEN1...
- Page 9 USB port at the back of the robot. Use the cable holders on the side of the robot to keep the USB cable out of the way. Power on the robot and launch the Opentrons App. If you successfully connected your module, it will appear in the Pipettes and Modules section on your robot’s device...
-
Page 10: Resources
Opentrons Support. SUPPORT Opentrons Help Center Answers to many common questions are available on the Opentrons Help Center at https://opentrons.com/support. Contact Opentrons If you have any other questions, contact support@opentrons.com. Please have the serial numbers of your module and robot available when contacting Opentrons Support. -
Page 11: Product And Manufacturer Description
Product and Manufacturer Description PRODUCT DESCRIPTION The Opentrons Heater-Shaker Module provides on-deck heating and orbital shaking. The module can be heated to 95 °C, and can shake samples from 200 to 3000 rpm. Completed Certifications IEC, FCC, RoHS Recommended Operating Conditions Environmental temperature: 20–25 °C... - Page 12 For a PDF of the complete Opentrons Heater-Shaker Module GEN1 Instruction Manual, scan this QR code:...
Need help?
Do you have a question about the Heater-Shaker Module GEN1 and is the answer not in the manual?
Questions and answers