Opentrons GEN1 Quick Start Manual
Heater-shaker module
Hide thumbs
Also See for GEN1:
- Manual (17 pages) ,
- Instruction manual (22 pages) ,
- Quick start manual (12 pages)
Table of Contents
Advertisement
Quick Links
Advertisement
Table of Contents

Related Manuals for Opentrons GEN1


Summary of Contents for Opentrons GEN1
- Page 1 Heater-Shaker Module GEN1 Quickstart Guide Opentrons Labworks Inc. September 2023...
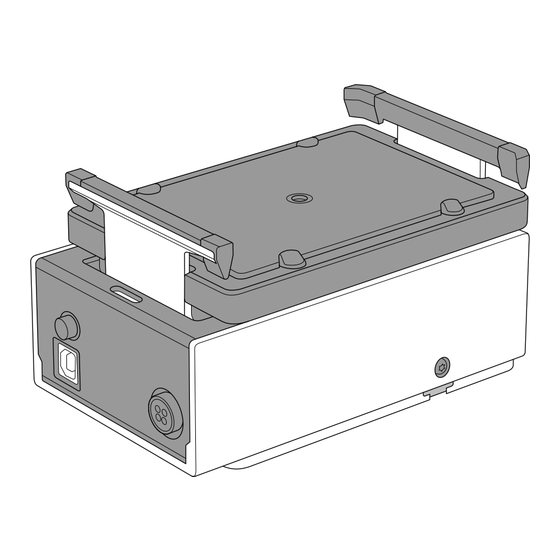
- Page 2 The module can be heated to 95 °C, and can shake samples from 200 to 3000 rpm. The Heater-Shaker is compatible with the Opentrons Flex and Opentrons OT-2 liquid handling robots. Post-sales service & contacting Opentrons If you have any questions about the use of the system, abnormal phenomena, or special needs, please contact: support@opentrons.com.
-
Page 3: Table Of Contents
Table of Contents Product Elements – Box Contents – Thermal Adapters – Flex Caddies Before You Begin – Deck Placement and Cable Alignment – Anchor Adjustments Flex Attachment Steps OT-2 Attachment Steps Attaching the Thermal Adapter Additional Product Information – Maintenance –... -
Page 4: Product Elements
BOX CONTENTS (1) T10 Torx Screwdriver TORX SCREW DRIVER (1) Power Supply POWER SUPPLY (1) T10 Torx L Key (1) M3x7 Thermal Adapter Screw (1) Power Cable (1) USB Cable THERMAL ADAPTOR SCREW IEC CONNECTOR (plus spares) HEATER-SHAKER MODULE GEN1... -
Page 5: Thermal Adapters
THERMAL ADAPTERS The Heater-Shaker requires a thermal adapter to hold your labware. You can purchase adapters directly from Opentrons at shop.opentrons.com. Universal Flat Adapter PCR Adapter UNIVERSAL FLAT PLATE ADAPTOR PCR PLATE ADAPTOR Deep Well Adapter Flat Bottom Adapter DEEP WELL PLATE ADAPTOR... -
Page 6: Flex Caddies
See the Modules chapter in the Flex Instruction Manual for more information. On/Off switch Handle The OT-2 does not use caddies. Modules clip directly to the deck. Module caddies are available for purchase at shop.opentrons.com. HEATER-SHAKER MODULE GEN1... -
Page 7: Before You Begin
Flex In any deck slot in column 1 or 3. The module can go in slot A3, but you need to move the trashbinfirst. OT-2 In deck slot 1, 3, 4, 6, 7, or 10. Flex OT-2 HEATER-SHAKER MODULE GEN1... - Page 8 Facing left in slot 1, 4, 7, or 10. ◾ Facing right in slot 3 or 6. ◾ Do not install the Heater-Shaker with the ports facing in, towards the middle of the deck. This alignment makes cable routing and access difficult. HEATER-SHAKER MODULE GEN1...
-
Page 9: Anchor Adjustments
Check the anchors to make sure they’re level with the base of the ◾ Heater-Shaker. If the anchors interfere with installing the module, adjust them ◾ until there’s enough clearance to seat the module and then tighten them to hold it in place. HEATER-SHAKER MODULE GEN1... -
Page 10: Flex Attachment Steps
If you successfully connected the module, it will appear in the Pipettes and Modules section on your robot’s device detail page in the Opentrons App. From there, you can control the module’s labware latch or run a test shake. HEATER-SHAKER MODULE GEN1... -
Page 11: Ot-2 Attachment Steps
If you successfully connected the module, it will appear in the Pipettes and Modules section on your robot’s device detail page in the Opentrons App. From there, you can control the module’s labware latch or run a test shake. HEATER-SHAKER MODULE GEN1... -
Page 12: Attaching The Thermal Adapter
Heater-Shaker. The module latches must be open before installing the thermal adapter. You can open the latches via the module card for the Heater-Shaker in the Opentrons App. To attach a thermal adapter to the module: Use the T10 Torx screwdriver and thermal adapter screw to fasten your adapter to the module. - Page 13 Check the alignment of the thermal adapter. The adapter sits evenly on the module when attached properly. Checkthattheadapterisfirmlyattachedbyrockingitbackand forth. It’s secure if it doesn’t move. HEATER-SHAKER MODULE GEN1...
-
Page 14: Additional Product Information
Please have the Heater-Shaker’s serial number available when contactingsupport.Youcanfindtheserialnumberonthebottomof the module or in the Opentrons App. On the Heater-Shaker card in the Pipettes and Modules section of your robot’s device detail page, click the three-dot menu (⋮) and then About. -
Page 15: Completed Certifications
COMPLETED CERTIFICATIONS IEC, FCC, RoHS RECOMMENDED OPERATING CONDITIONS Environmental temperature: 20–25 °C Environmental humidity: 80% maximum MANUFACTURER DESCRIPTION Opentrons Labworks Inc 45-18 Ct Square W Long Island City, NY 11101 HEATER-SHAKER MODULE GEN1... - Page 16 For more information, download the complete Opentrons Heater-Shaker Module GEN1 Instruction Manual from the Opentrons Knowledge Hub.
Need help?
Do you have a question about the GEN1 and is the answer not in the manual?
Questions and answers