Opentrons Thermocycler GEN2 Instruction Manual
Hide thumbs
Also See for Thermocycler GEN2:
- Quick start manual (12 pages) ,
- Instruction manual (23 pages)
Table of Contents
Advertisement
Quick Links
Advertisement
Table of Contents

Related Manuals for Opentrons Thermocycler GEN2


Summary of Contents for Opentrons Thermocycler GEN2
- Page 1 Thermocycler GEN2 Instruction Manual Opentrons Labworks Inc. January 2024...
-
Page 2: Table Of Contents
Table of Contents Product and Manufacturer Description - Product Description - Manufacturer Description Safety Information and Regulatory Compliance - Safe Use Specifications - Safety Warning Labels - Instrument Safety Warnings - Standards Compliance Product Specifications - Model Number - Included Parts - Physical Specifications - Temperature Profile - LED Status Light - Emergency Lid Opening - Deck Placement and Cable Alignment Before You Begin... -
Page 3: Product And Manufacturer Description
Product and Manufacturer Description PRODUCT DESCRIPTION The Opentrons Thermocycler Module GEN2 is a fully automated on-deck thermocycler, providing hands-free PCR in a 96-well plate format. Its heated lid and disposable seal fit tightly over the plate, ensuring efficient sample heating and minimal evaporation. MANUFACTURER DESCRIPTION Opentrons Labworks Inc 45-18 Ct Square W Long Island City, NY 11101... -
Page 4: Safety Information And Regulatory Compliance
Safety Information and Regulatory Compliance Opentrons recommends that you follow the safe use specifications listed in this section and throughout this manual. SAFE USE SPECIFICATIONS Input and Output Connections The Thermocycler has the following power input requirements, which are met by the included power supply. - Page 5 The following table lists and defines standards for recommended use, acceptable use, and storage. Operating Conditions Description Recommended Opentrons has validated the Thermocycler’s performance in the conditions recommended for system operation. Operating the Thermocycler in these conditions helps provide optimal results. Acceptable The Thermocycler is safe to use in conditions acceptable for system operation, but results may vary.
- Page 6 If you notice condensation on the Thermocycler’s plate after use, remove any labware from the module. Use the Opentrons App to set a temperature of 40 °C until the condensation is no longer visible. Software requirements The Thermocycler requires version 6.2.0 (or higher) of the Opentrons...
-
Page 7: Safety Warning Labels
SAFETY WARNING LABELS Warning symbols posted on the Opentrons Thermocycler and in this manual warn you about sources of potential injury or harm. The following table lists and defines each safety warning symbol. Symbol Description CAUTION: Risk of danger! This symbol identifies instrument components that pose a risk of personal injury or instrument damage if improperly handled. -
Page 8: Instrument Safety Warnings
CAUTION: Warning about risk of harm to body or equipment from electrical shock. Do not attempt to repair or remove the outer case of the Opentrons Thermocycler or its power supply unless directed by Opentrons Support. Attempting to do so puts you at risk of electrical shock. -
Page 9: Standards Compliance
STANDARDS COMPLIANCE The Thermocycler has been tested and found to be in compliance with all applicable requirements of the following safety and electromagnetic standards. Safety IEC/UL/CSA 61010-1 Safety Requirements for Electrical � Equipment for Measurement, Control, and Laboratory Use– Part 1: General Requirements IEC/UL/CSA 61010-2-010 Particular Requirements for �... - Page 10 FCC Warnings and Notes Warning: Changes or modifications to this unit not expressly approved by Opentrons could void the user’s authority to operate the equipment. This device complies with part 15 of the FCC Rules. Operation is subject to the following two conditions: This device may not cause harmful interference.
-
Page 11: Product Specifications
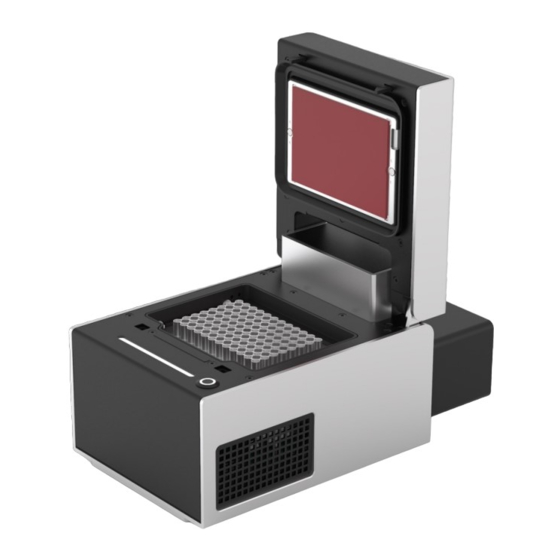
LED Strip Automated Lid Exhaust Duct Well Plate Block Air Intake Vents Plate Lift Mechanism Lid/Plate Lift Button MODEL NUMBER TCG2 INCLUDED PARTS (1) Thermocycler (1) Power Supply and Power Supply Connector (1) Power Cable (1) USB Cable (5) Rubber Automation (10) Opentrons Tough Seals PCR Plates THERMOCYCLER MODULE GEN2... -
Page 12: Physical Specifications
PHYSICAL SPECIFICATIONS Dimensions with lid open 244.95 mm L x 172 mm W x 310.1 mm H Dimensions with lid closed 244.95 mm L x 172 mm W x 170.25 mm H Weight 8.4 kg (including rear duct) TEMPERATURE PROFILE Thermal Block Range: 4–99 °C �... -
Page 13: Emergency Lid Opening
Warning: The status LED displays solid white whenever the module is not actively heating or cooling, regardless of its current temperature. Handle with caution. The module may still be hot to the touch. EMERGENCY LID OPENING In case of a power outage, connectivity issue, or other electrical failure, the Thermocycler lid may not open. -
Page 14: Before You Begin
The OT-2 does not use caddies. Modules clip directly to the deck. Also, the Thermocycler ships with a short exhaust duct, which is used by the OT-2 only. The module will not fit properly in its caddy with the OT-2 duct attached. Module caddies are available for purchase at shop.opentrons.com. THERMOCYCLER MODULE GEN2... -
Page 15: Anchor Adjustments
ANCHOR ADJUSTMENTS Anchors are screw-adjustable panels on the Thermocycler caddy. They provide the clamping force that secures the module to its caddy. Use a 2.5 mm screwdriver to adjust the anchors. To loosen/extend the anchors, turn the screws � counterclockwise. To tighten/retract the anchors, turn the screws clockwise. -
Page 16: Ventilation Clearance
DECK PLACEMENT AND CABLE ALIGNMENT The supported deck slot positions for the Thermocycler depend on the robot you’re using. Robot Model Deck Placement Flex Requires deck slots A1, B1, and the A1 expansion slot. OT-2 Requires deck slots 7, 8, 10, and 11. To properly align the module relative to the robot, make sure its exhaust port faces to the rear (away from the center of the deck). - Page 17 For OT-2 ventilation, Opentrons recommends using the side and rear window panels shown below. These panels are included with newer OT-2 models. If you have an older OT-2 and need these panels, contact us at support@opentrons.com. 2x Side Panels 1x Rear Panel...
-
Page 18: Flex Installation Steps
Flex Installation Steps Setting up the Thermocycler on your robot includes attaching it to the deck and running a first-time calibration process. The instructions here and on the touchscreen will help you get started. The tools you need are included in the User Kit that came with your Flex. ATTACHING THE THERMOCYCLER Use a 2.5 mm hex screwdriver to remove the A1 expansion slot plate and the A1 and B1 deck slot plates. -
Page 19: Calibrating The Thermocycler
When successfully connected, the module appears in the Pipettes and Modules section on your robot’s device detail page in the Opentrons App. Next, you’ll calibrate the module. CALIBRATING THE THERMOCYCLER You need to calibrate the Thermocycler after attaching it for the first time. To calibrate the Thermocycler, turn on the power supply. -
Page 20: Ot-2 Attachment Steps
OT-2 Attachment Steps To attach the Thermocycler to your OT-2: Use a 2.5 mm hex screwdriver or L-key to attach the exhaust duct to the back of the module. Use the two included screws, one on either side of the duct. Using both hands, lift the module carefully, set it in its supported deck location and press gently into place. - Page 21 When successfully connected, the module appears in the Pipettes and Modules section on your robot’s device detail page in the Opentrons App. The module is ready to use and does not require calibration on an OT-2. THERMOCYCLER MODULE GEN2...
-
Page 22: Attaching The Rubber Automation Seal
Attaching the Rubber Automation Seal Your Thermocycler uses a rubber automation seal to help reduce evaporation. The module ships with a seal and Opentrons Tough well plate already installed, along with replacement seals and well plates. Discard the pre-installed seal and well plate before using the Thermocycler. -
Page 23: Maintenance
Maintenance Users should not attempt to service or repair the Thermocycler themselves. If you have concerns about the module’s performance or require maintenance, please contact Opentrons Support. Cleaning The following table lists the chemicals you can use to clean your Thermocycler. - Page 24 Once you’ve prepared the module for cleaning: 1. Dampen a soft, clean cloth or paper towel with a cleaning solution. 2. Gently wipe off the module’s surfaces. 3. Use a cloth dampened with distilled water as a rinse wipe-down. 4. Let the module air dry. For information about cleaning the rubber seal, see the Attaching the Rubber Automation Seal section above.
-
Page 25: Additional Product Information
About. APP DOWNLOAD Control your liquid handling robot and modules using the Opentrons App. Download the app for Mac, Windows, or Linux at https://opentrons.com/ot-app. Post-sales service & contacting Opentrons If you have any questions about the use of the system, abnormal phenomena, or special needs, please contact: support@opentrons.com.
Need help?
Do you have a question about the Thermocycler GEN2 and is the answer not in the manual?
Questions and answers