Advertisement
Quick Links
SANKO Coating Thickness Meter
SWT-7000/7100
Instruction Manual
CAUTIONS:
Before using the Meter, read this INSTRUCTION MANUAL
thoroughly and use the Meter correctly.
Keep this INSTRUCTION MANUAL carefully and refer to this
when necessary.
In the event of any doubt arising, the original
INSTRUCTION MANUAL (Japanese) is to be of final authority.
SANKO ELECTRONIC LABORATORY CO., LTD.
Tokyo
Osaka
Nagoya
Fukuoka
Kawasaki
・
・
・
・
Advertisement

Related Manuals for SANKO SWT-7000

Summary of Contents for SANKO SWT-7000
- Page 1 Meter correctly. Keep this INSTRUCTION MANUAL carefully and refer to this when necessary. In the event of any doubt arising, the original INSTRUCTION MANUAL (Japanese) is to be of final authority. SANKO ELECTRONIC LABORATORY CO., LTD. Tokyo Osaka Nagoya Fukuoka Kawasaki ・...
-
Page 2: Table Of Contents
Contents Pages Attention for safety ・・・・・・・・・・・・・・・・・・・・・・・・・・・・・・・・・・・・・・・・・・・・・・・・・・・・・・・・・・・・・・ 1 Notes ・・・・・・・・・・・・・・・・・・・・・・・・・・・・・・・・・・・・・・・・・・・・・・・・・・・・・・・・・・・・・・・・・・・・・・・・・・ 3 Get started ・・・・・・・・・・・・・・・・・・・・・・・・・・・・・・・・・・・・・・・・・・・・・・・・・・・・・・・・・・・・・・・・・・・・・・ 4 ・ Contents in a package ・・・・・・・・・・・・・・・・・・・・・・・・・・・・・・・・・・・・・・・・・・・・・・・・・ 4 ・ Names of part ・・・・・・・・・・・・・・・・・・・・・・・・・・・・・・・・・・・・・・・・・・・・・・・・・・・・・・・・ 5 ・ How to fit batteries ・・・・・・・・・・・・・・・・・・・・・・・・・・・・・・・・・・・・・・・・・・・・・・・・・・・・ 6 ・ How connect, disconnect probes ・・・・・・・・・・・・・・・・・・・・・・・・・・・・・・・・・・・・・・・・・・ 7 ・... -
Page 3: Attention For Safety
Attention for safety (to use in correct ways) To prevent you and your properties from damaging please take some time to read thoroughly this “Attention for Safety” and correct uses keep these instructions attentive to read when necessary. Warning ● Do not dump nor wet the gauge unit in water, otherwise it may cause damages. Please contact our distributor or sales office should submerged water into the unit. - Page 4 Attention For Safety (to use safely and correctly) Warning ! ● Never fail to remove batteries from the unit when not in use for a long time. Leakages occurred from deterioration of batteries may cause erroneous reactions or damages. Must !...
-
Page 5: Notes
Attention For Safety (to use safely and correctly) Attention ● Do not use Benzene or Thinner for cleaning and spray pesticides on the meter, otherwise it may cause cracks or malfunctions. Prohibition ● Do not store the meter in places getting high in temperatures such as in a car in strong sunlight or near heaters, otherwise it will be hazardous to the meter and may cause malfunctions. -
Page 6: Get Started
Get started ◆ Contents in a package Main unit ・ SWT-7000, or SWT-7100 ・ Dry batteries R6P/AA (2 pieces) ・ Carrying case ・ Instruction manual (this manual) ・ Warranty/User resistor sheet (Available only in Japan) ・ AC adaptor (SWT-7100 only) ・... -
Page 7: Names Of Part
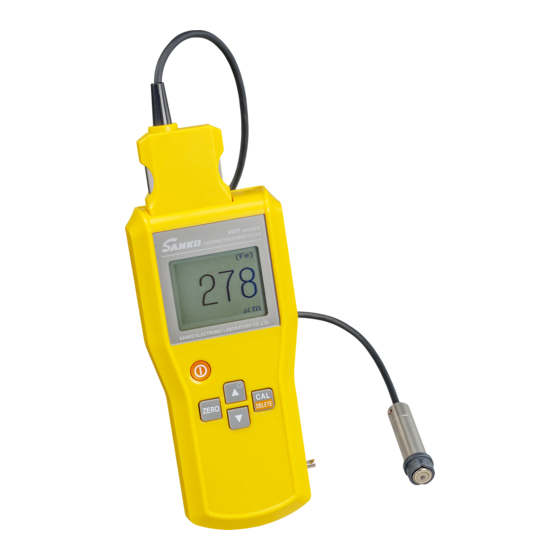
◆ Names of part Probe socket Display Hand strap Keys Battery compartment (the back) Socket for AC adaptor connector (SWT-7100 only) Socket for USB cable connector (SWT-7100 only) ● Probe socket Connect an optional-exclusive SWT probe to the probe socket. (1)... -
Page 8: How To Fit Batteries
◆ How to fit batteries ① Open the battery lid on the back of the unit. Press down and slide the lid in direction of arrow to open. ② Insert batteries. Ensure correct battery polarity ○ 、 ○ for placement. +... -
Page 9: How Connect, Disconnect Probes
◆ How connect, disconnect probes ◎ Connect an optional, exclusive SWT probe to the main unit Select one of the probes suited for your application. Insert a probe connector into the probe socket of the main unit. Make sure of aligning the keyway leading to a smooth joint without doing by force. Insert it to the extent that it is locked. -
Page 10: How To Hold Probes
◆ How to hold probes Cable Pinch and hold this part using fingers Black resinous ring Tip to press against a measurement object ◆ How to press a probe to an object ・ Keep the probe 5 cm or over away off metallic objects when not in use of measuring. ・... -
Page 11: How To Operate
How to operate (1) How to switch Power source Press ON/OFF key. START UP This message lasts for about 5 seconds. Caution PHASE Hold the probe in air without operation when Hold poobe the reading is on display. Or it may indicate in... -
Page 12: 3)Zeroing
(3) Zeroing It is capable of getting started on measurements immediately after the message of 「START UP PHASE」 has disappeared as described on page 9. However, it makes errors depending on material formation and shapes to be measured. To minimize measurement errors and obtain as accurate results as possible please be sure of carrying out 2 points of adjustments of 「Zeroing」... - Page 13 (Fe) The reading shows that 「Zeroing」 has completed and - it becomes possible to take measuring and adjusting operations of this unit. μm ● It is correct that numerical values measured by pressing the probe to the 「Zero Plate」 indicates 「0」 or in the neighborhood of 「0」.
-
Page 14: 4)Zeroing In Special Cases
(4)Zeroing in special cases (Multi-layers) Measuring the thickness of the 4 layer (4 layer) by zeroing at the 3 layer. (3 layer) (2 layer) (1 layer) Coating films Substrate material In case of being painted as shown with multi-layers on the substrate there may be needs to measure thicknesses of each layer. - Page 15 ZERO position is OFFSET. Press ZERO key twice while this message on the reading To continue ZERO adjustment, press Caution ZERO key twice successively. This message is indicated on display for about 10 seconds. If no ZERO key is pressed when the reading is on display, 「Zeroing」...
- Page 16 Remove the probe from 「Zero Plate」. Press ZERO key. The buzzer beeps. (Fe) - 「Zeroing」 has completed and it becomes possible to take measuring and adjusting operations of this unit. μm ● It is correct that numerical values measured by pressing the probe to the 「Zero Plate」 indicates 「0」 or in the neighborhood of 「0」.
-
Page 17: 5)Calibration Standard
(5)Calibration standard (CAL) ● Prepare 「Zero Plate」 used in 「Zeroing」. ● Prepare 「Thickness Standard」 which thicknesses is thicker or as thick as a measuring film. ● Place 「Thickness Standard」 on 「Zero Plate」. ● Press △ key or ▽ key. ▲ The buzzer emits a beeping sound. - Page 18 【Cal.w.foil】 When the reading message is indicated on display Use ▲ ▼ key, ( about 5 seconds), press ▲ key adjust displayed or ▼ key to equate a thickness value with value to the thickness 「Thickness Standard」 value of foil. Caution The message is indicated on the reading for about 5 seconds.
- Page 19 The buzzer beeps, beeps. [Cal.w.foil] Please wait under processing The buzzer beeps, beeps. (Fe) - μm It becomes possible to take measurement and adjusting operations. ● It is correct that numerical values measured by pressing the probe to the 「Thickness Standard」 on the 「Zero Plate」...
-
Page 20: Measuring
(6) How to delete calibration Take the following procedures to delete calibration when the reading on the screen is locked or after batteries replaced or when it becomes impossible to process 「Zeroing」、「Calibration Standard」(CAL). When holding ZERO key , press ▼ key.
Need help?
Do you have a question about the SWT-7000 and is the answer not in the manual?
Questions and answers