Table of Contents
Advertisement
Available languages
Available languages
Advertisement
Table of Contents

Related Manuals for Ivoclar Vivadent Programat EP 3000 G2


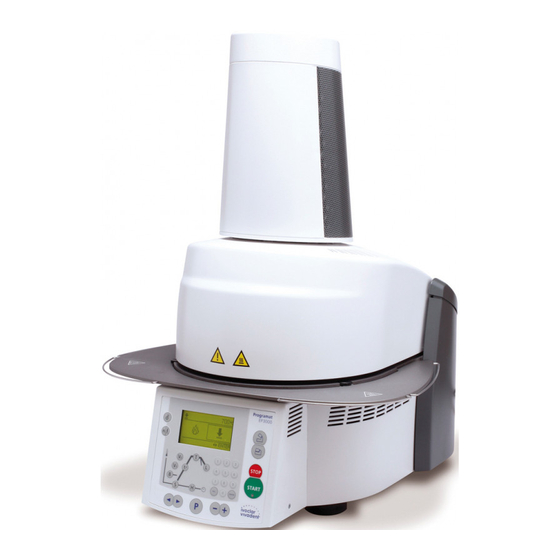
Summary of Contents for Ivoclar Vivadent Programat EP 3000 G2
- Page 1 Programat ® EP 3000 Operating Instructions...
-
Page 3: Table Of Contents
Table of Contents Views of the Furnace, List of Parts Introduction / Signs and Symbols 1.1 Preface 1.2 Introduction 1.3 Notes regarding the Operating Instructions 1.4 Notes on the different voltage versions Safety First 2.1 Indications 2.2 Health and safety instructions Product Description 3.1 Components 3.2 Hazardous areas and safety equipment 3.3 Functional description 3.4 Accessories Installation and Initial Start-Up... -
Page 4: Views Of The Furnace, List Of Parts
List of parts 1 Sealing surface 34 Cooling tray 2 Furnace head sealing ring 35 Screw for cooling tray 3 Insulation 36 Hood 4 Thermocouple 37 Knurled screw for hood 5 Firing plate 2 38 Air vents furnace head 6 Display 39 Air vents rear panel 7 Frame plate 40 Warnings 8 QTK heating muffle 41 Furnace head mounting mark 9 Housing base 42 Furnace base mounting mark 10 Keypad (membrane-sealed) 43 Furnace head mounting 11 On/Off switch 44 Quartz-glass tube... - Page 6 12 13 53 19 60 67 29...
- Page 7 Control unit: 70 Program key 71 ESC key 72 ENTER key 73 START key 74 Start LED 75 STOP key 76 Plus key 77 Minus key 78 Settings / Information 79 Cursor key right 80 Cursor key left 81 Stand-by temperature 82 Closing time 83 Temperature increase 84 Holding temperature 85 Holding time 86 Vacuum on 87 Vacuum off 88 Long-term cooling 89 Power Saving key 90 Open furnace head 91 Close furnace head 92 Numeric keys 93 Firing / Pressing 94 Home key 100 Programat firing tray 101 Metal pin A 102 Metal pin B 103 Metal pin C 110 USB data cable 115 Cooling grid (complete) 120 Automatic Temperature Checking Set 2 – ATK 2...
-
Page 8: Introduction / Signs And Symbols
1. Introduction / Signs and Symbols 1.3 Notes regarding the 1.1 Preface 1.2 Introduction Operating Instructions Dear Customer The signs and symbols in these Operating Instructions and on Thank you for having purchased the furnace facilitate the finding the Programat EP 3000/G2. It is of important points and have Furnace concerned: a state-of-the-art furnace for the following meanings: Programat EP 3000/G2 dental applications. Target group: Dental technologists Risks and dangers The furnace has been designed according to the latest industry These Operating Instructions standards. Inappropriate use facilitate the correct, safe, and may damage the equipment and economic use of the Programat Important be harmful to personnel. Please EP 3000/G2 furnace. -
Page 9: Safety First
2. Safety First This chapter is especially important for personnel who work with the 2.1.1 Programat EP 3000/G2 or who have to carry out maintenance or Risks and dangers repair work. This chapter must be read and the corresponding instructions followed. The furnace head should not be removed from the furnace base as long as the furnace head is con- 2.1 Indications nected by means of the heater cable. The Programat EP 3000/G2 must only be used to fire and/or press dental ceramic materials and it should be used for this purpose only. Other uses than the ones stipulated, e.g. cooking of food, f iring of other materials, etc., are contraindicated. The manufacturer does not 2.1.2 assume any liability for damage resulting from misuse. The user is solely responsible for any risk resulting from failure to observe these Risks and dangers Instructions. Make sure that no liquids or other Further instructions to assure proper use of the furnace: foreign objects enter the furnace. – The instructions, regulations, and notes in these Operating Instruc- tions must be observed. – The instructions, regulations, and notes in the material‘s Instruc- tions for Use must be observed. – The furnace must be operated under the indicated environmental and operating conditions (see Chapter 9). - Page 10 2.1.6 2.1.11 Risks and dangers Risk of crushing and burn hazard Do not carry the furnace by the Never reach under the furnace cooling tray. head with the hand or other parts of the body during operation, since there is a risk of crushing and a burn hazard. 2.1.7 2.1.12 Risks and dangers Contraindication Do not carry the furnace head by Do not insert any foreign objects the cables, since the cables and into the air vents. There is a risk of electrical shock. connections may be damaged. 2.1.13 2.1.8 Contraindication Risks and dangers The furnace head is equipped with This product contains ceramic an electric drive and must be fibres and may release fibre dust. operated by means of the Do not use compressed air, or electronic controls. Never open...
-
Page 11: Health And Safety Instructions
2.2 Health and safety instructions Any disruption of the protective conductor either inside or outside the furnace or any loosening of the protective This furnace has been designed according to EN 61010-1 and has conductor connection may lead to danger for the user in been shipped from the manufacturer in excellent condition as far as case of a malfunction. Deliberate interruptions are not safety regulations are concerned. To maintain this condition and to tolerated. Materials developing harmful gases must not ensure risk-free operation, the user must observe the notes and be fired. warnings contained in these Operating Instructions. – Place furnace on a fire-proof table (observe local regulations, e.g. Warnings regarding the removal of the heating muffle distance to combustible substances or objects, etc.). T his product contains ceramic fibres and may release fibre – Always keep the air vents at the rear of the furnace free from dust. Fibre dust has proved to be carcinogenic in animal obstruction. experiments. – Do not touch any parts that become hot during operation of the The heating muffle must only be disassembled by a certified After furnace. There is a burn hazard. Sales Service Centre. Information regarding the Safety Data Sheet is also available from your After Sales Service Centre. – Clean furnace only with a dry or slightly moist cloth. Do not use any solvents. Disconnect power before cleaning. -
Page 12: Product Description
3. Product Description 3.1 Components 3.2 Hazardous areas and safety equipment The Programat EP 3000/G2 Description of the hazardous areas of the furnace: comprises the following Hazardous area Type of risk components: – Furnace base with electronic Firing chamber Risk of burning controls Opening/closing mechanism Risk of crushing – Furnace head with firing chamber and press drive Electrical components Risk of electrical shock – Firing plate – Cooling tray – Power cord and hose for Description of the safety equipment of the furnace: v acuum pump Safety equipment Protective effect – Vacuum pump (accessories) -
Page 13: Installation And Initial Start-Up
4. Installation and Initial Start-Up 4.2 Selecting the location 4.1 Unpacking and checking the contents Place the furnace on a flat table using the rubber feet. Make sure The packaging provides the following advantages: – Reusable packaging that the furnace is not placed in the immediate vicinity of heaters or other sources of heat. Make sure that air may properly circulate – Closing mechanism with integrated transportation grips between the wall and the furnace. – Ideal protection by Styrofoam inserts – Easy handling / optimum unpacking Also ensure that there is enough space between the furnace and the – The packaging may be used in several ways (modules) user, as the furnace releases heat during the opening of the furnace head. Check the delivery for completeness (see delivery form in Chapter 9) and transportation damage. If parts are damaged or missing, contact The furnace should neither be placed nor operated in areas your local Ivoclar Vivadent Service Center. - Page 14 Place the cooling tray (34) on the frame plate (7). Make sure that the cooling tray (34) is correctly positioned on the frame plate (7). Secure the cooling tray (34) with the two screws (35) including the silicone washer (47). Step 2: Mounting the furnace head The complete furnace head (58) is best mounted with the rear panel of the furnace pointing towards the user. Lift the furnace head with both hands (see picture) and carefully position it on the furnace head mounting (43).
- Page 15 Ensure that the furnace head mounting mark (41) is aligned with the furnace base mounting mark (42). M ake sure that the firing plate holder (48) is not damaged by m ounting the furnace head. Step 3: Placing the firing plate for the investment ring (5) The firing plate for the investment ring (5) can now be placed on the firing plate holder (48). Step 4: Connections Connect the cables of the furnace head with the furnace base. Proceed as follows: – Insert the thermocouple plug (26) (make sure that the polarity of the plug is correct) – Insert the heater plug (28) – Insert the press drive plug (60)
- Page 16 Secure the heater plug (28) with the plug fuse (27) by turning it until the heater plug (28) has been secured. Step 5: Mounting the hood (36) Once all cables are properly connected to the furnace base, the hood (36) can be mounted. Subsequently, secure the hood with the knurled screw (37). The furnace may only be operated with the hood mounted. Step 6: Establishing additional connections Power connection Please make sure that the voltage indicated on the rating plate complies with the local power supply. Connect the power cord with the power socket of the furnace (17). Vacuum pump connection Connect the vacuum pump plug with the vacuum pump socket (18). We recommend using only the VP4 vacuum pump from Ivoclar Vivadent, since this pump is especially coordinated with the furnace. If other pumps are used, please observe and do not exceed the maximum power consumption.
-
Page 17: Removing The Furnace Head
4.4 Removing the furnace head Before the hood (36) is removed, the furnace has to be switched off and the power cord disconnected from the power socket (17). 1. Loosen and remove the knurled screw (37) of the hood (36) 2. Remove the hood (36) 3. Disconnect the press drive plug (60) 4. Disconnect the thermocouple plug (26) 5. Disconnect the heater plug (28) 6. Press the leaf spring (32) with a finger, lift off the furnace head at the same time and remove it Make sure the furnace head has c ompletely cooled down before it is removed (fire hazard). -
Page 18: Initial Start-Up
4.5 Initial start-up 4.5.4 Basic build-up of screens The different areas of the screen are shown with the press program 1. Connect the power cord with the wall socket. stand-by and operating screens as examples. 2. Put the On/Off switch (11) at the rear of the furnace on position The uppermost line mainly shows status information. In the central „I“ and connect the vacuum pump. and largest area, important information of the respective screen are displayed. The lowest line provides information about possible 4.5.1 Start screen a ctivities (keystrokes). The command keys (Open furnace head, Close Immediately after switching on, the display briefly shows the start f urnace head, STOP, START keys) are not shown for reasons of clarity. screen. Furnace Operation mode temperature Selected program, Status area investment ring Main area Possible Recommendation 4.5.2 Self-test keystrokes... -
Page 19: Operation And Configuration
5. Operation and Configuration 5.1 Introduction to the operation – Settings / Information (78) This key shows the selection (Information / Settings). The Left key The Programat EP 3000/G2 is equipped with a graphical display with shows the information screen. The Right key shows the settings backlighting. The furnace can be operated by means of the screen. m embrane-sealed keypad. In addition, the parameters can be s elected directly by means of the Parameter firing curve with the – Open furnace head (90) Parameter keys. Opening of the furnace head in 5 seconds. The numeric and command keys can be used to program and – Close furnace head (91) control the furnace. Closing of the furnace head in 5 seconds. – T = Holding temperature (84) Shows the holding temperature (actual firing temperature). -
Page 20: Program Structure
Symbol Parameter Value range °C Value range °F All the firing programs are equivalent and, therefore, full-fledged programs. In each program, P Program number 1-300 all the parameters can be adjusted. B Stand-by temperature 100-700 °C 212-1292 °F a) Ivoclar Vivadent firing programs for Ivoclar S Closing time (min : sec) 00:18-30:00 Vivadent materials t Temperature increase rate 10-140 °C/min 18-252 °F/min When the furnace is delivered ex works, the T Holding temperature 100-1200 °C 212-2192 °F Ivoclar Vivadent firing programs already contain... - Page 21 5.5 Settings, special programs and information Page Description Indication on display Short description This screen can be selected via the 7/24 Date The date can be Settings / Information key (78) if entered using the no program is active. Numeric keys. The cursor position (frame around the symbol) can be changed by means of the Cursor keys. The 8/24 General The general write marked symbol (Information or Set- write protection can be tings) can finally be selected using the Enter key. protection activated or de- activated using the Minus/Plus keys. The 5.5.1 Settings general write protec- Once the Settings have been tion locks all firing selected, the first page of the programs. The user Settings is displayed. The current...
- Page 22 5.5.2 Special programs Page Description Indication on display Short description 5.5.2.1 Vacuum test program 18/24 Load Resets the values With this vacuum test program, the performance of the vacuum sys- factory and parameters to tem can be automatically tested. For that purpose, the achieved settings the factory settings. (minimum) pressure in mbar is measured and indicated. If the NOTE: All individual pressure value is below 80 mbar (hPa), the vacuum performance of programs you have the system is adequate. created and saved will be deleted with 5.5.2.2 Heater test program this function. The The quality of the heating muffle may be automatically checked by user code is required. means of the heater test (duration: approx. 7 min.). The heater test should only be conducted with the empty firing chamber, since an 19/24 Set Resets the object in the chamber (e.g. firing tray) may influence the test result.
-
Page 23: Explanation Of The Symbols On The Display
5.6 Explanation of the symbols on the display Page Description Indication on display Short description Symbol name Meaning Symbol 1/11 Serial number Serial number of the furnace, see also rat- „One-stage Shows that a ing plate. program“ standard one-stage firing program is used 2/11 Software „Two-stage Shows that a two- version program“ stage special program is used. The bold line shows that the values 3/11 Firing hours of the first stage are of the furnace displayed. - Page 24 Symbol name Meaning Symbol Information For selecting the Infor- mation screen. Settings For selecting the Settings screen. For additional explanations on the symbols and the corresponding functions please refer to Chapter 6.4 „Other options and special features of the furnace“. 5.7 Explanation of the beeper signals Basically, the buzzer tunes and volume set by the user are used for all acoustic signals. The beeper can only be ended by pressing the STOP key. 1 After the self-test is completed To inform the user that the automatic self-test has been successfully completed, the selected melody is played. 2 Furnace head open and temperature below 550 °C / 1022 °F To inform the user that the temperature in the open furnace head has dropped below 550 °C / 1022 °F, the selected melody is played (5 seconds). In other words, the furnace head is basically...
-
Page 25: Practical Use
6. Practical Use – Program write protection and general write protection 6.1 Switching on/off The standard firing programs for Ivoclar Vivadent materials have Put ON/OFF switch on position “I”. The furnace conducts an auto- been locked ex works with an active program write protection matic self-test, which will be indicated in the beginning. (closed lock), which can be deactivated by the user for each Subsequently, a status bar shows how many % of the self-test have program using the Minus/Plus keys. been completed. Make sure that the furnace is not manipulated dur- The individual firing programs are open ex works, i.e. the program ing this time. write protection is not active (open lock). After successful completion of the self-test, the main menu is shown If the superordinate „General write protection“ was activated via in the display. Settings and user code, the „General write protection symbol“ is displayed instead. – Indication of invalid entry 6.2 Firing programs The blinking exclamation mark (!) indicates an invalid entry. For further notes please refer to Chapter 6.3.2. 6.2.1 Selecting the type of firing program Once the Firing mode has been – Predrying... -
Page 26: Press Programs
6.3 Press programs If a two-stage program is selected, the firing curve is shown in two stages. During a firing program in progress, the parameter screen or 6.3.1 Pressing using an Ivoclar Vivadent program operation screen may be displayed at any time for information pur- poses by pressing the P key. However, the parameters may only be Selecting the changed with the program stopped or the furnace in stand-by mode. operation *) The vacuum indication is faded out if no vacuum is needed. mode 6.2.6 Firing using an Ivoclar Vivadent program Step 1: Select the desired firing program according to the program table Selecting the (Chapter 10). press program type Selecting the operation mode... -
Page 27: Other Options And Special Features Of The Furnace
The error message symbol should supply a first indication of the type the heating and holding time of error: phase. Note, information Entry error Information symbol Exclamation mark symbol During the actual press process the following operation screen appears. The animated arrow indicates that the press plunger moves down- wards. The entire time of the press cycle is displayed once and the Technical error path which the press plunger has already covered since the start of Fork wrench symbol the press procedure. 6.3.8 Notes on the Ivoclar Vivadent press programs The Programat EP 3000/G2 has been especially coordinated with the materials systems from Ivoclar Vivadent. Therefore, the respective parameters of the different programs have already been set ex works. You only have to select the desired program for the corresponding material. - Page 28 6.4.4 Stopping the running program 6.4.9 Software update Press the STOP key once to pause a running program. The green LED The user will be able to conduct a software update by PC and down- in the START key blinks. Press the STOP key twice to completely stop load cable. For that purpose, the software download mode of the the program or press START to continue. furnace is activated by pressing two special keys simultaneously while the power supply is switched on. For further details, please 6.4.5 Changing the parameters while the program is refer to the Software Update Instructions (www.ivoclarvivadent.com/ interrupted downloadcenter). All parameters of the program, which have not yet been executed, can be changed while the program is interrupted. 6.4.10 Power-save mode If the power-save mode is activated and the furnace head closed, 6.4.6 Closing of the furnace head this function is automatically activated after 30 minutes if the Various functions are available for the f urnace is idle and no key is pressed during this time. The Power closing of the furnace head. If the cursor is S aving icon appears on the display. The power-save mode is...
-
Page 29: Maintenance, Cleaning And Diagnosis
7. Maintenance, Cleaning, and Diagnosis This chapter describes the user maintenance and cleaning procedures T his furnace has been developed for typical use in dental for the Programat EP 3000/G2. Only those tasks are listed that may laboratories. If the product is used in a production be performed by dental professionals. All other tasks must be per- enterprise, for industrial applications, and for continuous formed by qualified service personnel at a certified Ivoclar Vivadent use, premature ageing of the expendable parts has to be Service Center. expected. The expendable parts are as follows: – Heating muffle 7.1 Monitoring and maintenance – Insulation material The time for these maintenance procedures depends on the Expandable parts are not covered by the warranty. frequency of use and the working habits of the users. For that Please also observe the shorter service and maintenance intervals. reason, the recommended times are only approximations. What Part When Check all plug-in connections for correct fit Var. external connections weekly Check if the furnace head opens smoothly and without excessive noise. Opening mechanism monthly Check if the thermocouple is straight and in the right place. Thermocouple (4) weekly Check the insulation for cracks and damages. If the insulation is worn down... -
Page 30: Cleaning
7.2 Cleaning 7.3 Temperature calibration 1. Select the calibration program. The furnace may only be cleaned when it is cool, since there is a burn hazard. Do not use any cleaning solutions. 2. Remove the firing plate from the furnace using the furnace The following parts have to be cleaned from time to time: tongs and place it on the cooling tray. What: When: Cleaning material: 3. Carefully grip the upper part of the ATK 2 using the furnace Housing (9) and furnace if required soft, dry cloth tongs (Caution: Fracture risk of head (25) the ceramic) and insert it into Keypad (10) weekly soft, dry cloth the holes designated for this purpose until it snaps into Cooling tray (34) daily cleaning brush* place. The orientation of the Insulation (3) daily cleaning brush* calibration sample (left or Sealing rim of the daily cleaning brush and a right) is not important. -
Page 31: Replacing The Press Plunger
7.6 Replacing the press plunger In order to facilitate replacing the press plunger, the following procedure is recommended. 1. Remove the screw (20) and the press drive cover (56) while the furnace head is closed. 2. Loosen the terminal screw (65) from the press plunger by about half a rotation. 3. Open the furnace head by means of the respective key (90). Once the furnace head is wide open, switch off the furnace, disconnect the power, and allow the furnace to cool to room temperature. 4. Push the press plunger (59) with slightly rotating movements into the firing chamber with one hand and pull from below with the other hand. Contraindication: D o not touch the thermocouple when replacing the press plunger. 5. Push the white press plunger (59) with the taper ahead into the guide bush. Push the press plunger with slightly rotating movements into its split taper socket (64) and fasten the screw (65). Contraindication: Never reach into the press drive during operation. There is a risk of burn hazard and crushing. Mount the press drive cover (56) and fasten with screw. 6. Connect the power plug and switch on the furnace with the I/O switch. -
Page 32: What If
8. What if ... This chapter will help you to recognize malfunctions and take appropriate measures or, if possible and acceptable, to perform some simple repairs. 8.1 Error messages The furnace continuously checks all functions during operation. If an error is detected, the respective error message is displayed. The following error messages may be displayed. If there are any questions, please contact the Ivoclar Vivadent After Sales Service. Error / Continua- Error Error Message Text Hint tion pos- sible T < B Enter a logical value for T. L > T Enter a logical value for long-term cooling L. V2x <= V1x Enter a logical value for the vacuum-on temperature Vx1 or the vacuum-off temperature Vx2. V2x > Tx + 1°C Enter a logical value for V1x, V2x Incorrect values for V1x, V2x Geben sie plausible Werte für V1x, V2x ein. Current temperature after Start Excess temperature! Program aborted, furnace head opens to allow the furnace to cool down! *,** > Tx + 80°C T2 < T1 Enter a lower value for T1 or a higher value for T2. - Page 33 Error / Continua- Error Error Message Text Hint tion pos- sible Error muffle crack CDS Crack Detection System has been activated. The program has been aborted and the press plunger has been moved backwards. CDS could probably save your restorations from muffle cracks. Please check your restorations before you continue your working progress. Error muffle crack CDS Crack Detection System has been activated. The program has been aborted and the press plunger has been moved backwards. CDS could probably save your restorations from muffle cracks. Please check your restorations before you continue your working progress. Error muffle crack CDS Crack Detection System has been activated. The program has been aborted and the press plunger has been moved backwards. CDS could probably save your restorations from muffle cracks. Please check your restorations before you continue your working progress. Error during logging of press An error has occurred during logging of press program data. The storage medium might be full. program data Supply voltage outside the The supply voltage is outside the acceptable range. Check the supply voltage. acceptable range Start-up aborted due to an error The self-test of the furnace was interrupted by an error. It is not possible to work with the furnace! Switch the furnace off and on again, once the error has been rectified. Brief power failure during a A firing program in progress was interrupted by a brief power failure. The program is continued! program in progress Power failure during an over- An overnight program in process was interrupted by a power failure. The program is continued! night program in progress Incorrect supply voltage The furnace is operated with the incorrect supply voltage. Make sure that the furnace is operated with the supply voltage indicated on the rating plate.
-
Page 34: Technical Malfunctions
8.2 Technical malfunctions These malfunctions may occur without an error message being displayed. *If there are any questions, please contact the Ivoclar Vivadent After Sales Service. Fehler Kontrollfrage Massnahme Is the vacuum released within approximately 30 Wait until the vacuum is released, remove object. Vacuum is not released or only very slowly seconds? Switch the furnace on and off again. * Indication on display incomplete Activate the display test program Writing in the display is very hard to read Is the contrast properly set? Adjust contrast Is the furnace properly connected according to the Correctly connect the furnace and switch it on Display not illuminated Operating Instructions and switched on? Buzzer does not sound Is the buzzer switched off (Tune = 0)? -
Page 35: Product Specifications
9. Product Specifications 9.1 Delivery form 9.3 Acceptable operating conditions – Programat EP 3000/G2 Acceptable ambient temperature range: – Programat fring tray Kit +5 °C to +40 °C / +41 °F to +104 °F – Firing plate Acceptable humidity range: – Automatic Temperatur Checking Set 2 ATK 2 (Test Set) 80% maximum relative humidity for temperatures up to 31 °C – USB download cable (87.8 °F) gradually decreasing to 50% relative humidity at 40°C – USB Stick Programat (104 °F); condensation excluded. Acceptable ambient pressure: – PrograBase 2 Software – Service passport equipment The furnace has been tested for use at altitudes of up to 2,000 m – Operating Instructions (6562 ft.) above sea level. - Page 36 10. Appendix 10.1 Program table Two program tables (°C / °F) are enclosed in these Operating Instructions. If not, please contact your local Ivoclar Vivadent Service Center. Important information The current program tables are also available at: www.ivoclarvivadent.com/downloadcenter The program tables can be downloaded from the Internet as PDF files. Please make sure that your program table complies with the software version you use, as the table is coordinated with the respective software version.
- Page 37 10.2 Menu structure 10.2.1 Selecting the operation mode and program type 10.2.2 Firing programs...
- Page 38 10.2.3 Press programs 10.2.4 Settings / Information...
- Page 40 Fax +90 212 346 04 24 Ivoclar Vivadent GmbH www.ivoclarvivadent.com Ivoclar Vivadent GmbH Dr. Adolf-Schneider-Str. 2 Ivoclar Vivadent Polska Sp. z o.o. Ivoclar Vivadent Limited Bremschlstr. 16 D-73479 Ellwangen, Jagst Al. Jana Pawla II 78 Postfach 223 Germany...
- Page 41 VARIO PRESS 3 3 0 0 0 0 ® VARIO PRESS ® 3 3 0 0 0 0 innovative dental products Istruzioni per l’uso 01-2014 www.zubler.de...
- Page 42 Indice 0. Introduzione 1.3.7 Impostazioni lingua pagina Segnalazioni e simboli 1.3.8 Display 0.1 Dichiarazione di conformità Pericoli e rischi 1.3.9 Segnale acustico 0.2 Informazioni generali Questo simbolo pone l’attenzione su 1.4 Preriscaldo del forno quelle norme che si devono rispettare 0.3 Installazione dell’apparecchiatura per evitare pericoli e/o danni a cose e/o 1.5 Avvio ciclo notturno...
- Page 43 Introduzione 0.1 Dichiarazione di conformità 0.2 Informazioni generali 0.3 Installazione dell’appa- recchiatura Noi, Zubler Gerätebau GmbH La corretta ceramizzazione, con i nuovi Togliere dall’imballaggio grande le due Buchbrunnenweg 26 materiali oggigiorno disponibili, fa sì che scatole bianche. Estrarre il forno e collo- 89081 Ulm Jungingen l’odontotecnico avverta sempre nuove carlo nel luogo previsto.
- Page 44 Introduzione Collegamento all’aria compressa Messa in funzione Accertarsi che l’interruttore principale La scatola bianca più piccola contiene gli Aprire la scatola bianca grande, estrarre accessori necessari per il collegamento la base di cottura/pressata e tenerla a verde sul retro del forno si trovi in posi- zione “0”.
- Page 45 Introduzione Prima messa in funzione 0.4 Impostazioni supplementari Dopo aver messo in funzione il forno per 9.Il forno avvia il test per il vuoto. Per ca. Attenzione 2 minuti la pompa crea il vuoto, poi si la prima volta, e dopo aver posizionato il spegne e, a camera chiusa, rimane spen- piattello di cottura, si deve eseguire il ta per altri due minuti, per testare l’erme-...
- Page 46 Introduzione Dopo il ciclo di cottura/pressata togliere l’oggetto dal piattello ed appoggiarlo sull’apposita piattaforma di raffredda- mento. Trasportare e sballare l’apparecchiatura con cautela. Sollevare il forno, possibilmente in due persone, sempre alla base, mai prendendo la camera di cottura o il lift. Per la sinterizzazione della ceramica, utilizzare esclusivamente la base di cottura.
- Page 47 Introduzione 0.5 Norme di sicurezza Tenere sempre chiusa la protezione scorrevole a lato del forno. La rimozione o l’inserimento della chiavetta USB devono avvenire sempre a forno spento. Le fessure di raffreddamento non devono essere coperte, per permettere all’aria di circolare. Altrimenti, il forno si surriscalda.
- Page 48 Introduzione Il forno deve essere utilizzato esclusi- Lasciare uno spazio libero intorno e vamente per i procedimenti descritti sopra al forno di ca. 200 – 300 mm. nelle istruzioni per l’uso. Togliere tutto Le pareti vicine devono essere igni- il materiale d’imballaggio e i nastri fughe e la zona intorno ben aerata.
- Page 49 Introduzione Non installare il forno e la pompa per il I sistemi di aria compressa devono Pulire l’apparecchiatura con un panno vuoto nei pressi di una fonte di calore. corrispondere ai valori richiesti. asciutto o umido. Non utilizzare deter- L’allacciamento deve essere eseguito genti! Prima di pulire il forno staccare Assicurarsi che l’apparecchiatura sia esclusivamente da persone qualificate...
- Page 50 Introduzione Formazione di polvere dal refrattario Usare solamente pezzi di ricambio ori- Evitare che il refrattario si frantumi. In All’interno della camera di cottura si tro- ginali. caso, eliminare i residui e metterli in vano frammenti di fibre di ceramica contenitori chiusi.
- Page 51 Utilizzo del forno Scelta dei parametri del menu Funzioni del display ‚ Dopo aver acceso l’apparecchiatura sul display appare il menu principale Temperatura attuale Display LCD a colori Tipo di forno Dialer con cinque opzioni: Scelta del programma Impostare un programma MENÚ...
- Page 52 Utilizzo del forno 1.1 Scelta del programma Avvio programma Selezionare „scelta del programma“ 006 - DC CERAM 9.2 CERAMAY evidenziandolo con la barra rossa e 450°C Selezionare il programma confermare con il tasto „Enter“. 120 - DC 9.2 WASH 130 - DC 9.2 DENTINA 2 6+ Sul display appare una videata con 20 programmi (p.es.
- Page 53 Utilizzo del forno Sovrascrivere un programma durante il ciclo di cottura 006 - DC CERAM 9.2 CERAMAY Se durante un ciclo di cottura già avviato 748C Start „121 - DC CERAM 9.2 DENTINA 1“ fosse necessario modificare temporanea- -Preasciugatura 3:00 -Salita mente i parametri, si attiva il modus -Tempo di chiusura...
- Page 54 Utilizzo del forno Lavorare con l’indice 006 - DC CERAM 9.2 CERAMAY Nell’indice si possono impostare sin- goli programmi in gruppi individuali 450°C Selezione gruppo progr (vedasi 1.2.6). 000 - AUTHENTIC CERAMAY 010 - E.MAX PRESS ADVANCED Per passare dal programma di cottura 001 - 011 - E.MAX CERAM IVOCLAR o pressata appena utilizzato al pro-...
- Page 55 Utilizzo del forno 1.2 Scelta del programma Nuovo/Modificare Il cursore si sposta di una posizione a Selezionare il parametro „Impostare Impostazione del programma destra. programma“ con la barra rossa e con- 450°C fermare con il tasto verde „Enter“. Proseguire come descritto sopra fin- nuovo/modificare ché...
- Page 56 Utilizzo del forno Modifica dei parametri per la cottura/pressata Nel primo passo si sceglie il tipo di pro- 006 - DC CERAM 9.2 CERAMAY gramma: 748C Edit „121 - DC 9.2 DENTINA 1“ Professional Program: una sequenza ‚ -Tempera Tipo programma Professional di 16 parametri liberamente pro- grammabili per la cottura individuale -Temperat.
- Page 57 Utilizzo del forno ‚ Il Professional Program Temperatura di partenza La temperatura nella camera di cottura con la quale un ciclo di cottura inizia e termina. Preasciugatura Attivabile scegliendo „sì“ fra i parametri di programmazione. Tempo di preasciugatura Inserire un valore di tempo. Nell’intervallo di tempo prescelto, il lift identifica una posizione, che varia a seconda del calore irradiato dalla camera di cottura.
- Page 58 Utilizzo del forno — Lo Standard Program Temperatura di partenza La temperatura nella camera di cottura con la quale un ciclo di cottura inizia e termina. Preasciugatura Attivabile scegliendo „sì“ fra i parametri di programmazione. Tempo di preasciugatura Inserire un valore di tempo. Nell’intervallo di tempo prescelto, il lift identifica una posizione, che varia a seconda del calore irradiato dalla camera di cottura.
- Page 59 Utilizzo del forno ˜ Lo Special Program Temperatura di partenza La temperatura nella camera di cottura con la quale un ciclo di cottura inizia e termina. Preasciugatura Attivabile scegliendo „sì“ fra i parametri di programmazione. Tempo di preasciugatura Inserire un valore di tempo. Nell’intervallo di tempo prescelto, il lift identifica una posizione, che varia a seconda del calore irradiato dalla camera di cottura.
- Page 60 Utilizzo del forno … Il programma I-Press Temperatura di partenza La temperatura nella camera di cottura con la quale un ciclo di cottura inizia e termina. Salita Salita della temperatura per minuto fino al raggiungimento della temperatura finale. Temperatura finale La temperatura a cui la ceramica viene sinterizzata.
- Page 61 Utilizzo del forno › Programma di sinterizzazione (reso disponibile da parte dal produttore) Temperatura iniziale Temperatura della camera di cottura, con cui il programma inizia e termina Salita di riscaldamento 1 Primo aumento della temperatura (indicato in ore e minuti) Temperatura finale 1 Temperatura al termine del riscaldamento 1 Tempo di mantenimento 1 Tempo di permanenza alla temperatura finale 1 (indicato in ore e minuti)
- Page 62 Utilizzo del forno Programma “Advanced Press” per la pressata delle ceramiche in disilicato di litio Advanced Press venne brevettato nel 2010 e contiene un’interfaccia totalmente nuova, realizzata specificatamente per pressare il disilicato di litio. Sulla base di un calcolo matematico del comportamento termico dei materiali coinvolti nel ciclo di pressata, si ottiene una curva di preriscaldo che si distingue nettamente da quelle ottenute con il metodo classico di riscaldamento dei cilindri (vedasi grafico).
- Page 63 Utilizzo del forno 1.2.2 Copiare /modificare 1.2.3 Spostare 1.2.4 Cancellare Copiare da: selezionare all’interno di Spostare da: selezionare all’interno di Cancellare da: … selezionare all’inter- un gruppo di programmi il programma un gruppo di programmi il programma no di un gruppo di programmi il pro- da copiare usando il dialer o i tasti +/-.
- Page 64 Utilizzo del forno 1.2.6. Indice dei programmi La prima lettera da modificare viene nuovo/modificare Impostazione del programma evidenziata in blu. La pagina di indice facilita l’accesso al 450°C Per mezzo del dialer o dei tasti +/– programma di cottura o pressata selezio- Nuovo / Modificare selezionare la lettera o la cifra deside- nato.
- Page 65 Utilizzo del forno 1.2.8 USB transfer Per caricare oppure salvare dei programmi su un supporto USB si richiede una chiavetta adatta al protocollo Microsoft e una cartella “V200”. Nel modus “Impostazioni programmi” selezionare la voce “USB transfer” tramite il Dialer o i tasti -/+ e confermare con il tasto verde “Enter”.
- Page 66 Utilizzo del forno 1.3 Impostazioni supplementari 1.3.5 Livello del vuoto Nella parte „Impostazioni supplementari“ Test per il lift: controllo della posizione Si inserisce il valore per il livello del si possono individualizzare alcuni parame- di partenza e di chiusura del lift. vuoto per i programmi di cottura/pressata tri necessari per il funzionamento di base (minimo 700 mm/Hg).
- Page 67 Utilizzo del forno 1.4 Preriscaldo della camera (warm-up) Attivare il ciclo di warm-up all’inizio della giornata lavorativa. In tal modo ci si assicura un raggiungimento e mantenimento perfetto delle temperature nei cicli di cottura e di pressata. 1.5 Ciclo notturno Ciclo notturno Con l’attivazione del ciclo notturno si evita 445C...
- Page 68 Manutenzione 2.1. Controllo della condensa 2.2. Filtro aria compressa 2.3. Filtro Pompa per vuoto P3 Nei primi mesi dopo la messa in funzione La durata del filtro per l’aria compressa Il filtro evita che particelle del refrattario del forno, controllare il contenitore per la dipende dalla qualità...
- Page 69 Dati tecnici Dati tecnici: VARIO PRESS ® VARIO Press Pompa per vuoto P3 Larghezza x Profondità 360mm x 430mm 360mm x 430mm 320mmx186mm Altezza 765mm 765mm 275mm Peso 26kg 26kg 12kg Tensione 230V/50Hz 230V/50Hz 230V/50Hz Potenza 450VA s. pompa 1350VA s.
- Page 70 Dati tecnici 3.1 Entità di consegna VARIO PRESS ® 3 3 0 0 0 0 VARIO PRESS ® 3 3 0 0 0 0 1x Cavo elettrico 1x Cavo elettrico 1x Istruzioni per l’uso 1x Istruzioni per l’uso 1x Chiavetta USB 1x Chiavetta USB 1x Base di cottura 1x Base di cottura...
- Page 71 Assistenza innovative dental products Zubler Gerätebau GmbH Buchbrunnenweg 26 89081 Ulm-Jungingen Telefon: +49(0)731-14520 Fax: +49(0)731-145213 mail: vp300@zubler.de www.zubler.de pagina...
- Page 72 Proposte per la programmazione 5.1 Programmi di pressata* Il programma I-Press Temperatura Salita Tempe- Tempo di Tempo di pressata Pressione Livello del Tempo di di partenza ratura stazionam. extra vuoto apertura in °C °C/min finale in min in min in min Authentic cilindro da 100g 18:00...
- Page 73 Proposte per la programmazione Authentic 5.2 Programmi di cottura* Professional Modus Tempera- Pre- Tempo di Tempo di Temperat. Tempo di Salita Tempe- Tempo di Tempe- Tempo di Tempera- Tempo di Vuoto Rilascio Fine tura di asciu- pre- chiusura di omoge- omoge- in°C/min ratura stazio-...
- Page 74 Proposte per la programmazione 5.2 Programmi di cottura* Ceramay DC Ceram 12.5 Professional Modus Tempera- Pre- Tempo di Tempo di Temperat. Tempo di Salita Tempe- Tempo di Tempe- Tempo di Tempera- Tempo di Vuoto Rilascio Fine tura di asciu- pre- chiusura di omoge- omoge- in°C/min...
- Page 75 Proposte per la programmazione 5.2 Programmi di cottura* Ceramay DC Ceram 9.2 Professional Modus Tempera- Pre- Tempo di Tempo di Temperat. Tempo di Salita** Tempe- Tempo di** Tempe- Tempo di Tempera- Tempo di Vuoto Rilascio Fine tura di asciu- pre- chiusura di omoge- omoge- in°C/min...
- Page 76 Proposte per la programmazione 5.2 Programmi di cottura* Ivoclar e-max ceram, tecnica di stratificazione Professional Modus Tempera- Pre- Tempo di Tempo di Temperat. Tempo di Salita Tempe- Tempo di Tempe- Tempo di Tempera- Tempo di Vuoto Rilascio Fine tura di asciu- pre- chiusura...
- Page 77 Proposte per la programmazione 5.2 Programmi di cottura* Ivoclar e-max ® CAD parametri per la cristalizzazione Special Modus Tempera- Pre- Tempo di Tempo di Temperat. Tempo di Salita 1 Tempe- Tempo di Salita 2 Tempera- Tempo di Tempo di Vuoto Rilascio Fine tura di...
- Page 78 Per il calcolo del peso della cera alla risultati costanti e ripro- quantità di ceramica neccessaria nella ducibili. pressata, rispettare le istruzioni del pro- duttore di ceramica. * IPS PressVEST Speed è un marchio registrato della Ivoclar Vivadent AG Schaan/Liechtenstein pagina...
- Page 79 Note importanti sulla pressata del disilicato di litio con VARIO PRESS 300.e 6.4 Messa in Rivestimento peratura cala di circa 80°C; il tempo di Leggere con attenzione l’allegata brochu- cilindro in un luogo privo di vibrazioni. re riguardante la bilancia dosatrice VARIO stazionamento effettivo inizia solo quan- Rispettare con la massima precisione il BALANCE.
- Page 80 Note importanti sulla pressata del disilicato di litio con VARIO PRESS 300.e 6.6 Pressata Non preriscaldare i pellets (pastiglie) VARIO PRESS ® 3 3 0 0 0 0 010 - E.MAX PRESS ADVANCED Con il VARIO PRESS ® 3 3 0 0 0 0 è...
- Page 81 Note importanti sulla pressata del disilicato di litio con VARIO PRESS 300.e 6.7 Smuffolatura Seguire sempre le istruzioni del produtto- re. Per e.max, seguire le istruzioni della Ivoclar. • Incidere il cilindro con un disco sepa- ratore all’altezza del plunger. Con un coltello da gesso rompere il cilindro nel punto di separazione predetermi- nato.
- Page 83 DC5 CAD / CAM MICROSTAR ® Ceramay Zubler ® VARIO 200 VARIO BALANCE Zubler ® HS-PC™ Dental Concept Systems Flex Ring System per la Rivestimento “veloce” per Plunger monouso Concept Press Forno per ceramica Dosatrice messa in rivestimento ceramica pressata FZ VARIO FZ2 VARIOmatic ®...
Need help?
Do you have a question about the Programat EP 3000 G2 and is the answer not in the manual?
Questions and answers
I need the manual for p 3000 press oven
The manual for the Ivoclar Vivadent Programat EP 3000 G2 press oven is available in the provided context under the title "Programat EP 3000 G2 Ivoclar Vivadent Manual."
This answer is automatically generated
Fire program for For some layering technique