Advertisement
Owner's Manual & Safety Instructions
Save This Manual
operating, inspection, maintenance and cleaning procedures. Write the product's serial number in the
back of the manual near the assembly diagram (or month and year of purchase if product has no number).
Keep this manual and the receipt in a safe and dry place for future reference.
RETURNS NOT ACCEPTED
& WARRANTY VOID
if Sprayer is not properly cleaned
immediately after every use.
Clean Sprayer immediately
to prevent permanent damage.
See "Cleaning" and "Long Term Storage" on pages 16-18.
When unpacking, make sure that the product is intact
and undamaged. If any parts are missing or broken,
please call 1-888-866-5797 as soon as possible.
©
Copyright
2015 by Harbor Freight Tools
No portion of this manual or any artwork contained herein may be reproduced in
any shape or form without the express written consent of Harbor Freight Tools.
Diagrams within this manual may not be drawn proportionally. Due to continuing
improvements, actual product may differ slightly from the product described herein.
Tools required for assembly and service may not be included.
Keep this manual for the safety warnings and precautions, assembly,
Visit our website at: http://www.harborfreight.com
Email our technical support at: productsupport@harborfreight.com
®
. All rights reserved.
Read this material before using this product.
Failure to do so can result in serious injury.
SAVE THIS MANUAL.
REV 16h
62915
Advertisement

Related Manuals for KRAUSE & BECKER 62915


Summary of Contents for KRAUSE & BECKER 62915
- Page 1 (or month and year of purchase if product has no number). Keep this manual and the receipt in a safe and dry place for future reference. REV 16h 62915 RETURNS NOT ACCEPTED & WARRANTY VOID if Sprayer is not properly cleaned immediately after every use.
-
Page 2: Table Of Contents
It must be understood by the operator that common sense and caution are factors which cannot be built into this product, but must be supplied by the operator. Page 2 For technical questions, please call 1-888-866-5797. Item 62915... -
Page 3: Safety
Do not carry the sprayer with your finger on the trigger or connect the sprayer to the power supply with the trigger on. Item 62915 For technical questions, please call 1-888-866-5797. Page 3... - Page 4 (e.g. 1,1,1-trichloroethane and dichloromethane, also known as 4. Do not come into contact with a fluid stream created by a leak in the paint hose. Page 4 For technical questions, please call 1-888-866-5797. Item 62915...
- Page 5 22. Remove Spray Tip or turn to cleaning position of California to cause cancer and birth defects BEFORE cleaning or flushing Paint Sprayer system. or other reproductive harm. (California Health & Safety Code § 25249.5, et seq.) Item 62915 For technical questions, please call 1-888-866-5797. Page 5...
- Page 6 (See Table A.) Page 6 For technical questions, please call 1-888-866-5797. Item 62915...
-
Page 7: Specifications
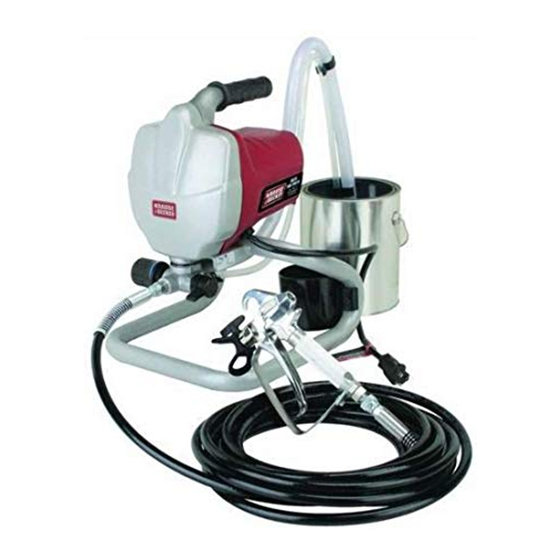
Underwriters Laboratories, Inc. Amperes Specifications Electrical Input 120 V AC / 60 H z / 7A Outlet 1/4"– N PS M Maximum Working Pressure 3000 PSI Paint Hose 25' Long Item 62915 For technical questions, please call 1-888-866-5797. Page 7... - Page 8 Pressure Control Knob Filter Paint Hose Outlet Prime/Spray Switch Red Inlet Release Button (underneath) Power Cord Hanging Hook Spray Tip Spray Gun Spray Tip Guard Trigger Guard Trigger Paint Hose Page 8 For technical questions, please call 1-888-866-5797. Item 62915...
- Page 9 Low Pressure Spraying, Priming/Cleaning, or Rolling. Align the Pressure Control Knob with indicator on the Sprayer Housing to set the function. Hi Spray Low Spray Prime/Clean Roll Low Pressure Spray Rolling High Pressure Spray Prime/Clean Item 62915 For technical questions, please call 1-888-866-5797. Page 9...
-
Page 10: Setup
1. Attach Paint Hose to Paint Hose Outlet 3. Turn Pressure Control Knob to and tighten with wrench. Low Pressure Spray setting. 2. Attach Paint Hose to Paint Gun and tighten with two wrenches. Page 10 For technical questions, please call 1-888-866-5797. Item 62915... - Page 11 Turn Power Switch OFF and unplug unit from outlet. Trigger to relieve any remaining pressure. Note: Always set to Prime mode between uses. 2. Switch Prime/Spray switch to Prime mode to safely release most pressure. Item 62915 For technical questions, please call 1-888-866-5797. Page 11...
- Page 12 2. Place Priming Tube in waste bucket. 5. Adjust Pressure Control Knob to Prime/Clean setting. 3. Submerge Suction Tube in water or flushing solvent. 6. Plug in Sprayer and turn power ON. Page 12 For technical questions, please call 1-888-866-5797. Item 62915...
- Page 13 9. Switch power ON. and continue to spray into waste bucket. 14. Stop spraying. If the motor stops, the pump and tubes are primed. If it does not stop, repeat priming steps. Item 62915 For technical questions, please call 1-888-866-5797. Page 13...
- Page 14 Control Knob and increase pressure as needed by turning clockwise to create a good spray pattern. 5. Overlap strokes by half. Always aim stroke at bottom edge of last stroke. Page 14 For technical questions, please call 1-888-866-5797. Item 62915...
- Page 15 5. Spray into waste bucket until clog clears. 2. Adjust nozzle to Clean setting. 6. Release Trigger. 3. Turn Spray/Prime Switch to Spray mode. 7. Adjust nozzle to Spray setting. Turn power ON. Item 62915 For technical questions, please call 1-888-866-5797. Page 15...
- Page 16 Sprayer will start pumping and water or flushing solvent as well as air bubbles will be purged from system. Let fluids discharge from Priming Tube into waste bucket until fluid is clear. 3. Separate tubes. Page 16 For technical questions, please call 1-888-866-5797. Item 62915...
- Page 17 Release trigger, turn power OFF and turn Prime/ Spray switch to Prime mode to relieve pressure. 14. Unscrew nut from housing, it is 10. Change to waste bucket as paint thins. behind the swivel connector. Item 62915 For technical questions, please call 1-888-866-5797. Page 17...
- Page 18 OFF 3. Add one ounce of light 7. Switch Power to ON household oil or a for five seconds, then pump storage product turn the power OFF. into each inlet. Page 18 For technical questions, please call 1-888-866-5797. Item 62915...
- Page 19 2. Sand wood to a sufficiently fine grit before painting. 3. Raised grain. 3. Wipe wood surface with thinner to raise grain, then sand with fine grit to knock off “hairs”. Item 62915 For technical questions, please call 1-888-866-5797. Page 19...
- Page 20 Clean Sprayer immediately to prevent permanent damage. Disposal Instructions Improper disposal of paint is against the law and a health and environmental hazard. Dispose of paint through local recycling facility. Page 20 For technical questions, please call 1-888-866-5797. Item 62915...
- Page 21 Note: If product has no serial number, record month and year of purchase instead. Note: Some parts are listed and shown for illustration purposes only, and are not available individually as replacement parts. Item 62915 For technical questions, please call 1-888-866-5797. Page 21...
-
Page 22: Parts List And Diagram
O-Ring (17 x 1 .8) Power Cord Clamp Paint Input Adapter Screw Priming Tube Connector Base Frame End Cap Clamp Priming Tube Paint Hose Suction Tube Spray Gun Clip Hex Key Page 22 For technical questions, please call 1-888-866-5797. Item 62915... - Page 23 RETURNS NOT ACCEPTED & WARRANTY VOID if Sprayer is not properly cleaned immediately after every use. Clean Sprayer immediately to prevent permanent damage. Assembly Diagram Item 62915 For technical questions, please call 1-888-866-5797. Page 23...
-
Page 24: Warranty
Limited 90 Day Warranty Harbor Freight Tools Co. makes every effort to assure that its products meet high quality and durability standards, and warrants to the original purchaser that this product is free from defects in materials and workmanship for the period of 90 days from the date of purchase.
Need help?
Do you have a question about the 62915 and is the answer not in the manual?
Questions and answers
Can you get a replacement pressure switch for Krause Becker item #62915