
Subscribe to Our Youtube Channel
Related Manuals for King Canada KC-702CN


Summary of Contents for King Canada KC-702CN
- Page 1 1” x 30” BELT AND 5” DISC SANDER MODEL: KC-702CN INSTRUCTION MANUAL COPYRIGHT © 2021 ALL RIGHTS RESERVED BY KING CANADA TOOLS INC.
-
Page 2: Warranty Information
Please keep your dated proof of purchase for warranty and servicing purposes. REPLACEMENT PARTS Replacement parts for this product are available at our authorized King Canada service centers across Canada. Please use the 10 digit part numbers listed in this manual for all part orders where applicable. - Page 3 SAFETY INSTRUCTIONS FOR YOUR BELT AND DISC SANDER SAFETY INSTRUCTIONS FOR BELT AND DISC SANDER • sanding belt narrower than 1 inches. Narrower belts uncover parts Safety is a combination of common sense, staying alert and knowing that could trap your fingers, how your belt disc sander works.
- Page 4 SAFETY INSTRUCTIONS FOR YOUR BELT AND DISC SANDER USE THE RIGHT TOOL. Don’t force tool or attachment to do a job as additional support for a workpiece that is longer or wider than the it was not designed to do. basic sander table, or to help feed, support, or pull the workpiece.
-
Page 5: Electrical Information
ELECTRICAL INFORMATION WARNING ALL ELECTRICAL CONNECTIONS MUST BE DONE BY A QUALIFIED ELECTRICIAN. FAILURE TO COMPLY MAY RESULT IN SERIOUS INJURY! ALL ADJUSTMENTS OR REPAIRS MUST BE DONE WITH THE COMPRESSOR DISCONNECTED FROM THE POWER SOURCE. FAILURE TO COMPLY MAY RESULT IN SERIOUS INJURY! POWER SUPPLY USING ON/OFF SWITCH WITH REMOVABLE SAFETY KEY WARNING: YOUR SANDER MUST BE CONNECTED TO A 120V WALL... -
Page 6: Getting To Know Your Sander
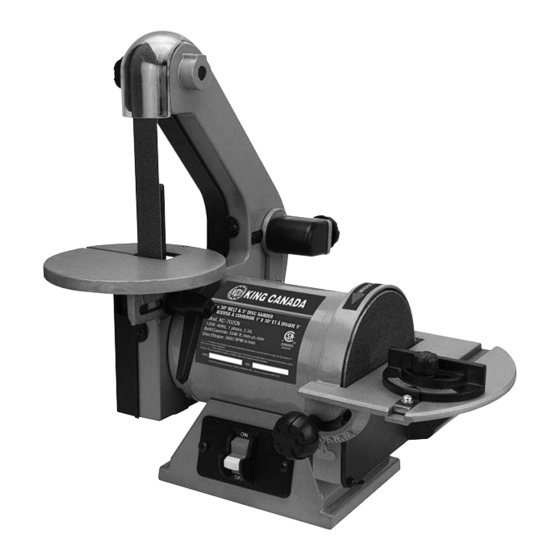
GETTING TO KNOW YOUR SANDER SPECIFICATIONS Model......................................KC-702CN Belt ......................................1” x 30” Belt speed.................................... 3,346 SFPM Disc ........................................5” Disc speed .................................... 3,450 RPM Motor ......................................2.3 Amp. Voltage .................................. 120V, 1 phase, 60 Hz Dimensions/weight ..........................14-1/2” x 11-1/2” x 15” / 16 lbs Getting to know your Sander 1. -
Page 7: Assembly And Adjustments
ASSEMBLY & ADJUSTMENTS ASSEMBLY- MOUNTING BELT AND DISC SANDER TO WORKBENCH If this Belt and Disc Sander is to be used in a permanent location, it should be fastened securely to a firm supporting surface such as a workbench using the two mounting holes provided in the base. - Page 8 ADJUSTMENTS & OPERATION ADJUSTMENTS- SQUARING SANDING DISC TILTING TABLE 1. To check the squareness of the 90º angle of the sanding disc table (A) Fig.7, place a square (B) on the table with the other end against the sanding disc. 2. Loosen the 2 disc table lock knobs (C) Fig.7, and adjust table angle to 90º. 3.
-
Page 9: Maintenance
- Turning the knob counter-clockwise will cause the belt to track to the left, towards the protective cover. PARTS DIAGRAM & PARTS LISTS Refer to the Parts section of the King Canada web site for the most updated parts diagram and parts list.
Need help?
Do you have a question about the KC-702CN and is the answer not in the manual?
Questions and answers