Advertisement
Advertisement
Table of Contents

Related Manuals for Avalon A8CTBOTTLELESSWHT


Summary of Contents for Avalon A8CTBOTTLELESSWHT
- Page 1 Model: A8CTBOTTLELESSWHT...
- Page 2 DIRECTORY SAFETY PRECAUTIONS GETTING STARTED TROUBLE SHOOTING WATER PURIFIER MACHINE INSTALLATION...
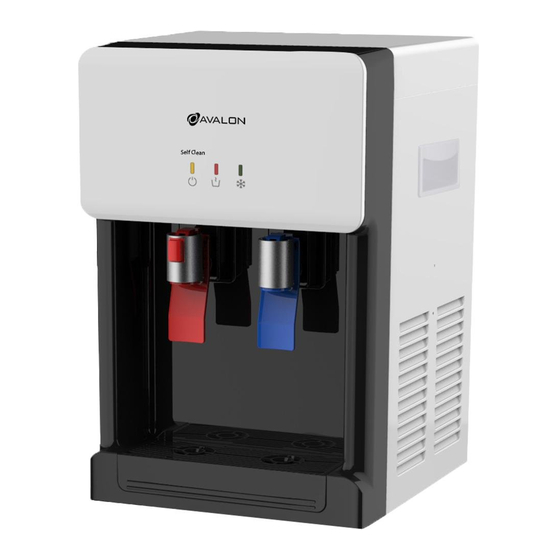
- Page 3 A: PART NAME 1 2 3 NO. PART NAME NO. PART NAME Right handle Ozone and Power Indicator Lamp Ozone Switch Heating Pilot Lamp Heating Switch Cooling Pilot Lamp Cooling Switch Front Shell Decorative Panel Night Light Switch Night Light Left Handle Tap of Cold Water Tap of Hot Water...
-
Page 4: B Safety Precautions
B: SAFETY PRECAUTIONS... -
Page 5: C: Getting Started
This appliance can be used by children aged from 8 years and above if they have been given supervision or instruc on concerning use of the appliance in a safe way and if they understand the hazards involved. Cleaning and user maintenance shall not be made by children unless they are older than 8 and supervised. - Page 6 3. Unpack the product, install the drip tray. 4. Take out the quick joint adapter with valve and install it on the water pipe. Intall the adapter: Metal Adapter with PE Tube (3m) Extra Filter Flushing Tape and Tools (not included) Valve Adapter Electronic Valve Connector...
- Page 7 3. Hold this filter with A4 System filter flushing adapter over a sink and turn on the valve near the water source. Let water to flow out of the filter and A4 System filter flushing adapter for 5 minutes to flush the new filter. 4.
-
Page 8: Filter Replacement Cycle
9. Turn back on the valve from the water source. 10. Turn on the blue valve to the le of the filter. 11. Flowchart of water genera on Water inlet Tap water PE pipe 12. A er installa on of water line and filter, plug the power cord into a grounded power supply and begin to use machine normally. -
Page 9: Water Leakage
Nightlight isn't working. Make sure the power cord is properly connected to a working outlet. Make sure nightlight power switch on back of dispenser is ON. Dispenser is noisy. Make sure the dispenser is posi oned on a level surface. Small water flow. - Page 10 E: WATER PURIFIER push bu on push bu on A er setup, hot water will be available in 15-20 minutes. 1. Posi on bo le, glass, pitcher, or cooking pot below spout. 2. Slide red bu on away from you and depress hot water push bu on downward to start hot water flow.
- Page 11 6) Turn back on the valve from the water source or the valve to the le of the filter inside the cabinet. 7) Only replace the filter with a new Avalon filter designed for this water cooler. Any other type of filter will damage the machine and void any warranty.
- Page 12 G: MACHINE INSTALLATION 1. Loosen the screw of the right bottom angle just as the picture shown. WARNING! To avoid a hazard due to instability of the appliance, it must be fixed in accordance with the instruc ons. If you encounter any issues or have any concerns, please email us at support@avalonproducts.com or call 1800-256-0695 .
Need help?
Do you have a question about the A8CTBOTTLELESSWHT and is the answer not in the manual?
Questions and answers