Table of Contents
Advertisement
Advertisement
Table of Contents

Related Manuals for VEVOR M1H-ZP5-254D-1


Summary of Contents for VEVOR M1H-ZP5-254D-1
- Page 1 BENCH-TYPE CIRCULAR SAW M1H-ZP5-254D-1 USER MANUAL...
- Page 3 CustomerService@vevor.com This is the original instruction, please read all manual instructions carefully before operating. VEVOR reserves a clear interpretation of our user manual. The appear- ance of the product shall be subject to the product you received. Please forgive us that we won't inform you again if there are any technology or software updates on our product.
-
Page 4: Safety Instruction
SAFETY INSTRUCTION Danger! Read all safety regulations and instructions. Keep all safety regulations and instructions in a safe place for future use. Warning - To reduce the risk of injury, user must read instructions manual carefully . This product is of protection class II. That means it is equipped with enhanced or double insulation. -
Page 5: General Safety Regulations
GENERAL SAFETY REGULATIONS WARNING! Read all safety warnings instructions, illustrations and specifi- cations provided with this power tool. Failure to follow the warnings and instruc- tions may result in electric shock, fire and/or serious injury. The term "power tool" in the warnings refers to your mains-operated (corded) power tool or battery-operated (cordless) power tool. - Page 6 3) Personal safety a) Stay alert, watch what you are doing and use common sense when operating a power tool. Do not use a power tool while you are tired or under the influence of drugs, alcohol or medication. A moment of inattention while operating power tools may result in serious personal injury.
-
Page 7: Additional Safety Instructions For Table Saws
d) Store idle power tools out of the reach of children and do not allow persons unfamiliar with the power tool or these instructions to operate the power tool. Power tools are dangerous in the hands of untrained users. e) Maintain power tools. Check for misalignment or binding of moving parts, break- age of parts and any other condition that may affect the power tools operation. - Page 8 c) Immediately reattach the guarding system after completing an operation (such as rabbeting, dadoing or resawing cuts) that requires the removal of the guard, riving knife and/or anti-kickback device. The guard, riving knife, and anti-kickback device help to reduce the risk of injury. d) Make sure the saw blade is not contacting the guard, riving knife or the work- piece before the switch is turned on.
- Page 9 e) Use only the push stick provided by the manufacturer or constructed in accor- dance with the instructions. This push stick provides sufficient distance for the hand from the saw blade. f) Never use a damaged or cut push stick. A damaged push stick may break causing your hand to slip into the saw blade.
- Page 10 a) Never stand directly in line with the saw blade. Always position your body on the same side of the saw blade as the fence. Kickback may propel the workpiece at high velocity toward anyone standing in front and in line with the saw blade. b) Never reach over or in the back of the saw blade to pull or support the workpiece.
- Page 11 4) Table saw operating procedure warnings a) Turn off the table saw and disconnect the power cord when removing the table insert, changing the saw blade or making adjustments to the riving knife, antikick- back device or saw blade guard, and when the machine is left unattended. Precautionary measures will avoid accidents.
- Page 12 SAFETY INSTRUCTIONS FOR THEHANDLING OF SAW BLADES 1. Only use insertion tools if you have mastered their use. 2.Observe the maximum speed. The maximum speed specified on the insertion tool may not be exceeded. If specified, observe the speed range. 3.
-
Page 13: Layout And Items Supplied
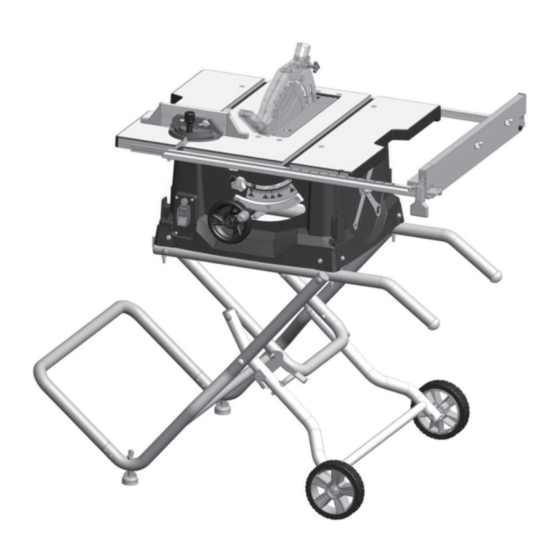
LAYOUT AND ITEMS SUPPLIED 1. LAYOUT 1. Front rip fence rail with ruler 19. Bevel angle lock 2. Miter gauge assembly 20. Push stick 3. Blade guard assembly 21. Carry handles (folded position) 4. Table insert 22. Stand in folded position 5. -
Page 14: Items Supplied
2. ITEMS SUPPLIED Please check that the article is complete as specified in the scope of delivery. If parts are missing, please contact our service center or the sales outlet and upon presen- tation of a valid bill of purchase. Also, refer to the warranty table in the service information at the end of the operating instructions. - Page 15 to be a case of misuse. The user / operator and not the manufacturer will be liable for any damage or injuries of any kind caused as a result of this. Please note that our equipment has not been designed for use in commercial, trade or industrial applications.
-
Page 16: Technical Data
TECHNICAL DATA AC Motor ......................... 120V ~ 60Hz Rated Current........................... 15A IdleSpeed n ........................5000 RPM Cutting-Off Wheel ..................Ø254xØ15.875x2.8mm Number Of Teeth ........................40 Main Table Size ......................650x 576mm Rip Capacity For Right ......................625 mm Cutting Height Max......................85 mm / 90° .............................. -
Page 17: Before Starting The Equipment
Wear ear-muffs. The impact of noise can cause damage to hearing. Keep the noise emissions and vibrations to a minimum. • Only use appliances that are in perfect working order. • Service and clean the appliance regularly. • Adapt your working style to suit the appliance. •... -
Page 18: Assembly And Adjustments
• When working with wood that has been processed before, watch out for foreign bodies such as nails or screws, etc. • Before you actuate the On/Off switch, make sure that the saw blade is correctly fitted and that the machine’s moving parts run smoothly. ASSEMBLY&... - Page 19 Mounting of the saw on folding stand 1. Position the saw on top of the stand (choose which orientation best suits you). Use 4 screws and nylon hex. nuts to secure job site saw to stand. Accessory storage and folding/unfolding stand (Fig.3 ) Note: Before folding stand, remove all workpieces from the table.
- Page 20 Mounting blade guard (Fig. 4) Mount the saw blade guard(A) together with the bolt(B) on top of the riving knife(C), so that the bolt is firmly seated in the slot of the riving knife(C). Fig. 4 Do not screw in the bolt(B) too tightly; the saw blade guard(A) must move freely. Plug the suction hose(D) on to the suction adapted and the connecting piece of the saw blade guard(A).
- Page 21 Fig. 5 Fig. 6 Mounting rip fence on table & adjustments(Fig. 7) 1.Position the front of the rip fence(A) on the front rail (B). Lower the back end of the rip fence on the rear rail. Check to make sure the rip fence slides freely on the rails.
- Page 22 Fig. 7 Mounting and adjusting miter gauge(Fig. 8) When crosscutting and the blade is set at 90° or 45°to the table, the miter gauge can be used in either T-slot on the table. When crosscutting and the blade is tilted, use T-slot on right side of table where the blade is tilted away from your hands and miter gauge.
- Page 23 Adjusting the extendable extension table(Fig. 9 & Fig. 10) The extension table allows the user to increase the length of the table for greater ripping capacity. To use the extension table; 1.Unlock or remove the rip fence from the table. 2.Unlock the extension table(A) by loosen the extension lock lever (B), slide the extension to the desired width.
- Page 24 Adjusting the blade angle (for beveled cuts) Note: A 90° cut has a 0° bevel angle and a 45° cut has a 45° bevel angle. 1.Unlock the bevel locking lever (B). 2. Push in and then turn the exterior hand wheel (A) to adjust the blade bevel angle, turning it counterclockwise increases the bevel angle of the blade.
-
Page 25: Using The Saw
Fig. 13 USING THE SAW The operation of power tools involves a certain amount of hazard for the opera- tor.Before attempting regular work we recommend you get the feel of operations using scrap lumber to check settings. Read entire instructions before you start to cut workpiece. - Page 26 2. RESET BUTTON (OVERLOAD PROTECTOR) This saw comes with an overload reset button (B) If the saw motor over heats, a safety mechanism stops the motor automatically due to motor over-heating or low voltage. To prevent motor over-heating, reduce load on motor or check voltage.
-
Page 27: Replacing The Power Cable
Start the motor and advance the work holding it down and against the fence. Never, stand in the line of the saw cut when ripping. Hold the work with both hands and push it along the fence and into the saw blade. The work can then be fed through the saw blade with one or two hands. -
Page 28: Cleaning, Maintenance And Ordering Of Spare Parts
CLEANING, MAINTENANCE AND ORDERING OF SPARE PARTS Always pull out the mains power plug before star-ting any cleaning work. 1. Cleaning • Keep all safety devices, air vents and the motor housing free of dirt and dust as far as possible. Wipe the equipment with a clean cloth or blow it with compressed air at low pressure. - Page 29 STORAGE Store the equipment and accessories in a dark and dry place at above freezing temperature. The ideal storage temperature is between 5 and 30 °C. Store the electric tool in its original packaging. Manufacturer: Zhejiang Huafeng Electric Tools Co., Ltd. Address: No.2111 Huafeng Road, Fucun Town, Jindong District, Free Trade Experimental Zone, 321037 Jinhua City, Zhejiang,PEOPLE'S REPUBLIC OF CHINA MADE IN CHINA...
- Page 32 E-mail: CustomerService@vevor.com...
Need help?
Do you have a question about the M1H-ZP5-254D-1 and is the answer not in the manual?
Questions and answers