Table of Contents
Advertisement
Quick Links
Advertisement
Table of Contents

Subscribe to Our Youtube Channel
Related Manuals for ekwb EK-PRO GPU WB AMP-Trinity RTX 4090 Ni+Inox


Summary of Contents for ekwb EK-PRO GPU WB AMP-Trinity RTX 4090 Ni+Inox
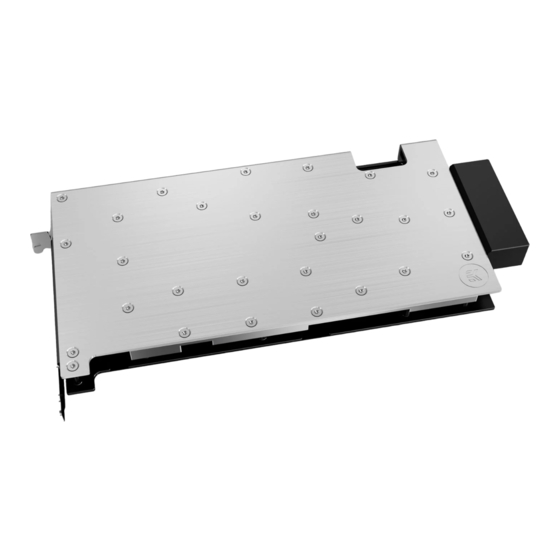
- Page 1 EK-PRO GPU WB AMP-Trinity RTX 4090 Ni+Inox GPU WATER BLOCK USER GUIDE...
- Page 2 Before you start using this product, please follow these basic guidelines: Carefully read the manual before beginning with the installation process. Remove your graphics card from the computer for the safest mounting process to prevent any possible damage to your GPU or its circuit board (PCB).
-
Page 3: Table Of Contents
TABLE OF CONTENTS BOX CONTENTS WATER BLOCK DIMENSIONS TECHNICAL SPECIFICATIONS AND WATER BLOCK PARTS PREPARING YOUR GRAPHICS CARD REMOVING THE STOCK COOLER ZOTAC GAMING GeForce RTX 4090 AMP Extreme AIRO CUTTING AND PLACING THERMAL PADS CLEANING THE PCB APPLYING THERMAL COMPOUND ATTACHING THE WATER BLOCK INSTALLING THE BACKPLATE ATTACHING THE BACKPLATE... -
Page 4: Box Contents
Thermal PAD G 2.0 mm - (120 x 24 mm) Thermal PAD F 1.5 mm - (120 x 16 mm) (2x) (2x) EK-Pro GPU WB AMP-Trinity RTX 4090 Ni+Inox Zotac RTX Pro Backplate (1x) Screw M2.5 x 4 ax1 (12x) Screw M2.5 x 7 AX1 (10x) Thermal PAD F 2.0 mm - (120 x 16 mm) -
Page 5: Water Block Dimensions
WATER BLOCK DIMENSIONS 23.8 mm 284 mm 247.4 mm 14.1 mm - 5 -... -
Page 6: Technical Specifications And Water Block Parts
TECHNICAL SPECIFICATIONS AND WATER BLOCK PARTS Position Description Quantity 106351 Coldplate (Nickel) 106355 Top plate (Inox) 106359 IO Bracket (Nickel) 106133 Plexi insert 103767 FC terminal Direct (Acetal) 106362 Backplate (Bl. elox) 5155 Terminal OR 15 x 1 mm 106360 Main OR Zotac RTX 4090 Pro 106367 Inner OR 170 x 2 mm... -
Page 7: Preparing Your Graphics Card
PREPARING YOUR GRAPHICS CARD REMOVING THE STOCK COOLER STOCK COOLER ZOTAC GAMING GeForce RTX 4090 AMP Extreme AIRO STEP 1 Using a Philips-head screwdriver, unscrew marked screws to detach the stock cooler and retention bracket from the GPU PCB. After removing, carefully unplug all the LEDs and FANs cables. -
Page 8: Cutting And Placing Thermal Pads
STEP 3 CLEANING THE PCB Wipe off the remains of the original thermal compound using a nonabrasive cloth or Q-tip, as shown in the sample image, until the components and circuit board are completely clean. EK recommends the use of denatured alcohol for removing TIM leftovers. After that, remove all remaining stock thermal pads from the PCB. -
Page 9: Applying Thermal Compound
STEP 2 Once cut to the size, Thermal Pads should be placed on the F1.5 F1.5 coldplate, as shown in the picture. F1.5 F1.5 G0.5 G0.5 G0.5 G0.5 G0.5 G0.5 F1.5 F1.5 Thermal Pad - 120 x 16 x 1.0 mm Thermal Pad - 120 x 16 x 1.5 mm F1.5 Thermal Pad - 120 x 24 x 0.5 mm... -
Page 10: Attaching The Water Block
ATTACHING THE WATER BLOCK STEP 1 Carefully position the water block with preinstalled standoffs on the graphics card. During this process, make sure you have aligned the mounting holes of the PCB with the holes of the water block. Pay attention not to use too much force when pressing the block down to the PCB since chip dies are prone to cracking. -
Page 11: Installing The Backplate
INSTALLING THE BACKPLATE STEP 1 After attaching the water block, a few more thermal pads needs to Thermal Pad F – 2.0 mm (120 x 16 mm) be cut into smaller pieces to cover all the necessary componets. EK made sure to provide with more than an adequate quantity of thermal pads to complete this step. -
Page 12: Attaching The Backplate
Check whether the water block makes contact with the intended integrated circuit. Then repeat Steps from the previous section to re-attach the block. In case you fail to obtain good contact, please check again or contact our support service at https://www.ekwb.com/customer-support/. - 12 -... -
Page 13: Inserting The Graphics Card Into The Chassis
INSERTING THE GRAPHICS CARD INTO THE CHASSIS Carefully lift your graphics card with the installed water block and insert it into your PC’s motherboard PCI express expansion slot. Please keep in mind that your graphics card is heavier than before it was equipped with the water block. -
Page 14: Support And Service
SUPPORT AND SERVICE In case you need assistance or wish to order spare parts or a new mounting mechanism, please contact: https://www.ekwb.com/customer-support/ For spare parts orders, refer to the page with “TECHNICAL SPECIFICATIONS AND WATER BLOCK PARTS” where you can find the EAN number of each part you might need.
Need help?
Do you have a question about the EK-PRO GPU WB AMP-Trinity RTX 4090 Ni+Inox and is the answer not in the manual?
Questions and answers