
Related Manuals for Diesse CHORUS AUTOSAMPLER


Summary of Contents for Diesse CHORUS AUTOSAMPLER
- Page 1 OPERATION MANUAL SW 0.30 Version of 28/03/2018 Rev. 02 of March 2021 Instrument for automatic transfer of samples (dedicated to Chorus Trio and Chorus Trio Expander) FOR IN VITRO DIAGNOSTIC USE ONLY...
- Page 2 Tel. +39 0577 587154 - +39 0577 587121, Fax. ++39 0577 587151 e-mail: scientificsupport@diesse.it mechanical No part of this manual may be reproduced, in any form or by electronic or means for whatever use, without written permission from DIESSE Diagnostica Senese S.p.A. Rev 2 (03.2021) AUTOSAMPLER USER MANUAL...
- Page 3 Autosampler by the Chorus Trio Expander Chorus Autosampler Models This manual refers to the following C HORUS UTOSAMPLER Chorus Autosampler 81210 Chorus Autosampler + top cover modified for Chorus TRIO 81215 Rev 2 (03.2021) AUTOSAMPLER USER MANUAL...
- Page 4 Standards applied in this document: 98/79/EEC “directive relevant to the In Vitro Medical-Diagnostic Devices (IVD)” EN 61010-1 (CEI 66-5) “Safety requirements for electrical equipment for measurement, control laboratory use – Part1: General requirements”. The instrument is classified in Class I EN 61010-2-101 “Safety requirements for electrical equipment for measurement, control and laboratory use –...
- Page 5 Symbols graphic symbols used in this manual An instrument meeting the requirements of the European Directive concerning in vitro diagnostic medical devices In vitro diagnostic medical devices Manufacturing unit date Unit serial number Manufacturer Electric and safety symbols used in this document Protective conductor WEEE: Waste electrical and electronic equipment - Separate Collection is required pursuant to Legislative Decree No.
- Page 6 When selling or transferring, make sure that this manual accompanies the instrument. The installation must be carried out by an authorized technician of Diesse Diagnostica Senese S.p.A. CHORUS AUTOSAMPLER is specifically designed to be used with the procedures provided by Diesse Diagnostica Senese S.p.A.
-
Page 7: Table Of Contents
Summary CHAPTER 1 ..................................9 INTENDED USE .................................... 9 INTRODUCING THE INSTRUMENT ............................ 9 GENERAL DESCRIPTION OF THE INSTRUMENT ...................... 10 1.3.1 Front side ......................................10 1.3.1.1 Display ......................................10 1.3.2 Left side ......................................11 TYPES OF COMPATIBLE TUBES ............................11 MATERIALS SUPPLIED WITH THE INSTRUMENT ...................... 11 MATERIALS REQUIRED, BUT NOT SUPPLIED ...................... - Page 8 3.2.3.2 printing the work plan ..............................31 3.2.4 Usable tip collection tray ..............................32 SOFTWARE DESCRIPTION..............................33 3.3.1 Chorus Autosampler Software ............................33 3.3.2 Chorus Trio Software ................................34 3.3.3 Chorus Trio Expander Software ............................38 CHAPTER 4 ................................43 DESCRIPTION OF A WORK CYCLE IN CHORUS TRIO (VERSION WITH OR WITHOUT EXPANDER) + CHORUS AUTOSAMPLER SYSTEM............................
-
Page 9: Chapter 1
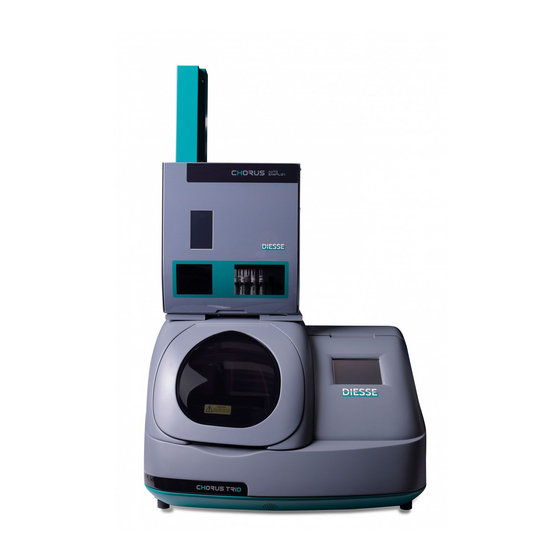
Chorus Autosampler instrument (Fig. 1 and Fig. 1) adds automation to the Chorus Trio line by perfecting the dispensation of biological samples in the strips inserted into. More specifically, it performs the following operations: Barcode reading of samples;... -
Page 10: General Description Of The Instrument
(see section 3.2.2). 1.3.1.1 ISPLAY The colour touch screen is on the front door. Only DIESSE Diagnostica Senese technical assistance may use this screen, for troubleshooting and software parameter settings. Rev 2 (03.2021) AUTOSAMPLER... -
Page 11: Left Side
1.3.2 EFT SIDE Fig. 4 – Chorus Autosampler left side Electrical connections are on the side of Chorus Autosampler (Fig. 4): power switch 2. power cord socket 3. 1 RS232 serial port 4. 1 USB 2.0 type-A port 5. 1 USB 2.0 type-B ports 1.4 TYPES OF COMPATIBLE TUBES... -
Page 12: Materials Required, But Not Supplied
12. Operation manual (1pc). If Chorus Trio is already installed in the lab, Chorus Autosampler will be supplied with another box, containing the modified top cover necessary for the installation. 1.6 MATERIALS REQUIRED, BUT NOT SUPPLIED Other materials, not supplied by Diesse Diagnostica Senese with the instrument, are required for the use of Chorus Autosampler, namely: Disposable gloves, protective glasses, and lab garments;... -
Page 13: Plate Data
Electrical requirements Interfaces Power supply: 110-230 V 1 USB Host, 1 USB Client, 1 RS232C Frequency: 50-60 Hz Central unity Power consumption: Max 100 VA ARM CORTEX-M4 180 MHz Microprocessor Fuses 2 x 10A (5x20 mm) Instrument Safety Protection category: CLASS I Safety standards CEI EN 61010-1 EMC: CEI EN 61326 * Serial numbers from 104 to 113 have the following dimensions: 365mm(l)x581mm(h)x288(d) -
Page 14: Chapter 2
• It is forbidden to use Chorus Autosampler for any activity other than its intended use. • Do not insert into Chorus Autosampler any component or material that is not relevant to the instrument’s specific use. • The standard use of the machine foresees operations during which the operator may come into... -
Page 15: Electrical Hazards
The instrument is not protected against liquid spills and important phenomena of this kind could: Seriously damage the operation of the two machines: in Chorus Autosampler there is a large hole, used for mechanical arm input and sample dispensing in the Chorus Trio. Spilling liquids in this hole could seriously damage Chorus Trio. -
Page 16: Shipping And Installation
Any damage caused during transportation or the lack of parts or items must be immediately ▪ notified to Diesse Diagnostica Senese Store the packaging for any future technical assistance needs. ▪... - Page 17 2. Remove the machine kit from the top of packaging and the carton and polyethylene packaging. The inside of the box is shown in Fig. 7. The kit is shown in the table below Fig. 7. Fig. 7 - Chorus Autosampler CHORUS AUTOSAMPLER KIT...
- Page 18 3. Extract the instrument from the box by holding it with both hands, one on each side, taking care that the top of the Chorus Trio carter has already been replaced with the modified one for the assembling of Chorus Autosampler. CAUTION The before mentioned operation shall be performed by one person only, making sure to hold the instrument with both hands.
-
Page 19: Instrument Installation
Chorus Autosampler assembly plate. Chorus trio with modified carter and plate is as shown in Fig. 8. The 4 holes for Chorus Autosampler installation are circled in red. - Page 20 Fig. 9 – Envelope with assembly screws and inserts with slot 2. Remove machine rear panel by unscrewing 6 screws, six in the rear and one per side (top), holes shown in Fig. 10. After extracting the panel, there are two assembly holes at the bottom of the two ends of the instrument.
-
Page 21: Uninstallation And Reinstallation
5. Reassemble the rear panel. 6. Connect the power cord to the power supply and to Chorus Autosampler (Fig. 12). 7. Connect USB cable to one end (USB 2.0 type-A) on Chorus Autosampler, and the other one (USB 2.0 Type-B) on Chorus Trio. -
Page 22: Installation In A Different Location
2. Before disposal, thoroughly clean and decontaminate all possible sample or reagent residues 3. The instrument should only be dismantled by qualified personnel 4. Chorus Autosampler is considered an electronic waste. Local authorities will be able to provide information on waste collection points of this type. -
Page 23: Ordinary Maintenance
2.4.2 O RDINARY MAINTENANCE Ordinary maintenance must be performed by the user depending on instrument needs, and consists of the following: Daily cleaning of the instrument and its surrounding area 2. Checking, and eventually restocking tips 3. Cleaning the steel box 2.4.3 S CHEDULED MAINTENANCE Regular maintenance must be provided to ensure the correct instrument operation. -
Page 24: Chapter 3
Make sure that the power switch on the side of the machine is placed down, with the "I" indicator sticking out. 2. Connect one end of the power cord to the socket on the side of Chorus Autosampler (see Fig. 4) and the other one to the wall socket. -
Page 25: Preparing Working Session
3.2 PREPARING WORKING SESSION The required materials to place in the Chorus Autosampler to perform a working cycle are the following: Disposable tips ▪ Samples ▪ Calibrators and QC ▪ Used tip collection box ▪ 3.2.1 ISPOSABLE There is only on type of tips compatible with the machine. These tips are disposables and speficic for automation [Ref: 83611], not steryle, 200 µl. -
Page 26: Samples And Acceptance Limits
CAUTION Diesse Diagnostica Senese shall not be liable for any damage to property or persons resulting from the use of disposable tips other than those indicated in this user manual and provided by DIESSE Diagnostica Senese S.p.A. 3.2.2 AMPLES AND ACCEPTANCE LIMITS There are 30 positions for sample insertion. - Page 27 The result will be the following: 300µl (dead volume) + 4*50µl + 80µl + 130µl + 150µl = 860 µl. CAUTION Diesse Diagnostica Senese shall not be liable for any damage to property or persons resulting from the use of sample tubes other than those indicated in this user manual.
-
Page 28: Calibrators, Qcs And Acceptance Limits
3.2.3 , QC ALIBRATORS S AND ACCEPTANCE LIMITS 30 are the positions for calibrators and QCs and they are the same as those for the samples. Both calibrators and QCs are contained in a small vial with size 10x45mm. To be placed inside the same sample housing they need an adapter, as shown in Fig. - Page 29 Fig. 21b - Properly inserted calibrator printed sample tray) CAUTION Calibrators and QCs must be loaded into the rotor without plug and inserted into the appropriate adapters. The minimum volume required for a correct transfer of the sample into Chorus Trio varies only by the type of test.
-
Page 30: Calibrator And Qc Barcodes
CAUTION Diesse Diagnostica Senese shall not be liable for any damage to property or persons resulting from the use of QC or calibrator vials other than those indicated in this user manual and provided by DIESSE Diagnostica Senese. Diesse Diagnostica Senese shall not be liable for any damage to property or persons resulting from the use of diagnostic test kits other than those indicated in this user manual and provided by DIESSE Diagnostica Senese. -
Page 31: Printing The Work Plan
3. total volume required per each sample (sum of volumes required in the various tests + dead volume) The position in Chorus Autosampler is useful if two identical patient codes are used, so if one tube only is not sufficient to perfect all the tests desired for that sample. -
Page 32: Usable Tip Collection Tray
SABLE TIP COLLECTION TRAY Chorus Autosampler comes with a stainless steel box, for the collection of disposable tips used in the work cycle. The box must be placed on the left side of the samples holder rotor with the top edge facing the operator. -
Page 33: Software Description
Fig. 26 - Machine start up Only two of the three visible keys are active. The two active keys are green coloured. The bottom key activates the pages required by DIESSE Diagnostica Senese technical personnel to modify machine parameters and settings. -
Page 34: Chorus Trio Software
3. Green if the sample has been correctly transferred. NOTE: Barcode digits do not appear on the Chorus Autosampler screen, but they may be read on the Chorus Trio screen. All Chorus Autosampler ongoing work cycle information is displayed on Chorus Trio. - Page 35 By pressing the “C-list” key, the image (b) of Fig. 29 will appear, which presnts two extra keys Sampler” and “Volumes”, if compared to the software version with Chorus Trio only. Pressing the “Sampler” key the work session with Chorus Autosampler is activated, while pressing the "Volumes" key the workplan is printed.
- Page 36 Chorus Trio). Recovery procedures are described in Chapter 4. Also in the Chorus Trio + Chorus Autosampler system, priority is given to errors, so if any, "Err" column remains assigned to this task, while in case of absence of errors, the column is occupied by the position of the sample into Chorus Autosampler.
- Page 37 A view of the resulting R-list during the samples plate control lap is shown in Fig. 33. Fig. 33 - R-list Pressing the "RUN" key, Chorus Trio sends to Chorus Autosampler the request to start dispensing samples, which will be transferred all at once, so that they can be retrieved within a short time to handle any analysis laboratory needs.
-
Page 38: Chorus Trio Expander Software
Chapter 4. Once the errors are solved, by pressing "RUN" again from the R-list window, the analysis cycle begins and Chorus Autosampler has completed its work. From now on, the Chorus Autosampler door will be unlocked and samples can be retrieved. - Page 39 Fig. 37 - Disposable tips insertion The message invites to insert the maximum amount of tips into the Chorus Autosampler rotor. NOTE: It is recommended to always insert the maximum amount of tips into the rotor, because in case of total or partial tips lack, the machine will search for all positions (32), a given action which cannot be stopped or retrieved.
- Page 40 A dedicated window will appear which will allow, via keyboard or external barcode reading, to modify the sample code and/or the strip code. NOTE: If the sample code comes from an automatic Chorus Autosampler reading, only the type of associated test may be changed.
- Page 41 Also in the Chorus Trio Expander + Chorus Autosampler system, priority is given to errors, so if any, "Test/Strip" column remains assigned to this task, while in case of absence of errors, the column is occupied by only the test associated with the sample and code of the corresponding strip.
- Page 42 "Run" again from the R-list window, the analysis cycle can begin and Chorus Autosampler has completed its work. From now on, the Chorus Autosampler door will be unlocked and samples can be retrieved.
-
Page 43: Chapter 4
Open the Chorus Autosampler door and insert the 32 tips and the used tip collection box as described in section 3.2. Chorus Autosampler has a bidirectional connection to the host, so it can obtain the list of tests to be executed on the samples and communicate the results of those performed. The operator has the... - Page 44 If all the codes have been correctly read, their number will appear in the "Sample" column, while in case of problems, the position in the Chorus Autosampler will be displayed instead of the sequence of numbers. For example, label “SMP: 2”, indicates a sample with unreadable code in position 2 in the samples holder rotor (see Fig.
- Page 45 Fig. will appear while Chorus Trio Expander will appear message Fig. 45. Fig. 45 - Request rotor re-reading A second run of barcode reading of the entire rotor can be useful when some vials or tubes have been inserted with the barcode in a different (and therefore incorrect) position if compared to the one shown in section 3.2.2.
-
Page 46: Adding Samples, Calibrators And Controls (Version With Or Without Expander)
3. read the code with the scanner, 4. press “Ok” key. The sample code will appear in the selected row instead of the “SMP:XX” label. All manually entered codes will be recognizable in the end-of-cycle of Chorus Trio (version with or without Expander) printing with the "?"... -
Page 47: Transferring Samples (Version With Or Without Expander)
R-List. NOTE: Chorus Autosampler does not exclude manual test preparation in Chorus Trio (version with or without Expander). In this case the procedure is the same one used in case of absence of the sampler. - Page 48 VERSION WITH OR WITHOUT XPANDER Chorus Autosampler performs tips search on all 32 available positions if they are wholly or partially missing. A timed sound alarm is generated, and an error message is displayed on the display that invites to re-integrate the tips into the rotor ( Fig.
- Page 49 Fig. 48 for Chorus Trio Expander). Fig. 48 - Reintegration tips - confirming As soon as the "YES" key is pressed, the Chorus Autosampler door will be locked and the machine will search for tips in all 32 available positions.
-
Page 50: Errors During R-List Creation (Version With Or Without Expander)
This calibrator must be added into the Chorus Autosampler. Since the door is unlocked, it can be opened so that it is possible to insert the calibrator with its adapter into the rotor of the machine. Then follow the procedure explained in section 4.2.1.1. -
Page 51: Errors During Sample Transfer (Version With Or Without Expander)
VERSION WITH OR WITHOUT XPANDER Chorus Autosampler uses disposable tips to transfer sample into strips. There are a number of internal controls to make sure that if the mechanical arm does not correctly insert the tip into its housing, this is released and the next one is taken. -
Page 52: Chorus Trio-Chorus-Autosampler Communication Error
VERSION WITH OR WITHOUT XPANDER Chorus Trio (version with or without Expander) and Chorus Autosampler are connected via USB cable. There may be a communication problem on that cable. If the problems occur during samples transfer, Chorus Trio (version with or without Expander) will wait for Chorus Autosampler's response, then a message of communication failure will be displayed. - Page 53 VERSION WITH OR WITHOUT XPANDER At the end of the transfer session, Chorus Autosampler has completed its work and Chorus Trio (version with or without Expander) starts testing. Chorus Trio (version with or without Expander) starts session automatically if no errors occurred during dispensation by Chorus Autosampler, while it is subordinated to the actions of the user otherwise.
- Page 54 Fig. 53 - Sample error If the user presses the "Yes" key, the instrument will be stopped and the user can see the strips to be retrieved, selected in dark colour for Chorus Trio (see Fig. 54) and highlighted in red with the addition of an arrow icon for Chrous Trio Expander (see Fig.
- Page 55 Finally, if the user does not press any button and allows the timed alarm of 60 seconds to expire (Fig. 44-a or Fig. 44-b), Chorus Trio (version with or without Expander) will start the cycle without being able to recover unused strips. Rev 2 (03.2021) AUTOSAMPLER USER MANUAL...
-
Page 56: Chapter 5
CHAPTER 5 5.1 TOUCH SCREEN CALIBRATION The user can calibrate the touch screen during the start-up procedure of the instrument by pressing the screen for a few seconds as soon as the start-up window is displayed (see Fig. 56). Fig. 56 - Start-up screen Once the calibration procedure has started, the screen becomes white and shows the message of Fig. -
Page 57: Troubleshooting
Chorus Autosampler does not proceed with dispensation, it is stopped CORRECTIVE ACTION Connect the USB cable to Chorus Trio and Chorus Autosampler 2. Turn off and restart Chorus Autosampler 3. Call technical assistance ERROR Door locked DESCRIPTION It is not possible to open the door at the end of... - Page 58 Distributed by: http://www. iesse.it e-mail: salesoffice@ iesse.it...
Need help?
Do you have a question about the CHORUS AUTOSAMPLER and is the answer not in the manual?
Questions and answers