
Related Manuals for Hunter Douglas Pirouette PowerView+ Gen 3 Automation


Summary of Contents for Hunter Douglas Pirouette PowerView+ Gen 3 Automation
- Page 1 Installation Installation Operation Operation Care Care • • • • Pirouette Window Shadings ® PowerView+ Gen 3 Automation ™...
-
Page 2: Table Of Contents
Removing the Shading ............17 Cleaning Procedures ............17 DECLARATIONS..............19 WARRANTY .................20 Questions? Call Hunter Douglas Consumer Support at (800) 789-0331. © 2022 Hunter Douglas. All rights reserved. All trademarks used herein are the property of Hunter Douglas or their respective owners. -
Page 3: Getting Started
GETTING STARTED Product View Optional Dust Cover (For Outside Mount) Optional Back Cover (For Inside and End Mount) Fabric-covered Installation Headrail Brackets Battery Wand Headrail Control End Cap Button Fabric Bottom Rail... -
Page 4: Important Operating Note
GETTING STARTED Thank you for purchasing Hunter Douglas Pirouette Window Shadings with PowerView+ ™ ® Gen 3 Automation. With proper installation, operation, and care, your new shadings will provide years of beauty and performance. Please thoroughly review this instruction booklet and the enclosed packing list before beginning the installation. -
Page 5: Installation
INSTALLATION Installation Overview To install your shading, you will need to perform the following three steps: STEP 1: Mount the Installation Brackets STEP 2: Install the Shading STEP 3: Connect the Power Source, If Applicable STEP 1 — Mount the Installation Brackets Your order will include the correct number of installation brackets for your shading width, ■... -
Page 6: Mount The Installation Brackets - Inside Mount
INSTALLATION Ensure your brackets will not interfere with the cable location coming from the PowerView+ Gen 3 Smart Power Supply. See the recommended cable locations below. The cable should exit on the same side that the shading motor is on. Inside Mount Inside Mount Outside Mount... - Page 7 INSTALLATION Mount the Installation Brackets Mark 2" from each jamb for bracket location. ■ If more than two installation brackets came with your order, space additional bracket(s) ➤ evenly between the two end brackets and mark their location. Mount into wood whenever possible.
- Page 8 INSTALLATION Install the Optional Back Cover Install the cover into the back cover brackets. ■ If necessary, trim the back cover to the desired width. ■ Back Cover Proceed to “STEP 2 — Install the Shading” on page 10.
-
Page 9: Mount The Installation Brackets - Outside Mount
INSTALLATION Mount the Installation Brackets — Outside Mount Mount the Installation Brackets Center the headrail over the window opening at the desired height. Use a pencil to lightly ■ mark the wall at each end of the headrail. Alternatively, measure the width of the headrail and use that width to mark the ➤... - Page 10 INSTALLATION Drill the screw holes using a ⁄ " drill bit. ■ CAUTION: Use drywall anchors when mounting into drywall. Attach the installation or extension brackets using the screws provided. ■ IMPORTANT: The top of the installation brackets or extension brackets must be level with their front edges aligned.
-
Page 11: Mount The Installation Brackets - End Mount
INSTALLATION Mount the Installation Brackets — End Mount End mount the headrail when conventional mounting techniques will not work — for example, in an arched window opening. Mount the Extension and Installation Brackets Mount extension brackets to each side of the opening at the desired height of the shading. ■... -
Page 12: Step 2 - Install The Shading
INSTALLATION STEP 2 — Install the Shading IMPORTANT: Leave the protective cover on the fabric-covered headrail until you are satisfied with the installation and operation of your shading. Lever Headrail Position the shading so that the ■ front faces you. Slide the headrail into the ■... -
Page 13: Step 3 - Connect The Power Source
INSTALLATION STEP 3 — Connect the Power Source NOTE: When power is connected to the motor, a blue LED inside the control button housing will flash to indicate the shading is ready for operation. Connect the shading’s power cable to the field wiring utilizing the male plug-in connector ■... -
Page 14: Operation
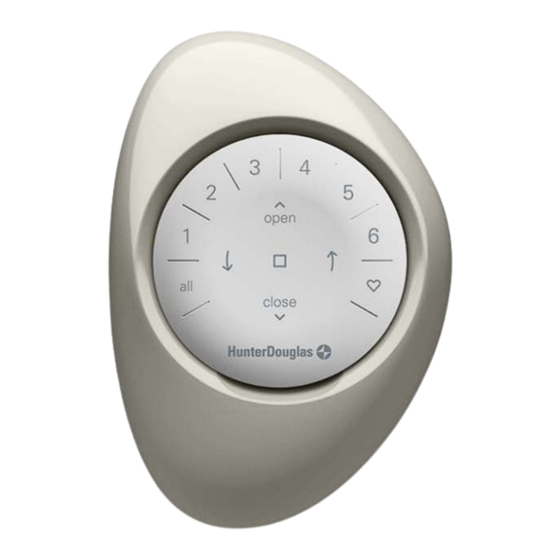
OPERATION Operating the PowerView App and Gen 3 Remote ® Syncing and Programming Your Remote Activate the remote by pulling both plastic tabs from the back battery compartment. ■ Download the PowerView App for your smartphone or tablet at hdpvapp.com. ■... - Page 15 OPERATION Operating Tips 1. When the shading is raised, pressing the RIGHT ARROW will first lower the shading and then open the vanes. 2. When the shading is lowered with the vanes open, pressing ▲ OPEN will first close the vanes and then raise the shading all the way.
-
Page 16: Resetting The Shading (If Necessary)
OPERATION Resetting the Shading (If Necessary) Calibration Reset The calibration reset is used to recalibrate the shading’s travel limits. This action is performed in the PowerView App. Select Calibrate Shade in the Advanced Options section of the Shade Settings menu in the ■... -
Page 17: Troubleshooting
■ Refer to the following troubleshooting for specific solutions for your shading. ■ If questions remain, please contact Hunter Douglas Consumer Support at (800) 789-0331. Problem The shading will not snap into the installation brackets. Solution Check that the installation brackets are level. - Page 18 TROUBLESHOOTING Problem The shading raises or lowers unevenly, the bottom rail is not level when fully raised, or the fabric winds unevenly or starts to rub against one end of the headrail. Solution Check that the installation brackets are level. Shim to level, if necessary. Check if the window is out-of-square by measuring the diagonals.
-
Page 19: Care
CARE Removing the Shading Fully raise the shading. ■ Disconnect the power source from the power cable ■ Top View at the back of the shading. Move each lever of the installation brackets to the ■ left to release the shading. A flat blade screwdriver can be used to move ➤... - Page 20 CARE Ultrasonic Cleaning We do not recommend Ultrasonic Cleaning for any Pirouette fabrics. ■ Electrostatic Cleaning Do not use electrostatic cleaning devices on any Pirouette Window Shading. ■ A Note About Pirouette Fabric As with all textiles, Pirouette fabrics are subject to some variations. Slight wrinkling, puckering, or bowing is inherent to this textile product and should be considered normal, acceptable quality.
-
Page 21: Declarations
CE Statement Hunter Douglas Window Fashions, One Duette Way, Broomfield, CO 80020, USA Hunter Douglas hereby declares that the PV33 is in compliance with the essential requirements and other relevant provisions of Electromagnetic Compatibility (EMC) Directive 2014/30/EU and Radio Equipment Directive (RED) 2014/53/EU. -
Page 22: Warranty
2. Visit hunterdouglas.com for additional warranty information, frequently asked questions and access to service locations. 3. Contact Hunter Douglas at (800) 789-0331 for technical support, certain parts free of charge, for assistance in obtaining warranty service or for further explanation of our warranty.
Need help?
Do you have a question about the Pirouette PowerView+ Gen 3 Automation and is the answer not in the manual?
Questions and answers