Table of Contents
Advertisement
Advertisement
Table of Contents

Related Manuals for Hunter Douglas Solera Soft Shades


Summary of Contents for Hunter Douglas Solera Soft Shades
- Page 1 Installation Operation Care • • Solera Soft Shades ® PowerView Gen 3 Automation ®...
-
Page 2: Table Of Contents
Removing the Shade (If Necessary) ........27 Cleaning Procedures ............27 DECLARATIONS..............28 CHILD SAFETY ..............29 WARRANTY .................30 Questions? Call Hunter Douglas Consumer Support at (800) 789-0331. © 2022 Hunter Douglas. All rights reserved. All trademarks used herein are the property of Hunter Douglas or their respective owners. -
Page 3: Getting Started
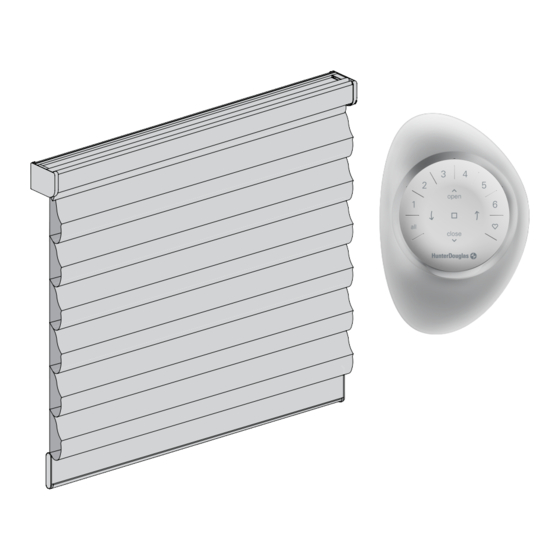
GETTING STARTED Product View Installation Brackets Control Button Not Shown: Top-Down/Bottom-Up Shades and spacer blocks for an outside mount with attached battery wand. -
Page 4: Tools And Fasteners Needed
GETTING STARTED Thank you for purchasing Hunter Douglas Solera Soft Shades with PowerView Gen 3 ® ® Automation Lifting System. With proper installation, operation, and care, your new shades will provide years of beauty and performance. Please thoroughly review this instruction booklet and the enclosed packing list before beginning the installation. -
Page 5: Installation
INSTALLATION Installation Overview To install your shade, you will need to perform the following four easy steps: STEP 1: Install the Brackets STEP 2: Install the Battery Wand (If Applicable) STEP 3: Install the Shade STEP 4: Connect the Power Source STEP 1 —... -
Page 6: Mount The Installation Brackets - Inside Mount
INSTALLATION Mount the Installation Brackets — Inside Mount Mark 2" in from each jamb. ■ If more than two installation brackets came with your order, space additional bracket(s) ➤ evenly between the two end brackets and mark their location. Mount into wood whenever possible. - Page 7 INSTALLATION With Attached Battery Wand ⁄ " Needed for Rear Clearance 2½" Minimum Inside Mount ⁄ " Fully Recessed Mount Window Casement Window Casement Bracket Bracket Battery Wand Battery Wand ⁄ " ⁄ " ⁄ " ⁄ " Satellite Battery Pack or 18V DC Power Supply "...
-
Page 8: Mount The Installation Brackets - Outside Mount
INSTALLATION Drill the screw holes using a " drill bit. ■ Attach the installation brackets using the screws provided. ■ Check that the mounting surface is level and the brackets are aligned. If mounting to a ➤ heavily textured surface, shim the brackets, if needed. IMPORTANT: Use drywall anchors when mounting into drywall. - Page 9 INSTALLATION Center the brackets on your marks and mark the screw holes. ■ A minimum of 1 ⁄ " flat ➤ Installation Spacer vertical surface is required to Bracket Block Headrail mount the brackets. End Mark For shades with attached ➤...
-
Page 10: Step 2 - Install The Battery Wand (If Applicable)
INSTALLATION STEP 2 — Install the Battery Wand (If Applicable) Battery Wand Clip (If Applicable) NOTE: Refer to this section only if a battery wand clip was included with the shade. Battery Wand Clip Attach the battery wand clip to the headrail. ■... -
Page 11: Step 3 - Install The Shade
INSTALLATION Attach the battery wand clip to the headrail. ■ Hook the battery wand clip onto the back channel of ■ the headrail. IMPORTANT: Position the clip so that the battery wand will be between installation brackets. Rotate the clip down until it snaps into place. ■... -
Page 12: Step 4 - Connect The Power Source
INSTALLATION STEP 4 — Connect the Power Source NOTE: When power is connected to the motor, a blue LED inside the control button housing will flash to indicate the shade is ready for operation. Refer to the appropriate page based on your order. ■... - Page 13 INSTALLATION If You Have a Satellite Battery Pack... Mount the Satellite Battery Pack Wall Mount Bracket Decide where you want to attach the wall mount bracket. ■ A satellite battery pack may be mounted in any orientation. Mark the screw holes. ■...
- Page 14 INSTALLATION Headrail-Mounted Rechargeable Battery Wand Insert the Rechargeable Battery Wand into the Battery Mount NOTE: The rechargeable battery wand ships fully charged, so it is ready to install out of the package. Match the direction of the arrow on the underside of the battery wand with the arrow on ■...
- Page 15 INSTALLATION CAUTION: Install the battery mount on a flat surface only. Installing on a round or other non-flat surface may result in the battery wand not attaching into the mount properly. This can result in either a failure to connect the shade to power or the wand falling out of the mount.
- Page 16 INSTALLATION Push the battery wand flush into the mount until the battery snaps into place. ■ CAUTION: Failing to insert wand properly may cause it to fall out of the mount, posing an injury risk and potentially damaging the wand. Additionally, when mounting on a door, closing the door with excess force may cause battery wand to dislodge from the mount, also posing an injury risk and possibly damaging the wand.
- Page 17 INSTALLATION 18V DC Power Supply with Daisy-Chain Connections NOTE: The daisy-chain feature is only available with the 18V DC Power Supply option. Refer to this section if you have an 18V Power Supply with daisy-chain connections. The daisy-chain feature allows up to three PowerView Gen 3 automated shades to be ®...
- Page 18 INSTALLATION Double Connector Power Cable for Adapting Two Battery Wands NOTE: Refer to this section only if you have a double connector power cable. Install the Batteries into the Battery Wand or Satellite Battery Pack Refer to “Replace the batteries in the battery wand.” on page 23. ■...
-
Page 19: Testing The Shade
INSTALLATION Testing the Shade Testing the shade with the control button will allow you to ensure that the motor and power source are working correctly. CAUTION: When raising the shade for the first time, observe how the fabric stacks. It should stack evenly. -
Page 20: Operation
OPERATION Operating the PowerView App and Gen 3 Remote ® Syncing and Programming Your Remote Activate the remote by pulling both plastic tabs from the back battery compartment. ■ Download the PowerView App for your smartphone or tablet at hdpvapp.com. ■... - Page 21 OPERATION Top-Down/Bottom-Up OPEN - Press once to raise the bottom and middle rails and open the shade(s) GROUP NUMBERS from the bottom-up Each number represents - Quickly press twice to a different group raise the bottom rail*** LEFT ARROW RIGHT ARROW - Press once to lower the - Press once to raise bottom and middle rails,...
-
Page 22: Resetting The Shade (If Necessary)
OPERATION Resetting the Shade (If Necessary) Calibration Reset The calibration reset is used to recalibrate the shade's travel limits. Select Calibrate Shade in the Advanced Options section of the Shade Settings menu in the ■ PowerView App. ® Bottom - Up Shades: Shade will raise to its top limit, then finish in the closed position. ➤... -
Page 23: Troubleshooting
Refer to the following troubleshooting procedures for specific solutions for your shade. ■ If questions remain, please contact Hunter Douglas Consumer Support at (800) 789-0331. Problem The shade will not fit into the installation brackets. Solution If the shade has a battery wand, check that the wand is not interfering with the installation brackets. - Page 24 TROUBLESHOOTING Problem The shade is operating slowly or does not raise or lower completely. Solution The batteries may be low in the battery wand, satellite battery pack, or C-size battery wand. Replace the batteries. Check that the power source is securely connected to the power cable and the cables are not pinched or caught in the headrail or installation brackets.
- Page 25 CAUTION: The rechargeable battery wand can only be charged with these Hunter Douglas provided charging options. Attempting to charge battery wands with an alternative charger may result in permanent damage. Removing the Rechargeable Battery Wand from the Mount To safely remove the rechargeable battery wand from your shade, grasp ■...
- Page 26 TROUBLESHOOTING Problem Rechargea ble battery needs recharging (continued) Solution Recharging Via the Single Charger Remove the rechargeable battery wand from the mount, or insert the single charger cable without removing from the shading. Attach the plug adapter to the charger. ■...
- Page 27 Squeeze Latch Press the cap on until it latches. NOTE: Hunter Douglas recommends AA alkaline batteries for use with our battery-powered shades. These will provide more than one year of operation, depending on usage. Lithium and rechargeable batteries are not...
-
Page 28: Care
Pull the headrail straight out from the installation ■ Screwdriver. brackets. Cleaning Procedures Hunter Douglas Solera Soft Shades are made of anti-static, dust-resistant fabric which repels ® dirt and dust. For most fabrics, the following cleaning options are available. Dusting Regular light dusting with a feather duster is all the cleaning that is needed in most ■... -
Page 29: Declarations
CE Statement Hunter Douglas Window Fashions, One Duette Way, Broomfield, CO 80020, USA Hunter Douglas hereby declares that the PV34 is in compliance with the essential requirements and other relevant provisions of Electromagnetic Compatibility (EMC) Directive 2014/30/EU and Radio Equipment Directive (RED) 2014/53/EU. -
Page 30: Child Safety
CHILD SAFETY... -
Page 31: Warranty
2. Visit hunterdouglas.com for additional warranty information, frequently asked questions and access to service locations. 3. Contact Hunter Douglas at (800) 789-0331 for technical support, certain parts free of charge, for assistance in obtaining warranty service or for further explanation of our warranty.
Need help?
Do you have a question about the Solera Soft Shades and is the answer not in the manual?
Questions and answers