Computherm Q3RF Operating Instructions Manual
Wireless (radio-frequency) digital room thermostat
Hide thumbs
Also See for Q3RF:
- Operating instructions manual (15 pages) ,
- Operating instructions manual (12 pages) ,
- Operating instructions (2 pages)

Related Manuals for Computherm Q3RF


Summary of Contents for Computherm Q3RF
- Page 1 COMPUTHERM Q3RF wireless (radio-frequency) digital room thermostat Operating Instructions You can watch the most important aspects of the usage of this thermostat on our video presentation at www.computherm.info.
- Page 2 GENERAL DESCRIPTION OF THE THERMOSTAT The COMPUTHERM Q3RF type switched-mode room ther- mostat is suitable to regulate the overwhelming majority of boilers and air conditioners. It can be easily connected to any gas boiler having a two-wire thermostat connection point and to any air conditioning apparatus or electrical ap- paratus, regardless of whether they have a 24 V or 230 V control circuit.
- Page 3 Temperature can be measured and set more precisely as compared to simple, conventional thermostats. In heating mode, in accordance with the selected switching sensitivity, the thermostat switches the boiler or any other appliances on and off below and above the adjusted temperature, respectively, and contributes to reduce energy costs while maintaining comfort.
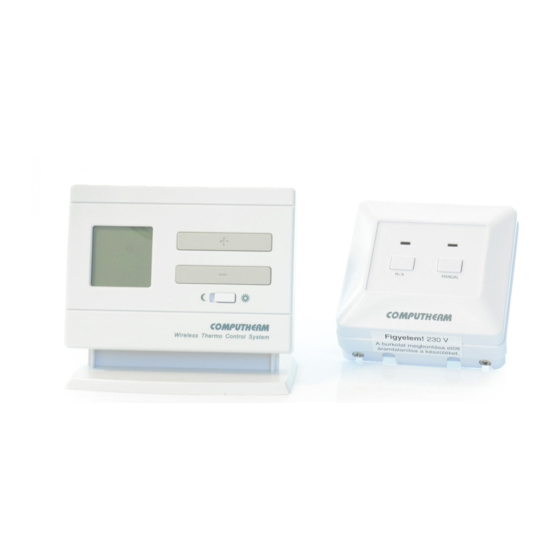
- Page 4 The device consists of two units. One of them is the portable control unit (thermostat), while the other unit is the receiver that controls the boiler. Because there is a wireless (radio- frequency) connection between the two units, no cable is required between the thermostat and the boiler.
- Page 5 230 V (50 Hz; max. 16 A) according to the room temperature. (Detailed description of the COMPUTHERM Q1RX socket and usage suggestions can be found on our website www.computherm.info.) The COMPUTHERM Q3RF thermostat can be used as an extension to the COMPUTHERM Q5RF or Q8RF multi-zone devices. - 5 -...
- Page 6 1. LOCATION OF THE DEVICE The thermostat of the COMPUTHERM Q3RF type device can be freely moved in your residence. It is reasonable to locate it in a room used regularly or for many hours per day so that it is in the direction of natural ventilation in the room but protected from drought or extreme heat (e.g.
- Page 7 aggressive or dusty environment. Its optimal location is 0.75- 1.5 m above floor level. It can be placed on its own stand or can be mounted on a wall. IMPORTANT WARNING! If the radiator valves in your flat are equipped with a thermostatic head, adjust it to maximum temperature or replace the thermostatic head of the radiator valve with a manual control knob in the room where the room thermostat is to be located, otherwise the thermostatic head...
-
Page 8: Basic Settings
the housing. Insert 2 AA alkaline batteries (LR6 type) in accordance with the diagram in the battery compartment. Warning! Alkaline batteries may only be used for this appliance. Carbon-zinc batteries known as durable or long life batteries and chargeable accumulators are not suitable for the operation of this appliance. - Page 9 plugs and/or changing the position of the orange-colored potentiometer) located on the main panel. 3.1 Selecting the Displayed Temperature The temperature(s) to be shown on the display can be selected and set by the left jumper. With factory default settings the jumper is located on the cent- ral and uppermost pins, in which case the display shows the currently measured room temperature value, while the notice “ROOM”...
- Page 10 of the display, indicating whether the display shows the room temperature or the adjusted temperature value. 3.2 Selecting the Switching Sensitivity (Accuracy) The switching sensitivity of the thermostat can be selected by the central jumper, which determines how much below/above the set temperature the thermostat switches on/off the device connected to it.
- Page 11 frequent on and off switches of the boiler reduce its efficiency and hence increases the gas consumption. We recommend using the ±0.1 °C switching sensitivity for heating systems with high thermal inertia (e.g. underfloor heating), and the ±0.2 °C switching sensitivity (factory default setting) for heating systems with low thermal inertia (e.g.
- Page 12 3.4 Calibration of the thermometer of the thermostat You can calibrate the thermometer of the appliance (to cor- rect measured temperature). To this end all you have to do is change the position of the orange-colored potentiometer by a Phillips screwdriver. When you adjust the potentiometer cloc- kwise then the displayed temperature will be lower than that measured initially, and when you adjust it anticlockwise the displayed temperature will be higher than that.
- Page 13 3.5 Synchronising the Thermostat and the Receiver Unit In order to have a safe, reliable and trouble-free wireless (radio-frequency) connection, both the thermostat and the receiver unit have their own safety codes. After installing the receiver unit, the two units should be synchronised by pressing the “LEARN”...
- Page 14 the currently set temperature, taking into account the swit- ching sensitivity of the thermostat (factory default ±0.2 °C). This means that if the thermostat is set to heating mode and 22 °C, then with a switching sensitivity of ±0.2 °C the connec- tion points 1 (NO) and 2 (COM) of the receiver output relay are closed below 21.8 °C (heating is turned on) and opened at temperatures above 22.2 °C (heating is turned off).
-
Page 15: Setting The Desired Temperature
( w ) 4.1 Economy Mode (left hand position of the switch) In the left hand position of the switch, the thermostat provi- des the set economy temperature (e.g. night temperature) to be maintained at the place where the thermostat has been installed. - Page 16 The factory default temperature is 18 °C for the economy position and 20 °C for the comfort ( ☼ ) position. These default temperatures can be changed as follows: • Move the switch according to the temperature you would like to change (economy or comfort ( ☼...
-
Page 17: Battery Replacement
bottom right corner of the display, and once again the current room temperature and the notice “ROOM” are displayed. • The previously set temperature can be freely changed any time using the buttons. Always the last set temperatures are in effect. 6. -
Page 18: The Receiver Unit
to indicate low battery voltage warns reliably that the batteries should be replaced only when alkaline batteries are used. 7. THE RECEIVER UNIT 7.1 Installation and connection of the receiver unit WARNING! The device must be installed and connected by a qualified professional. - Page 19 or other bulky metal constructions. We recommend that you check reliability of RF connection at the place selected before installing the receiving unit. ATTENTION! Do not install the receiver unit under the housing of the boiler or near hot pipes because it may damage the parts of the device or compromise wireless (radio-frequency) connection.
- Page 20 phase conductor to point L. We recommend using a fork type connection including a switch for mains connection. There is no need for grounding as the product is double insulated. The receiver unit controls the boiler or air conditioner through a potential-free alternating relay whose connection points are: 1 (NO), 2 (COM) and 3 (NC).
- Page 21 If you would like to operate an old boiler or any other device that has no connection points for thermostats, then the 1 (NO) and 2 (COM) connection points of the thermostat should be connected to the mains cable of the device, similarly as a switch would be connected.
- Page 22 (radio-frequency) connection unreliable, install the receiver unit nearer to the place of thermostat or use a COMPUTHERM Q2RF signal repeater to increase the communication distance of the COMPUTHERM Q3RF thermostat.
- Page 23 button of the thermostat several times, until the set temperature is at least 0.5 °C higher than the temperature of the room. Following this, the “HEAT” icon indicating that the heating is turned on should appear on the display of the thermostat within a few seconds.
- Page 24 ATTENTION! Pressing the “LEARN” button for 10 seconds generates a new safety code for the thermostat, and the receiver will recognize it only after a repeated tuning. With this in mind, do not keep the “LEARN” button of the thermostat or the “M/A”...
- Page 25 (radio-frequency) range or out of it (due to the floor-plan of the house or the shading effect of its structure), to guarantee the safe wireless connection, place a COMPUTHERM Q2RF wireless repeater between the two parts. 7.4 Manual control of the receiver unit Pressing the “MANUAL”...
- Page 26 The vast majority of the problems encountered can be solved easily by using the hints available on our website, without seeking professional help.
- Page 27 • Using programmable thermostats you can ensure that every room (zone) is just heated according to a timetable preset in accordance with the demands. (You can obtain information on the services provided by COMPUTHERM Q7; Q7RF and Q8RF programmable room thermostats on our website).
-
Page 28: Technical Data
TECHNICAL DATA Technical data of the thermostat (transmitter): ‒ temperature measurement range: 3 to 45 °C (in 0.1 °C increments) ‒ adjustable temperature range: 5 to 40 °C (in 0.5 °C increments) ‒ temperature measurement accuracy: ±0.5 °C ‒ thermometer calibration range: approx. - Page 29 Technical data of the receiver unit: ‒ power supply voltage: 230 V AC, 50 Hz ‒ power consumption: 0,01 W ‒ switchable voltage: max. 30 V DC / 250 V AC ‒ switchable current: 6 A (2 A inductive load) ‒...
- Page 32 Manufacturer: Fülemüle u. 34., Szeged, H-6726, Hungary Phone: +36 62 424 133 • Fax: +36 62 424 672 E-mail: iroda@quantrax.hu Web: www.quantrax.hu • www.computherm.info designed in the EU, manufactured in China Origin: Please watch our video presentation of the most important aspects of the usage of this thermostat at our websites!
Need help?
Do you have a question about the Q3RF and is the answer not in the manual?
Questions and answers