Computherm Q7RF Operating Instructions Manual
Programmable wireless radio-frequency digital room thermostat
Hide thumbs
Also See for Q7RF:
- Operating instructions manual (19 pages) ,
- Operating instructions (2 pages) ,
- Operating instructions manual (17 pages)

Related Manuals for Computherm Q7RF


Summary of Contents for Computherm Q7RF
- Page 1 COMPUTHERM Q7RF Programmable wireless (radio-frequency) digital room thermostat Operating Instructions You can watch the most important aspects of the usage of this thermostat on our video presentation at www.computherm.info.
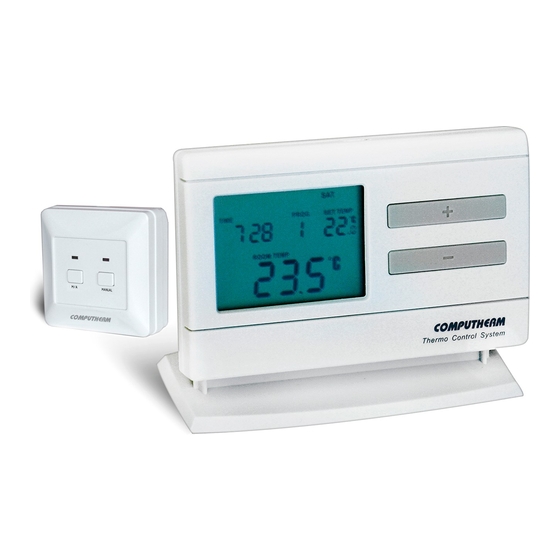
- Page 3 GENERAL DESCRIPTION OF THE THERMOSTAT The COMPUTHERM Q7RF type switched-mode room ther- mostat is suitable to regulate the overwhelming majority of boilers and air conditioners. It can be easily connected to any gas boiler having a two-wire thermostat connection point and to any air conditioning apparatus or electrical apparatus, re- gardless of whether they have a 24 V or 230 V control circuit.
- Page 4 The device can be programmed according to customer-spe- cific requirements so that the heating/cooling system heats/ cools your residence or office to the required temperature at the dates and times specified by you, to reduce energy costs while maintaining comfort. Separate temperature programs can be prepared for each day of the week.
- Page 5 To increase the lifetime of the batteries, the thermostat will not transmit signals continuously. Instead it will repeatedly transmit the actual signal every 8 minutes. Therefore, the regulation of the heating or cooling will continue even after a blackout. The information shown on the liquid crystal display of the thermostat includes the following: Program number Manual control...
- Page 6 This wireless (radio-frequency) thermostat can also be easi- ly extended with the COMPUTHERM Q1RX socket if needed, with which the thermostat is able to control any electrical de- vice (e.g. fan heaters, pumps, zone valves, etc.) operating on...
- Page 7 (Detailed description of the COMPUTHERM Q1RX socket and usage suggestions can be found on our website www.com- putherm.info.) The COMPUTHERM Q7RF thermostat can be used as an ex- tension to the COMPUTHERM Q5RF or Q8RF multi-zone de- vices. The simultaneous use of several COMPUTHERM room thermo-...
- Page 8 1. LOCATION OF THE DEVICE The thermostat of the COMPUTHERM Q7RF type device can be freely moved in your residence. It is reasonable to locate it in a room used regularly or for many hours per day so that it is in the direction of natural ventilation in the room but protected from drought or extreme heat (e.g.
- Page 9 2. PUTTING THE THERMOSTAT INTO OPERATION, BASIC SETTINGS 2.1 Inserting batteries Pressing the lock on the upper side of the housing of the ther- mostat, remove the back cover of the thermostat as shown in the figure below. The battery compartment is in the inner side of the front panel of the housing.
- Page 10 After the batteries have been inserted, the display flashes the day, time and program number as well as the adjusted and measured temperatures. (If this information fails to appear on the display, press the “RESET” button located on the main panel of the thermostat. After the batteries have been inserted, snap the front panel of the device into the rear panel and press the “SET”...
- Page 11 becomes visible continuously while the numbers indicating the hour will flash on the display. Using the large buttons on the front panel of the device, set the hour value of the current time. Press the “DAY” button again. At this time the numbers that indicate the hour stop flashing and become visible continuously, while the numbers indicating the minute will begin flashing.
- Page 12 1 (NO) and 2 (COM) of the receiver unit are closed below the set temperature in heating mode, and they are closed above the set temperature in cooling mode (taking the switching sensitivity into account). To switch between the two modes, first press the “SET” button to go to the main screen.
- Page 13 in higher comfort. The heat loss of the room (building) does not depend on the switching sensitivity. If higher comfort is needed, the switching sensitivity should be set so that it provides a steadier room temperature. On the other hand, please also take into account that the boiler should not switch on and off multiple times in an hour’s time except at low outside temperatures (e.g.
- Page 14 by pressing the “SET” button (if no buttons are pressed for at least 15 seconds, the setting is automatically confirmed). After this confirmation, the device goes back to the main screen. You can read more about switching sensitivity in Chapter 3. 2.5 Activation of the pump protection function Under the factory default settings, the pump protection func- tion is inactive.
- Page 15 1-minute period at 12:00 p.m. every day, if no switch has been performed on the given day or the day before (e.g. outside the heating season.) The pump protection function can accomplish its task only if the boiler is in working order in the summer, too. It is reasonable to set a low temperature level, e.g.
- Page 16 in 0.1 °C increments. Finally, confirm the setting by pressing the “SET” button (if no buttons are pressed for at least 15 seconds, the setting is automatically confirmed). After this confirmation, the device goes back to the main screen. The correction of the measured temperature takes effect a couple of seconds after the confirmation.
-
Page 17: Programming The Thermostat
The closed status of the output relay terminals 1 (NO) and 2 (COM) is indicated by the icon in the lower left corner of the display, depending on the selected operating mode. 4. PROGRAMMING THE THERMOSTAT 4.1 A brief introduction to programming • Programming means the setting of switching times and selection of accompanying temperature levels. - Page 18 time PROG is reached. After switching time PROG the temperature selected to switch PROG will be valid until the time of the next switch (PROG ). • The start time of switch PROG is , which cannot be changed, only its temperature can be adjusted. So under the factory default settings, the thermostat performs only one switch (PROG ) every day, which is in effect from until...
- Page 19 • The PROG – PROG switches are deactivated by factory default (their start time is ), but they can be activated at need. Their start time can be freely set between at 10-minute intervals given the constraint, that their start time should be in increasing order and a difference of at least 10 minutes should be between them.
- Page 20 buttons. The confirmation of a value is always done by pressing the “PROG” button, after which the next value can be adjusted. The program can be saved by pressing the “SET” button. A more detailed description of the programming steps can be found in Chapter 4.3. •...
-
Page 21: Programming Steps
cooling mode, and these programs are preserved when switching between the modes. Therefore, if the thermostat is used for both heating and cooling, then there is no need to modify the program of the thermostat every time a switch between these modes is performed. 4.2 Recommendations for creating a heating program The average comfort needs of a person can usually be satisfied by a temperature of 19-21 °C during the night, and a temperature of 22-23... - Page 22 b. Press the “SET” button again and hold it down and press the “PROG” button, too. At this point the device gets into programming mode and the abbreviations indicating the days of the week (MON TUE WED THU FRI SAT SUN) are flashing on the display.
- Page 23 which is indicated on the display of the device by flashing the temperature value to be set ( °C by default). Set the desired temperature using the large buttons, then press the “PROG” button. e. Then, the start time of switch PROG should be adjusted, which is indicated on the display of the device by flashing the time value to be adjusted ( by default).
- Page 24 If you do not want to activate any more switches for the selected day(s), then press the “PROG” button without changing the start time of the next switch from the default . This way the programming of the selected day(s) is finished, the thermostat offers another day to be programmed and the programming can be continued from step “c”.
- Page 25 4.4 Using the „COPY” function (Copying the program of a day to other days) • First, press the “SET” button to go to the main screen. Then press the “COPY” button for approximately 3 seconds to activate the “COPY” function. The notice appearing in “...
-
Page 26: Modifying The Program
• After selecting the abbreviation that indicates the day to which you wish to copy the program, press the “COPY” button to copy the program. Hereafter, the abbreviation indicating the day to which the program was copied will be visible continuously. Following this, you can select further days using the large buttons and copy the program to those days too by pressing the “COPY”... - Page 27 • The number of activated switches can be increased at will as described in Chapter 4.3. • A previously activated switch can be deactivated by setting its start time to using the large buttons (or by pressing the “DAY” button once), and then pressing the “PROG”...
- Page 28 the basic settings of the thermostat again and create the new program, as described in Chapters 2 and 4. 4.6 Program inspection • First, press the “SET” button to go to the main screen, then press the “PROG” button. At this point, the abbreviation indicating the day(s), the symbol of switch PROG and the time and temperature level set for...
- Page 29 5. TEMPORARY MODIFICATION OF THE TEMPERATURE CORRESPONDING TO THE PROGRAM If you wish to operate your device in a way that differs tem- porarily from the program that has been set (e.g. on bank holidays or the winter holidays), you can choose among the options described in Chapters 5.1 - 5.4.
- Page 30 in accordance with current requirements. The economy and comfort temperature values assigned to buttons can be modified as follows: • To set the economy temperature, press the “SET” button and keep it depressed and press the button, too. Following this, with the help of the buttons, set the economy temperature selected by you.
- Page 31 5.1 Temperature modification until the next program switch Set the required temperature using the large buttons on the front panel of the device. After the temperature modification the program number disappears, and the icon appears on the display, indicating that the thermostat is operated with manual control.
- Page 32 5.2 Temperature modification for 1-99 hours (party program) Set the required temperature using the large buttons on the front panel of the device. After the temperature modification the program number disappears, the icon appears on the display, indicating that the thermostat is oper- ated with manual control.
- Page 33 the time on the display alternately show the exact time (TIME) and the time remaining in manual control (TIME LEFT, for example , that is 3 hours and 20 minutes). After this time has elapsed, the icon disappears and the device resumes the program that has been set.
- Page 34 ber flashes, showing that the duration can be changed). Adjust this time to the desired length (between 1 and 99) using the large buttons (1 day means 24 hours). The holiday pro- gram will start approximately 10 seconds after the adjustment. Following this, the device will keep the modified temperature for the given period of time.
-
Page 35: Turning On The Backlight
pears on the display, indicating that the thermostat is operated with manual control. Then, press the “HOLD” button briefly, after which icon appears and the icon disappears. The device will then control the boiler according to the set value until the next man- ual interference. -
Page 36: Locking The Control Buttons
button had been pressed. Turning the automatic light function on is shown on the display after pressing the “LIGHT” button for 5 seconds: in the place of the exact time the notice “ ” appears for 3 seconds. If you press the “LIGHT” button for 5 seconds again, then this automatic light function turns off and the “... -
Page 37: Changing The Battery
unlocking the buttons, the notice “ ” appears in place of the time characters for a couple of seconds, whereupon all the buttons can be used normally again. 8. CHANGING THE BATTERY The average lifetime of the batteries is 1 year, but frequent use of the background light may shorten this time consider- ably. -
Page 38: The Receiver Unit
9. RESETTING THE THERMOSTAT TO I FACTORY DEFAULT SETTINGS By pressing the “RESET” button located on the main panel of the thermostat, the thermostat can be reset to its factory default settings. This results in deleting the day, exact time, basic settings and the set program. - Page 39 ATTENTION! Do not install the receiver unit under the hous- ing of the boiler or near hot pipes because it may damage the parts of the device or compromise wireless (radio-frequency) connection. To avoid electric shock, entrust a specialist with connecting the receiver unit to the boiler! Unscrew the two screws at the bottom of the receiver unit without removing them.
- Page 40 The receiver unit controls the boiler or air conditioner through a potential-free alternating relay whose connection points are: 1 (NO), 2 (COM) and 3 (NC). Connect the two connection points of the heating or cooling equipment to be controlled to the normally open 1 (NO) and 2 (COM) terminals of the relay, as shown on the below figure.
- Page 41 If you would like to operate an old boiler or any other device that has no connection points for thermostats, then the 1 (NO) and 2 (COM) connection points of the thermostat should be connected to the mains cable of the device, similarly as a switch would be connected, as shown in the figure below.
- Page 42 If the distance between the transmitter and receiver units is too large due to local circumstances and it makes the wireless (radio-frequency) connection unreliable, install the receiver unit nearer to the place of thermostat or use a COMPUTHERM Q2RF signal repeater. 10.2 Putting the receiver unit into operation Turn on the power supply to the receiver unit.
- Page 43 button of the thermostat several times, until the set temper- ature is at least 0.5 °C higher than the temperature of the room. Following this, the icon indicating that the heating is turned on should appear on the display of the thermostat within a few seconds. At the same time, the red LED light on the receiver unit should switch on to indicate that the receiver unit has received the command of the transmitter (thermostat).
- Page 44 With this in mind, do not keep the “SET” and “DAY” buttons of the thermostat depressed simultaneously or the “M/A” button of the receiver unit depressed without any reason after the two units have been tuned successfully. 10.3 Transmission distance inspection With the help of the “TEST”...
- Page 45 (due to the floor-plan of the house or the shading effect of its structure), to guarantee the safe wireless connection, place a COMPUTHERM Q2RF wireless repeater between the two parts. 10.4 Manual control of the receiver unit Pressing the “MANUAL” button separates the thermostat from the receiver unit.
- Page 46 The vast majority of the problems encountered can be solved easily by using the hints available on our website, without seeking professional help.
- Page 47 A BRIEF DESCRIPTION OF PROGRAMMING • Setting the date and time: press the “DAY” button, then adjust values using the “DAY”, buttons. • Programming: press and hold down the “SET” button, while pressing the “PROG” button too, then adjust values with the “PROG”, buttons;...
- Page 48 • Using programmable thermostats you can ensure that every room (zone) is just heated according to a timetable preset in accordance with the demands. (You can obtain information on the services provided by COMPUTHERM Q7; Q7RF and Q8RF programmable room thermostats on our website).
-
Page 49: Technical Data
TECHNICAL DATA Technical data of the thermostat (transmitter): ‒ temperature measurement range: 3 to 45 °C (in 0.1 °C increments) ‒ adjustable temperature range: 5 to 40 °C (in 0.5 °C increments) ‒ temperature measurement accuracy: ±0.5 °C ‒ temperature calibration range: ±3 °C (in 0.1 °C increments) ‒... - Page 50 Technical data of the receiver unit: ‒ power supply voltage: 230 V AC, 50 Hz ‒ power consumption: 0,01 W ‒ switchable voltage: max. 30 V DC / 250 V AC ‒ switchable current: 6 A (2 A inductive load) ‒...
- Page 52 Manufacturer: Fülemüle u. 34., Szeged, H-6726, Hungary Phone: +36 62 424 133 • Fax: +36 62 424 672 E-mail: iroda@quantrax.hu Web: www.quantrax.hu • www.computherm.info designed in the EU, manufactured in China Origin: Please watch our video presentation of the most important aspects of the usage of this thermostat at our websites!
Need help?
Do you have a question about the Q7RF and is the answer not in the manual?
Questions and answers