Computherm Q3 Operating Instructions Manual
Digital room thermostat computherm q3
Hide thumbs
Also See for Q3:
- Operating instructions manual (20 pages) ,
- Operating instructions manual (24 pages)
Advertisement
Advertisement
Table of Contents

Related Manuals for Computherm Q3


Summary of Contents for Computherm Q3
- Page 1 COMPUTHERM Q3 digital room thermostat Operating Instructions...
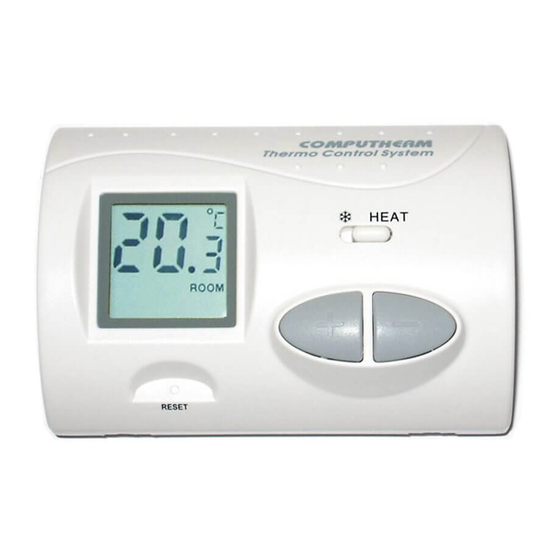
- Page 2 GENERAL DESCRIPTION OF THE THERMOSTAT COMPUTHERM Q3 type switched-mode room thermostat is suitable to regulate the overwhelming majority of boilers available in Hungary. It can easily be connected to any gas boiler or air conditioning device that has a double wire connector for a room thermostat, regardless of whether it has a 24 V or 230 V control circuit.
- Page 3 The switching sensitivity of the thermostat is ± 0.2°C (± 0.3°C). This means the difference between the adjusted temperature and the actual temperature measured during the The information shown on the liquid switching process. crystal display of the thermostat example, includes the following: the factory default Temperature...
-
Page 4: Important Warning
1. LOCATION OF THE DEVICE It is reasonable to locate it in a room used regularly or for many hours per day so that it is in the direction of natural ventilation in the room but protected from drought or extreme heat (e.g. direct sunlight, refrigerator, chimney, etc). -
Page 5: Installation Of The Thermostat
2. INSTALLATION OF THE THERMOSTAT • To install the thermostat, detach the rear panel of the thermostat from the front panel by loosening the screws at the bottom of the cover as shown in the figure. • With the help of the screws provided and some tools fasten the rear panel of the device to the wall. - Page 6 be controlled to terminals No. 1 (NO) and No. 2 (COM), i.e. to the normally open terminals of the relay, while the two connection wires of the cooling equipment should be connected to terminals No. 2 (COM) and No. 3 (NC), i.e. to the normally closed terminals of the relay.
- Page 7 3. PUTTING THE THERMOSTAT INTO OPERATION To put the thermostat into operation, detach the rear panel of the thermostat from the front panel by loosening the screws at the bottom of the cover as shown in the figure. The battery compartment is in the inner side of the front panel of the housing.
-
Page 8: Default Settings
4. DEFAuLT SETTINGS After removing the rear panel of the device, the following factory default settings can be modified by relocating the jumpers (black plugs) located on the base panel. 4.1 Modifying the Switching Sensitivity The switching sensitivity of the thermostat can be selected or adjusted by the uppermost jumper. - Page 9 the device is switched on or off) is ±0.2°C that can be modified to ±0.3°C by relocating the plug onto the left and central pins. 4.2 Changing the Unit of Measurement of the Displayed Temperature The unit of measurement of the temperature shown on the LCD display can be selected and set by the central jumper.
- Page 10 With factory default settings the display shows the currently measured room temperature value, while the notice “RooM” appears in the bottom right corner of the display. The adjusted temperature is visible only during the adjustment process (for approximately 15 seconds). By relocating the plug onto the left and central pins the displayed temperature can be modified so that the display alternately shows the current room temperature and the adjusted temperature for 4 seconds, respectively.
-
Page 11: Setting The Desired Temperature
5. SETTING THE dESIREd TEMPERATURE The factory default temperature was set to 20°C and in case of the default switching sensitivity (± 0.2°C), the thermostat switches on and off the connected heating appliance below 19.8°C and above 20.2°C, respectively. This default temperature can be freely changed in steps of 0.5°C between 10°C and 30°C as follows: •... - Page 12 at the place where the thermostat has been installed can be set in steps of 0.5°C. • Approximately 15 seconds after setting the room temperature to be maintained, the device automatically switches to normal mode. The notice „Set” disappears from the bottom right corner of the display, and once again the current room temperature is displayed.
- Page 13 6.1 Heating Mode (right hand position of the switch) According to the change in room temperature and temperature setting, the device controls (switches on or off) the boiler or any other heating equipment connected to the appliance. When activated, the normally open contact pairs, i.e. No. 1 (NO) and No. 2 (COM), of the relay of the device clamp shut, and, as a consequence, the appliance connected to the thermostat is switched on.
-
Page 14: Battery Replacement
open contact pairs, i.e. No. 1 (NO) and No. 2 (COM) of the relay of the thermostat clamp shut and, as a consequence, the device connected to the thermostat unit is switched on. The activated state is indicated by the appearance of a (snowflake) icon on the LCD display. -
Page 15: Technical Data
TECHNICAL dATA — switchable voltage: 24 V AC / DC,…250 V AC; 50 Hz — switchable current: 8 A (2 A inductive load) — temperature measurement range: 5 to 35°C (in 0. 1 °C increments) — adjustable temperature range: 10 to 30°C (in 0.5°C increments) —... - Page 16 The COMPUTHERM Q3 type thermostat complies with the requirements of standards EU EMC89/336/EEC; LVD 73/23/ EEC; 93/68/EEC and R&TTE 1999/5/EC.
Need help?
Do you have a question about the Q3 and is the answer not in the manual?
Questions and answers