
Related Manuals for Gigaset GX4


Summary of Contents for Gigaset GX4
- Page 1 (E940-2797-00) You can find the most up-to-date user guide at www.gigaset.com/manuals...
-
Page 2: Table Of Contents
Gigaset GX4 ........ -
Page 3: Overview
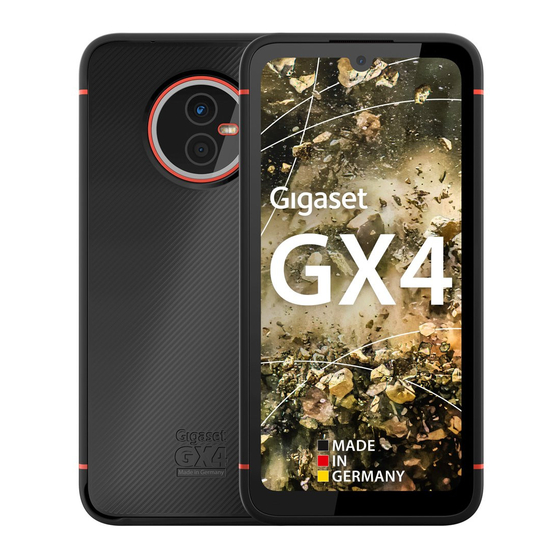
Gigaset GX4 Overview Gigaset GX4 Speaker (receiver) 11 Headset jack Microphone (top/bottom) 12 Function key (individual assignment) Brightness sensor 13 Front camera Message LED 14 Air pressure sensor Volume +: Press up 15 Main camera Volume –: Press down 16 Flash... -
Page 4: Start Screen
Start screen Status displays for message LED The message LED provides information on the charge level when charging and the arrival of notifications. Meaning Smartphone is charging. Flashing Smartphone is charging and/or notification available. Smartphone is not being charged or it is charged and there is no notification. Start screen Notifications and status bar Icons show the arrival of notifications and... -
Page 5: Illustration In The User Guide
Illustration in the user guide Illustration in the user guide The following sections contain information to be shown in the operating guide. The symbols and procedures used in this document are described. Icons Warnings, the non-adherence to which can result in damage to devices or personal injury. -
Page 6: Safety Information
Proper use The Gigaset GX4 – hereinafter referred to as the smartphone – is suitable for use in a mobile network. Your smartphone is suitable for private and business use. Any other use is not permitted. You are not permitted to make changes or modifications to the smartphone and any such changes or modifications will invalidate the warranty. - Page 7 • If your smartphone becomes hot, changes colour or shape or leaks whilst being used, charged or at any other time, contact Gigaset Customer Service immediately. • The apps preinstalled on your smartphone will be updated automatically. Updates may result in differ- ences from the described menus, functions and displays or apps may no longer function properly.
- Page 8 Safety information Use in hospitals / medical devices • The function of medical equipment near your smartphone can be impaired. Bear in mind the technical conditions of the environment in question (such as in a doctors’ surgery). • If you use a medical device such as a pacemaker, please consult the manufacturer of the product before using the product.
- Page 9 Defective devices • The installation and repair of products are the sole preserves of qualified maintenance personnel. Please contact a Gigaset Service Centre. • Dispose of faulty devices carefully or have them repaired by our Customer Service team. These devices could interfere with other wireless services.
-
Page 10: Getting Started
Getting started Getting started Package contents Check the package contents of the Gigaset GX4, before starting it. Contact Gigaset Customer Service if anything is missing or damaged. × • smartphone Gigaset GX4 × • charger cable (USB type C) ×... - Page 11 Getting started Insert nano SIM card / memory card. Your SIM card 1 goes in a holder under the memory card. Your smartphone detects memory cards with a storage capacity of 1 TB. To remove SIM card 1, push the ejector tool lever on the left downwards (see diagram).
- Page 12 USB power adapter. Please use the USB power adapter from your old smartphone. You can also buy a USB power adapter from the Gigaset online shop. Only use approved USB power adapters or mains adapters. Alternatively, you can inductive charge your smartphone using a wireless charger.
- Page 13 Remove the power adapter from your smartphone before replacing or removing the battery. Ensure the environment is free of dust so that no dust collects on the camera lenses. Only use Gigaset batteries with the same technical specifications as the original battery ( p. 104).
- Page 14 Using the touchscreen Using the touchscreen Movements and gestures for using the touchscreen: Briefly touch the screen with your finger Examples: Start an app, and select function or setting: Tap the element Enter text: Tap a text field . . . A keypad is shown Touch and hold Keep your finger on an element until it responds.
- Page 15 Using the touchscreen Selecting the language The set language is displayed. Select another language and country as required Tap START Inserting SIM cards This screen is only shown when no SIM card is inserted: Insert card now ( p. 10) Insert SIM card later: Skip Establishing a WLAN connection...
- Page 16 Using the touchscreen Using Google services Various services are displayed. Use the switch to enable/disable the service you want to use Accept Performing this step means you accept the conditions of use and data protection declaration of Google. Selecting a search provider You can select which search provider you use for search requests.
- Page 17 Afterwards you need to confirm the data protection policy and declaration of agreement. As the last step, you can accept the device charge limit. The charge limit of your smartphone is preset to 90% battery capacity. This increases the battery life. Your Gigaset GX4 is now ready to use.
-
Page 18: Using Your Smartphone
Basic operation Using your smartphone This section includes basic information about using your smartphone, the start screen, messages and apps. The menus, functions and displays described here may differ in appearance and func- tion as the result of automatic updates for the device or individual apps. Please note that the following sections will not describe every detail of every setting. - Page 19 Basic operation Setting the period of inactivity for transitioning to idle mode Settings Display Screen timeout Select period Ending idle mode Briefly press the on/off button Remove notifications if necessary Swipe up Unlock display lock Some apps can be accessed directly from idle mode with a fingerprint ( p.
- Page 20 Basic operation Switching between start screens and apps The Navigation bar is at the bottom of every screen. Navigation is performed by gestures or three virtual buttons depending on your settings. Setting the Navigation bar Set the required operation type for the Navigation bar: Settings Navigation bar Select Gesture navigation or Virtual key...
- Page 21 Basic operation Navigation using virtual buttons Virtual key is set. Opens the last screen viewed. You can go back several times (only as far as the start screen). Home button Briefly tap to: Open the start screen which was open last time. Touch and hold to: Open the Google Assistant Google Help Opens an overview of the apps and browser tabs used last time.
-
Page 22: Configuring The Start Screens
Configuring the start screens Configuring the start screens The following sections contain information about creating and managing the start screen. Tailoring the Favourites bar At the bottom of every start screen is the Favourites bar, from which you are able to quickly access the apps you use most frequently. - Page 23 Configuring the start screens Adding a widget to a start screen Widgets are components that are specifically intended to be displayed on a start screen, e.g. the entry field for a search machine, a clock, a calendar extract for the current day, an important entry from the contact list or a direct dial.
- Page 24 Configuring the start screens Adding, rearranging and removing start screens If you have created multiple start screens, white dots appear above the Favourites bar indicating the number of start screens and the position of the current start screen. Adding start screens Touch and hold an app Drag the app to the right until a blank start screen is shown...
- Page 25 Configuring the start screens Quick settings The quick settings enable you to access frequently used settings from all user situations, such as screen lighting, WLAN, Bluetooth and similar settings. Opening the quick settings From the Status bar, swipe down . . . The most important quick settings are displayed Swipe down again .
- Page 26 Configuring the start screens Setting volume and vibration with the Volume button Press one of the volume buttons on your smartphone . . . The slider for the volume is opened Adjust the volume with the slider or volume buttons Which volume is changed depends on what you are currently doing.
- Page 27 Configuring the start screens Adding text Entering letters and symbols: Tap a key Entering uppercase letters: Tap the shift key ( Enabling/disabling Caps Lock: Double tap the shift key ( Showing umlauts: Touch and hold the key Whilst text is being entered, suggestions from the keypad dictionary are shown above the keypad.
-
Page 28: Notifications
Notifications Setting voice entry If an app permits it, you can also enter text by speaking into the microphone. The function is enabled by default. Enable/disable voice input: Settings System Languages & input On-screen keyboard Manage on- screen keyboards Enable/disable Google Voice input with switch Voice input settings: Settings System... - Page 29 Notifications Dealing with notifications Viewing and responding to notifications Tap the notification . . . The contents of the message are displayed in the associated app. If there are several possible apps, you can select one. Which information is displayed and which actions are possible depend on the app which trig- gers a notification.
- Page 30 Notifications Changing the default notification sound Settings Sound Notifications Select notification sound No notification sound: Select None (first entry in the list) • If you do not wish to be disturbed, you can mute your smartphone. No notification sound is played. Use the “Do not disturb”...
-
Page 31: Apps
Apps Apps The following sections contain information about using and managing apps. The apps available on your smartphone are stored in the App menu. Your smartphone is supplied with a number of default apps. You can download and install more apps, or disable and uninstall existing apps. You can place frequently used apps directly on a start screen ( p. - Page 32 Apps Ending apps (gesture control) Drag slowly from the bottom up . . . The apps used most recently are displayed Swipe the app up to exit Tap Clear all Ending apps (Navigation bar) Tap the button . . . The apps used most recently are displayed Swipe the app up to exit.
- Page 33 Apps Preinstalled default Google apps Your smartphone makes available many of the default apps from Google, including: Google Browse Internet and search smartphone Chrome Browser for surfing on the Internet Gmail Receive, write and send emails Look for and find out about places in all corners of the Maps globe YouTube...
- Page 34 Apps Using two apps at the same time Split screen mode enables you to display two apps next to or above each other on the screen, and to work with both apps in parallel. Both apps support the function. Starting Split screen mode Depending on the device orientation, the apps are either displayed top/bottom (portrait) or left/right (landscape).
- Page 35 Apps Protection from harmful apps Downloading apps from sources other than Google Play If you want to download apps from sources other than Google Play, you must permit it explicitly. You can fund this function in the settings of the app that is allowing the download, such as the browser or mail program.
-
Page 36: Downloads
Downloads Improving the detection of harmful apps The Scan apps with Play Protect is enabled. If the function is enabled, Google also receives anonymous information on all apps installed which are not from the Google Play Store. This helps Google to provide better protection for users against harmful apps. -
Page 37: Fingerprint Sensor
Fingerprint sensor Fingerprint sensor Your smartphone has a fingerprint sensor. It enables you, for example, to authorise purchases, register with certain apps and open a contact quickly from idle mode. Setting up the fingerprint Settings Security Biometrics & password Fingerprint Fingerprint Manager . -
Page 38: Protection From Unwanted Interruptions
Protection from unwanted interruptions Using a fingerprint If an action is to be authorised with a fingerprint, the icon or alternative display lock (if set up) is displayed. Tap the fingerprint sensor with a finger which has been scanned Repeat the process as required The alternative display lock is requested automatically if the fingerprint is not recognised after several attempts. - Page 39 Protection from unwanted interruptions Restrict app usage Settings Digital wellbeing & parental controls Tap the diagram Show all apps Next to the app for which you want to set the usage time, tap Set the time in hours and minutes OK .
- Page 40 Protection from unwanted interruptions Setting sleep time mode When sleep time mode is enabled, your smartphone can be muted and/or the screen changed to the grey scale display at a defined time. Settings Digital wellbeing & parental controls Sleep time mode The welcome screen with information about sleep time mode is displayed.
- Page 41 Protection from unwanted interruptions Permit/prevent authorisations from apps Settings Digital wellbeing & parental controls Manage notifications . . . A list of apps is displayed Prevent all notifications for an app: Disable the switch next to the app Detailed setting of app notifications: Tap the app More information on authorisations: p.
- Page 42 Protection from unwanted interruptions Define rules for “Do not disturb” Touch and hold the icon . . . The setting screen for Do Not Disturb is opened Settings Digital wellbeing & parental controls Do Not Disturb . . . The setting screen for Do Not Disturb is opened People You can set which people are permitted to contact you even when “Do not disturb”...
- Page 43 Protection from unwanted interruptions Alarm & other interruptions Set whether you are allowed to be interrupted by alarms, media sounds, touch sounds, reminders or calendar appointments. Tap the respective option Use the displayed sliders to set which events to permit. Schedules Specify how long the “Do not disturb”...
-
Page 44: Additional Functions
Additional functions Parental controls With parental controls, you can define rules for when your children use your smartphone. For this, the Family Link app must be installed on your smartphone as well as that of the child. With Family Link, you can set up rules that ensure exposure to digital media is age-appropriate, such •... - Page 45 Additional functions Setting up a guest Settings System Multiple users Use multiple users . . . All available users are displayed Add guest Switch to guest . . . Your smartphone switches to the guest area. There is also an option to define whether the guest is to be permitted to use your smartphone for calls: Enable/disable Allow calls with the switch Removing a guest...
- Page 46 Additional functions Creating screenshots Take a screenshot of your smartphone as an image, and edit, share and send it. Taking a screenshot Open the screen for which you want to create a screenshot. Press and hold the on/off button Screenshot Press the volume - and on/off buttons simultaneously The screen content is kept in the Photos app.
- Page 47 Additional functions Transferring files For data interchange with a computer with macOS: Android File Transfer is installed and started on the computer. Swipe the Notifications bar down Tap the USB notification Select File Transfer Settings Connected devices File Transfer Windows: Automatic drive detection is opened on the computer Open Windows Explorer Use drag-and-drop to move files as for other external drives macOS: The Android File Transfer window is opened on the computer...
- Page 48 Additional functions Sending the screen content to another device (streaming) Sent the image and sound of your smartphone to a TV device. The TV device is streaming-capable or equipped with a streaming device (such as Chromecast) and is in the same network (via LAN or WLAN). The app for which you want to stream content supports the same Chromecast version.
-
Page 49: Communication
Making calls Communication This section contains information and making calls and contacts. The menus, functions and displays described here may differ in appearance and func- tion as the result of automatic updates for your smartphone or individual apps. Please note that the following sections will not describe every detail of every setting. Making calls The following section contains information about making calls and corresponding functions during a call. - Page 50 Making calls Incoming calls With an incoming call, the phone number of the caller is displayed, if available. Information on the contact or the Caller ID is also displayed. Accepting a call Display lock enabled: Touch the white circle and swipe up No display lock: Tap Answer Rejecting a call...
- Page 51 Making calls Merging two calls into a conference call One call active, one call on hold..The calls are merged Ending a conference call: . . . The phone numbers of the participants are displayed next to a phone number . . . The connection to this participant is ended next to a phone number .
- Page 52 Making calls Blocking incoming numbers Protect yourself against unwanted calls and texts. Phone Settings Blocked numbers . . . Blocked incoming numbers are listed Add a number: Add number Enter the number BLOCK Enable the number again: next to the number UNBLOCK Network-dependent settings You can, depending on your mobile network operator, use additional network services such as...
- Page 53 Making calls Call list The call log shows all outgoing, accepted and missed calls. Showing the call log Phone . . . The calls are listed with phone number, place and date. Arrow icons show the types of calls: Missed call Accepted call Outgoing call to see a detailed list of missed calls.
-
Page 54: Contacts
Contacts Contacts The following sections contain information about using, creating and managing contacts. You can use the Contacts app to enter and organise all information on your contacts, such as different number, address, mail address and much more. Other apps, such as the Phone app, access the information and make it available where it is needed. - Page 55 Contacts Grouping contacts Merge contacts into groups under a common label. You can, for example, send a group message or a group email to the members of a label. Different labels are predefined, such as Family and Friends. Contacts . . . Existing labels are listed Creating a new label Create label Enter the label name...
- Page 56 Contacts Correcting and managing contacts Contacts can be corrected and managed. This includes options such as merging and correcting duplicate contacts or restoring, exporting and importing contacts. Correcting and merging Duplicate contacts can be detected automatically and corrected. Contacts Correcting and managing Merge and correct .
- Page 57 Contacts Editing contact details Contacts Select the contact to edit Tap the field you wish to edit Change the contents Save Scroll down Tap More fields Fill in the required fields Save Adding contacts to Favourites Add people you contact frequently to your Favourites. Favourites are shown in the Phone app in a separate list ( p.
-
Page 58: Messages (Sms/Mms)
Messages (SMS/MMS) Messages (SMS/MMS) The following sections contain information about sending, receiving and managing messages (SMS/MMS). To send and receive messages (SMS/MMS), use the Messages app. It is in the Favourites bar on the start screen by default ( p. 22). Helpful information about the Messages app: Messages Help &... - Page 59 Messages (SMS/MMS) Writing an MMS Multimedia messages (MMS) can contain text, images, voice messages, camera pictures or videos, preconfigured stickers (animated symbols) and information about a location. When writing a message, tap to the left of the text field Select the required attach- ment(s) .
- Page 60 Messages (SMS/MMS) Sending speech-to-text messages When writing a message, tap and hold next to the text field Record the voice message Release the symbol. The spoken text will be converted into text via speech recognition and can be sent as a message. Voice messages are not stored on your smartphone.
- Page 61 Messages (SMS/MMS) Saving MMS pictures and videos on your smartphone: . . . The picture is saved in the internal memory on your smartphone under Pictures/ Messages Deleting a message from a conversation: Confirm with Delete Searching in messages Messages Enter the search term .
-
Page 62: Settings
Device Settings The following section contains information about the different device settings, such as display, sounds, energy options, security, mobile signal and network. The menus, functions and displays described here may differ in appearance and func- tion as the result of automatic updates for the device or individual apps. Please note that the following section will not describe every detail of every setting. - Page 63 Device Display You can find detailed display settings that have a direct impact on the device display in the Display menu. You can also configure start screen settings here ( p. 19). Brightness Change the screen brightness or adapt it the surroundings. From the Status bar, swipe down .
- Page 64 Device Dark design When the function is enabled, the background colour of the system and of theapps provided changes to black. Settings Display Theme mode Select dark design From the Status bar, swipe down . . . The quick settings are opened Dark theme Enable and disable using the button...
- Page 65 Device Enable vibration Settings Sound Tap the Vibrate for calls option and choose from three setting options. Ringtones Changing the default ringtone Settings Sound Select the category (phone, notification, alarms) Select ringtone Adding new ringtones Ringtone apps: Download and install ringtone apps from the Google Play Store Transferring a music file (MP3) from a computer: Use the USB cable provided to connect your smartphone to a computer p.
- Page 66 Device Displaying the charge level as a percentage icon in the Status bar shows the charge level. Showing the charge level in the battery icon (as %): Settings Battery Enable/disable the Battery percentage function with the switch Display battery use Settings Battery .
- Page 67 Device Automatically disable Power Save mode when charge level is adequate When the function is enabled, Power Save mode is disabled automatically when the battery is 90% full. Settings Battery Battery Saver Enable/disable the Turn off when fully charged option with the switch Storage Your smartphone differentiates between permanent device storage (which can be extended with a memory card) and main memory.
-
Page 68: Security
Security Security The following sections contain information about the main security settings for your smartphone, such as data protection, device and SIM card locks and app permissions. Data protection The Privacy menu contains different settings with which you can protect your privacy. Settings Privacy . - Page 69 Security Display lock The display lock protects your smartphone from unauthorised use. When you switch your smartphone on or enable the display, you are prompted to unlock your smartphone . The display lock becomes active after a defined time after your smartphone has switched to idle mode.
- Page 70 Security Unlocking display lock with facial recognition Your smartphone will unlock when it detects a trusted face. Scan your face. Your smartphone will carry out facial recognition when you switch it on and unlock if it recognises the face. Facial recognition is not as secure as a PIN, pattern or password. Someone who looks like you could unlock your smartphone.
- Page 71 Security Screen pinning When you pass on your smartphone to someone else, you can restrict its usage to a single app. For this, you pin a certain view of this app. Enabling/disabling screen pinning Settings Security screen pinning Enable/disable the Use app pinning- function with the switch Use the switch to specify whether the PIN, pattern or password needs to be entered to unpin the screen.
- Page 72 Security App permissions When downloading an app from Google Play, specify the functions and data to which this app has access, e.g. to contacts or your location. You can check and change permissions for apps on your smartphone. With App permissions management, you have quick access to all permissions granted to apps on your smartphone.
-
Page 73: Accounts And Location Detection
Accounts and location detection Android Device Manager If you have lost your smartphone, you can use the Android Device Manager to locate it, ring it, lock it and delete data on it. Your smartphone is registered with a Google account ( p. - Page 74 Accounts and location detection Account types Google account You need a Google account for Google services such as Gmail, Google+ or YouTube™ and for downloading apps from Google Play. When you log in with a Google account, emails, contacts, appointments and other information assigned to this account are automatically synchronised with your smartphone.
- Page 75 Accounts and location detection Enabling/disabling automatic synchronisation Setting synchronisation for a Google account: Settings Passwords & accounts Enable/disable the Auto-sync data option Disabling automatic synchronisation prolongs the battery life. Enable automatic synchronisation again if you want to continue after charging the battery. Setting synchronisation for individual apps: Settings Passwords &...
-
Page 76: Apps
Apps Managing location history When Location history is enabled, Google can also determine the location of your smartphone when no Google app is active. Location history information is stored in your Google account for all devices assigned to the account. Settings Location Location services... - Page 77 Apps Selecting a default app for an action If multiple apps are available for an action and a default app is not defined, you are prompted to select an app. Tap the app you want to use. Select whether this app is used Just once or Always for the action. If you select Always, the app is set as the default app for all actions of this type.
- Page 78 Apps Storage & cache Internal storage used by the app. Freeing up storage: Clear storage Freeing up temporary app memory: Clear cache Mobile data & Wi-Fi Data volume downloaded or uploaded by the app over the mobile data network or WLAN p.
-
Page 79: Network Connections
Network connections Special app access Contains detailed information on the access capabilities of apps to data and system resources. Resetting app settings Reset all the changes made to app settings. Settings Apps Show all apps Reset app preferences Network connections This section includes information about mobile networks, WLAN, data usage, Bluetooth, NFC, VPN and tethering. - Page 80 Network connections App data usage Shows data usage and how this breaks down by individual app. Data warning & limit Specify the data usage limit at which a warning is to be displayed ( p. 84). 4G Calling Improve speech quality and other communication. Preferred network type Select the preferred mobile standard, such as 2G, 3G, 4G, 5G.
- Page 81 Network connections WLAN Use your smartphone to establish a connection to a WLAN, and use the connection to send data and to surf the Internet. A connection is established automatically if your smartphone is within range of a registered WLAN and the WLAN function is enabled. Enabling/disabling the WLAN function From the Status bar, swipe down using two fingers .
- Page 82 Network connections Sharing WLAN access Sharing your WLAN access with friends is quick. Settings Wi-Fi Tap the WLAN you want to share Share Confirm your identity with a fingerprint or use the current method for screen unlocking . . . The password is shown as text and a QR code You can provide friends with this code so they can take a photo of it or scan it to connect to your WLAN.
- Page 83 Network connections DHCP When there is no active DHCP server in the WLAN: Under IP settings Select the Static option Enter network configuration data Save Additional WLAN settings Settings Wi-Fi Wi-Fi settings Select option . . . Enable WLAN automatically when in range of stored networks. Location detection must be enabled.
- Page 84 Network connections WLAN Settings Wi-Fi Wi-Fi data usage . . . This shows the data volume sent over WLAN within the time period set. Underneath is a list of apps that sent data over WLAN, including the data volume sent. Display another time period: Tap the arrow next to the time period displayed Select time period...
- Page 85 Network connections Enabling/disabling Data save mode Mobile data usage is reduced when Data save mode is enabled. Most apps and services can only retrieve background data over WLAN. From the Status bar, use two fingers to swipe down . . . The quick settings are displayed = enabled) Restricting background data can impact the performance of the app.
- Page 86 Enable/disable Internet access / Contact sharing / SIM Access with the switch Changing the Bluetooth name of your smartphone Your smartphone can be seen by other Bluetooth devices under the name Gigaset GX4. You can change the name. Settings Bluetooth...
- Page 87 Network connections Flight mode WLAN, mobile networks and Bluetooth are disabled in Flight mode. From the Status bar, swipe down . . . The quick settings are displayed Tap the Flight mode icon Settings More networks and connections Airplane mode Enable/disable Flight mode with the switch When Flight mode is enabled, the...
- Page 88 Network connections Deleting a VPN Settings More networks and connections VPN . . . The VPNs set up are listed Next to the VPN to be deleted, tap Forget Editing VPN settings Settings More networks and connections Next to the VPN to be changed, tap Edit the VPN settings Save...
- Page 89 Network connections Changing WLAN hotspot settings Change the network name, security, password and frequency band for access points. Settings Hotspot & tethering Wi-Fi hotspot Select the required option and change it as required Connecting a device to the WLAN hotspot To connect, you need the hotspot name and password.
- Page 90 Network connections Setting up and using USB tethering Share the Internet connection with another device over a USB cable. The mobile data connection is active p. 79 Use a USB cable to connect a smartphone to another device Open the notification over the USB connection Select USB tethering Enabling/disabling USB tethering:...
-
Page 91: System
System System The following sections include information about system updates, backing up and restoring the system and resetting your smartphone. Date and time Settings System Date & time . . . Automatic setting The date and time are set automatically using a time server: Tap Set time automatically Select the required option (network or GPS) Disable it and set the date and time manually... - Page 92 System System update Your smartphone checks automatically for new system updates (Android versions). You can also trigger this process manually. Checking the Android version Settings Phone info . . . The current version is displayed under Android version Download system update You are notified when a new system update is available for your smartphone by default.
- Page 93 System Backing up and restoring the system Backing up data and settings Use the Android Backup Service to backup data linked to one or more Google accounts. If you have to swap your smartphone or delete data, you can restore the data from every Google account backed up beforehand.
- Page 94 System Smart Touch Smart Touch is a smart assistant that can be used to display functions across all apps. The func- tions are controlled with the Smart Touch Ball. Enabling Smart Touch: Settings Smart Touch Use the switch to enable Smart Touch Configuring Smart Touch: Settings Smart Touch...
-
Page 95: Troubleshooting
Troubleshooting Sometimes your smartphone may not function as it should. The following sections contain troubleshooting information. Rebooting your smartphone If apps or other functions are not working properly or the screen of your smartphone is no longer reacting, reboot your smartphone. Hold down the on/off button for at least 10 seconds . - Page 96 Resetting your smartphone using recovery mode If you cannot reset your smartphone using the system, you can reset it using recovery mode. Please note that the following description is only suitable for advanced users. Your smartphone is switched off. If you cannot switch it off using the system, open the battery compartment cover and remove the battery ( p.
-
Page 97: Questions And Answers (Faq)
This section contains answers to frequently asked questions about your smartphone and describes how to solve problems. If none of the answers help you rectify the problem, please contact a Gigaset Service Centre. Why won't my smartphone switch on? Your smartphone battery is not inserted. Insert the battery ( p. - Page 98 Questions and answers (FAQ) How do I adjust the display brightness? Open quick settings and adjust the brightness. Alternatively, you can also adjust the brightness via Settings: Settings Display Brightness level For more information, see the corresponding section ( p. 63). How do I set the ringtone, notification sounds or vibration? You can adjust the various sounds of your smartphone via Settings: Settings...
-
Page 99: Appendix
Please have your proof of purchase ready when calling. Please note that if the Gigaset product is not sold by authorised dealers in the national territory the product may not be fully compatible with the national telephone network. It is clearly specified on the box near the CE mark for which country/countries the equipment has been developed. -
Page 100: Customer Service & Assistance
- - - - - - - - - - - - - - - - - (Preço de uma ligação local) - - - - - - - - - - - - - - - - - - - - - - (01800 999 GIGASET) - Page 101 In the case of new devices and their components exhibiting defects resulting from manufacturing and/or material faults within 24 months of purchase, Gigaset Communications shall, at its own option and free of charge, either replace the device with another device reflecting the current state of the art, or repair the said device.
-
Page 102: Manufacturer's Advice
Country-specific requirements have been taken into consideration. Hereby, Gigaset Communications GmbH declares that the radio equipment type Gigaset GX4 (E940-2797-00) is in compliance with Directive 2014/53/EU and the UK Radio Equipment Regulations 2017. - Page 103 Manufacturer's advice Waste and environmental protection Correct disposal of this product (Directive for electric and electronic equipment (WEEE)) (Applicable in countries with waste separation systems) EU: This label on the product, accessory or in documentation indicates that the product and its elec- tronic accessories (such as charger, headphones and USB cable) may not be disposed of in household waste.
- Page 104 110 KHz - 205 KHz -7.665 dBuA/m 87.5 MHz - 108 MHz GNSS 1559 MHz - 1610 MHz Accessories Only use Gigaset approved chargers, batteries and cables. Unapproved accessories can damage the device. Battery Technology: Li-Polymer Capacity: 5000 mAh Part number:...
-
Page 105: Open Source Software
Open source software General Included on your Gigaset device is Open source software which is subjected to various licence conditions. With regard to Open source software, the granting of usage rights extending beyond operation of the device in the form supplied by Gigaset Communications GmbH is governed by the relevant license conditions of the Open Source software. -
Page 106: Index
Index Index ....... . . 13 Replace Numerics ......65 Battery charge level . - Page 107 Index ........73 Contact Locate ......57 .
- Page 108 Index ......16 Capturing ........37 Name .
- Page 109 Index Number ..... . . 49 Enter from keypad ......6 Safety information Numbers .
- Page 110 Index ........4 ......24 Status bar Using gestures .
- Page 111 Issued by Gigaset Communications GmbH Frankenstraße 2, D-46395 Bocholt © Gigaset Communications GmbH 2023 Subject to availability. All rights reserved. Rights of modification reserved. www.gigaset.com Google, Android, and Google Chrome are trademarks of Google LLC.
Need help?
Do you have a question about the GX4 and is the answer not in the manual?
Questions and answers