berlinger Fridge-tag 2 Operation Manual
Hide thumbs
Also See for Fridge-tag 2:
- User manual (121 pages) ,
- Operation manual (35 pages) ,
- Installing (16 pages)

Related Manuals for berlinger Fridge-tag 2


Summary of Contents for berlinger Fridge-tag 2
- Page 1 ® Fridge-tag with external sensor OPERATION MANUAL ENGLISH PAGE 1-35 GEBRAUCHSANWEISUNG DEUTSCH SEITE 36-70...
-
Page 2: Table Of Contents
Content Page 1) Display explanations 2) State of delivery / Sleep Mode 3) Gathering information prior to device activation ® 4) Placing the sensor of the Fridge-tag 5) Activation process 5.1) Overview sequences of activation 5.2) Activation 5.3) Setting the calendar format 5.4) Use of READ and SET 5.5) Setting the date 5.6) Setting the time... -
Page 3: Display Explanations
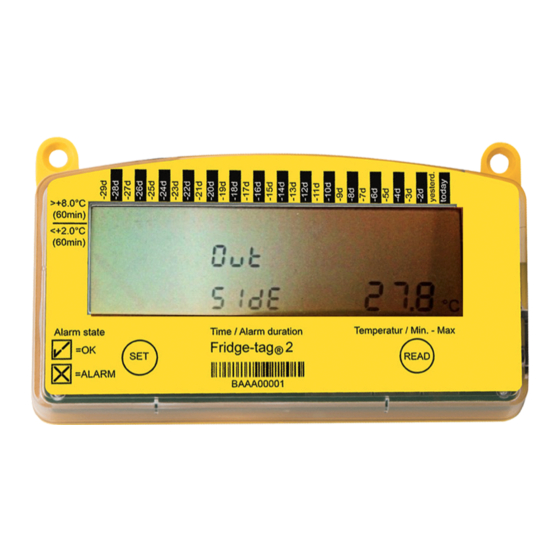
1) Display explanations Ext. Int.Sensor Sensor 1 - 888 max. °F 8888 °C min. OK ( ) or ALARM (X) indicator Daily HIGH / LOW alarm indicator (showing history of the last 30 days) Power on indicator (double point is flashing) Battery low indicator (approx. -
Page 4: State Of Delivery / Sleep Mode
„Sleep Mode“. >+8°C (10hrs) <-0.5°C (60min) Temperatur / Min. - Max Alarm state Time / Alarm duration Fridge-tag 2 ® READ =ALARM BAAA00001 The display (LCD) is blank. 3) Gathering information prior to device activation (in Sleep Mode) The following chart shows which information will be indicated on the LCD screen upon successive READ button pressing while in Sleep Mode. - Page 5 Pressing the READ-button Displayed Information 1st press of READ: Sensor Ext. Int.Sensor Display test: 1 - 888 max. °F 8888 all segments activated min. °C 2nd press of READ: Indication of date and production test result: 16. September 2012 / P SS PASS 3rd press of READ:...
-
Page 6: Placing The Sensor Of The Fridge-Tag 2
For the right positioning of the ext. sensor within the fridge, please follow the instructions of WHO, CDC or any other governmental requirements of your country (for more information visit www.berlinger.com). -
Page 7: Activation Process
5) Activation process Overview sequences of activation 5.1) Instruction for the use of the READ and the SET button State of delivery 5.2) Activation 5.3) Setting the calendar format 5.5) Setting the date 5.6) Setting the time 5.7) Setting the alarm limits (only if factory preset otherwise skipped) 5.8) Connection error NOTE:... -
Page 8: Activation
3 seconds. >+8°C (10hrs) <-0.5°C (60min) Temperatur / Min. - Max Alarm state Time / Alarm duration Fridge-tag 2 ® READ =ALARM BAAA00001 Successful activation is visible when the following indication will appear on the screen: 5.3) Setting the calendar format Option 1: Setting the date format to: dd.mm.yyyy... -
Page 9: Use Of Read And Set
<-0.5C (60min) Press READ to change Temperatur / Min. - Max Time / Alarm duration Alarm state the calendar Fridge-tag 2 ® READ format =ALARM Then press SET to save the calendar format After setting the caldendar format, the first digit of the date will start flashing. -
Page 10: Setting The Date
16th Sep. 2012 (16.09.2012) in Europe format The first digit is flashing: >+8°C 10hrs) <-0.5C 60min) Temperatur / Min. - Max Alarm state Time / Alarm duration Fridge-tag 2 ® READ =ALARM BAAA00001 Press READ until „1“ appears as the Press SET first digit... - Page 11 >+8°C The third digit is (10hrs) flashing: <-0.5C (60min) Temperatur / Min. - Max Time / Alarm duration Alarm state Fridge-tag 2 ® READ =ALARM BAAA00001 Press READ until „0“ appears as the Press SET third digit to save >+8°C...
-
Page 12: Setting The Time
The eighth digit is flashing: >+8°C (10hrs) <-0.5C (60min) Temperatur / Min. - Max Alarm state Time / Alarm duration Fridge-tag 2 ® READ =ALARM BAAA00001 Press READ until „2“ 2 Press SET appears as the to save eighth digit The date is now set to: 16.09.2012... - Page 13 The second digit (10hrs) is flashing: <-0.5C (60min) 1 00 Temperatur / Min. - Max Alarm state Time / Alarm duration Press READ Fridge-tag 2 ® READ until „3“ =ALARM appears as the second digit 2 Press SET to save >+8°C...
-
Page 14: Setting The Alarm Limits (Not Standard)
1) and 3) Setting the HI & LO alarm duration, they are completed in the same manner The first digit is flashing: 0 00 Temperatur / Min. - Max Alarm state Time / Alarm duration Fridge-tag 2 ® READ Press READ to =ALARM adjust the number. Press SET to... - Page 15 The third digit is flashing: 0 00 Temperatur / Min. - Max Alarm state Time / Alarm duration Fridge-tag 2 ® READ Press READ to =ALARM adjust the number. 2 Press SET to confirm the number The fourth digit is flashing: 0 00 Temperatur / Min.
- Page 16 °C Temperatur / Min. - Max Alarm state Time / Alarm duration Fridge-tag 2 ® READ =ALARM Press SET to adjust the limit between 0 °C / 0 °F and +55 °C / +131 °F The next digit can now be set.
- Page 17 °C Press READ until the flashing „ “ sign is Temperatur / Min. - Max Time / Alarm duration Alarm state Fridge-tag 2 ® READ indicated on the screen: =ALARM Press SET to set the limit below 0 °C / 0 °F The next digit can now be set.
-
Page 18: Connection Error
5.8) Connection error After 10 minutes without a connection between the device and the sensor, the following alarm will be shown on the display. >+8°C (10hrs) <-0.5C (60min) 1 21 Temperatur / Min. - Max Alarm state Time / Alarm duration Please check the following two points: ®... -
Page 19: Read And Change Settings / How To Correct Setting Mistakes
Read and change settings / How to correct setting mistakes 6.1) Overview menu Device activated 6.2) Menu entry 6.2.1) Menu: SET DATE (Change date and / or time) 6.2.2) Menu: READ CONF (Read alarm configurations) 6.2.3) Menu: CELS FAHR (change alarm configurations) 6.2.4) Menu: SET CONF (only if factory preset otherwise skipped) NOTE:... -
Page 20: Menu Entry
You can access the following 4 menus: OUT SIDE - first screen, shows the temperature measured with the int. sensor of the Fridge-tag 2 (normal ambient temperature) 1) SET DATE - change date and/or time settings... - Page 21 • The number of time adjustments during the same day is un- limited. Note: After the adjustment has been done, the Fridge- ® 2 ext. sensor will be locked for 24 hours from the following midnight (e.g. changes on the 15th Sep., device locked from 00:01 am on the 16th until 00.01 am on the 17th).
-
Page 22: Display Indication During Measurement
0 00 °C Temperatur / Min. - Max Alarm state Time / Alarm duration Fridge-tag 2 ® READ =ALARM For a maximum of 1 minute no current temperature is displayed on the screen, indicated by (--.-). Example of OK Display - during measurement >+8°C... -
Page 23: Warning Symbol
1 42 °C Temperatur / Min. - Max Alarm state Time / Alarm duration Fridge-tag 2 ® READ If the temperature and time conditions are outside the preset alarm parameters the following will be displayed on the screen: • The ( ) OK symbol will be replaced by (X) ALARM symbol •... -
Page 24: Option 1: Read Out Day-Per-Day
Ext. Sensor max. 0 32 °C Temperatur / Min. - Max Time / Alarm duration Alarm state Fridge-tag 2 ® Press READ once READ =ALARM The following information is indicated on the screen: • The OK symbol • The corresponding arrow (example: high arrow of „today“) •... - Page 25 (10hrs) <-0.5C (60min) 1 21 Temperatur / Min. - Max Time / Alarm duration Alarm state Fridge-tag 2 ® READ =ALARM Press READ The following information is indicated on the screen: • The ALARM symbol • The corresponding arrow (example: Lower ALARM limit) •...
-
Page 26: Option 2: Read Out Only Alarms (Use Alarm-Super-Jump Function)
Sensor 0 35 min. Temperatur / Min. - Max Time / Alarm duration Alarm state Fridge-tag 2 ® READ =ALARM Press READ a second time The following additional information is indicated on the screen: • Lowest recorded temperature (example: -1.1˚C) •... - Page 27 >+8°C (10hrs) <-0.5C (60min) 2 30 Temperatur / Min. - Max Alarm state Time / Alarm duration Fridge-tag 2 ® READ =ALARM BAAA00001 Press READ for 3 seconds The following information is indicated on the screen: • The ALARM symbol •...
-
Page 28: Computer (60 Day History)
Information: Press and hold the READ button again for at least 3 seconds and the next Alarm event will appear on the screen. 9.3) Option 3: Read out data from the files generated by the Fridge-tag ® with ext. sensor by connecting it with a computer (60 day history) ®... - Page 29 Wait sufficient time for the device to generate the ASCII and PDF files (approx. 10 seconds). Now choose the appropriate file genera- ® ted by the Fridge-tag Information: For this process no additional software is necessary. Note: For a proper USB-port disconnection of the device, please always use the “safely remove hardware”...
- Page 30 Sample of a PDF-file generated by a Fridge-tag ® with external sensor Page 1...
- Page 31 ® Information: File names on the Fridge-tag 2 ext. sensor are write protected. The names may only be changed after downloading onto a computer. Changing is either possible directly on unopened files or via open and save commands with the Adobe Reader. Using other programs may cause loss of the digital signature.
-
Page 32: Veryfication Process
2 ext. sensor are authentic and have not been manipulated or accidentally changed (meets the strict FDA CFR 21 Part 11 requirements). 1st step: Download the software „Verifier“ from our website: www.berlinger.com 2nd step: Open the software. The following window will appear: 3rd step: Click on „Open file“... -
Page 33: Explanation Of Terms
July 2016 (2016-07). ® More information about the Fridge-tag 2 ext. sensor can be found in the sales brochure and on the website: www.berlinger.com 12) Technical specifications Storage condition (inactive) 0 °C to +30 °C Operating temperature (ext. sensor) -40 °C to +60 °C Display visible -10 °C to +55 °C... -
Page 34: Important Information
13) Important Information Liability The manufacturer shall not be held liable: • if the device was used beyond the manufacturer’s given limitations. • for any claims due to the improper storage and use of the device. • for any problems with the temperature controlling and / or cooling unit. •... - Page 35 Manufacturer: Q-tag AG Mitteldorfstrasse 2 9608 Ganterschwil Switzerland www.q-tag.com Sales: Berlinger & Co. AG Mitteldorfstrasse 2 9608 Ganterschwil Switzerland Tel.: +41 71 982 88 11 Fax: +41 71 982 88 39 E-Mail: info@berlinger.com Web: www.berlinger.com 20151126_Release_3.0 Subjet to change. Please note that all information in this document is correct at the time of publication. Due to our policy of continuous product development, we reserve the right to change this information without prior notice.
Need help?
Do you have a question about the Fridge-tag 2 and is the answer not in the manual?
Questions and answers