Advertisement
Quick Links
Advertisement

Related Manuals for Yadea C1S


Summary of Contents for Yadea C1S
-
Page 2: Table Of Contents
Statement Catalogue At the beginning of printing, this manual contains 1. Foreword..............01 the latest product information at that time.Yadea is 2.Safety precautions..........02 committed to improving product design and quality. 3.Scooter structure............11 As a result, the product design may be changed at 4.Oprate instruction...........15... -
Page 3: Foreword
For the safety of you and your family and to prevent accidents, please be sure to read and observe the following First of all, thank you for choosing to buy "YADEA" safety precautions and relevant laws and regulations. products. This manual introduced the knowledge and... - Page 4 Driving safety 3.When riding, we should wear helmet, goggles and 1.It is strictly prohibited to lend the scooter to anyone other protective devices that meet the safety standards correctly. We should wear clothes that are clear, free to who is not familiar with its performance. 2.Electric scooter shall carry personnel or articles in move all over, not tight, and not open cuffs.
- Page 5 5.Before washing water with electric motor, you should know the contents of the instructions on "matters needing attention in washing water". 6.If the power supply is damaged or the charging system fails, replace and maintain it at the authorized repair shop designated by YADEA.
- Page 6 If there is any abnormality, please When cleaning the scooter, avoid water from impacting the charging socket, wiring harness connector, fuse and other contact YADEA authorized service station for repair or find professional repair. electrical components, and do not directly splash water 8.The installation of batteries for new scooters and...
- Page 7 Don't recharge when it thunders. When charging, the battery and charger must not be covered with anything, and the they should go to YADEA professional service station charger must not be placed on the saddle, so as not to affect for maintenance..
-
Page 8: Scooter Structure
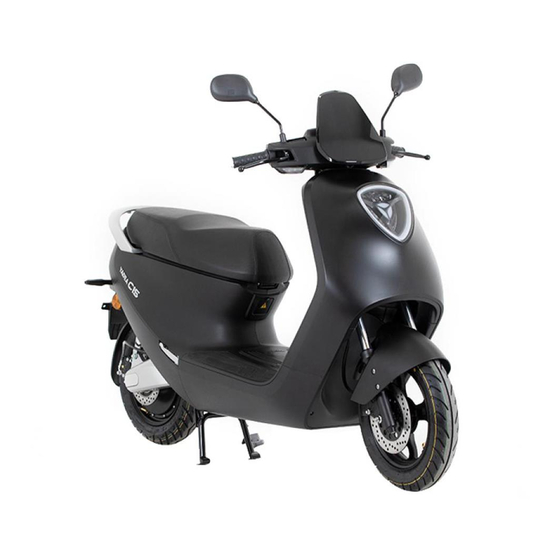
3.SCOOTER STRUCTURE Scooter structure diagram 19 18 1615 14 13 1.Front fender 2. Headlight 3. Windshield 4. Rear-view mirror 1.Left rear brake lever 2. Grip 3. Left switch group 5. Footplate 6.Seat cushion 7. Rear arm rest 8. Taillight 4. Speedometer 5. Right switch group 9. - Page 9 VIN Frame coding Speedometer function(If applicable) Example: LR4DE190××××××××× 3 4 5 6 Height 7mm Depth 0.2mm Frame stand tube 1.Left turning light indication 2. Battery charging state 3. High beam indication 4. Light sensor 5. Automatic headlight indication 6. Smart key indication Motor model coding 7.
- Page 10 Power lock switch 4.OPERATE INSTRUCTION Power off Power on Installation of the battery(If applicable) Lock hole Seat lock/Anti-theft lock 1.Battery box cover Battery box lock 2.Battery handle 3.Power wire plug 1.Power on: Press the key at /Lock position, the speedometer will display , then rotate the key clockwise to position in 20S.
- Page 11 Anti-theft alarm(If applicable) Left switch group Single mileage clear High beam/Low beam Mechanical key Turning light Lock/Unlock Horn 1.Single mileage clear: Long press “SET” button over 5S. 2.High beam and low beam switch: When the headlight switch is turned on, short press the button to change high beam and low beam.
- Page 12 Right switch group Throttle Rotate counterclockwise to accelerate, rotate clockwise Double flash switch to decelerate. Reset after loosening, the motor stops outputting power. Fully off(Zero speed) Model change MODE Constant speed cruise Parking Fully open(Maximum speed) Front brake lever 1.Double flash switch: Short press the switch to turn The front brake lever is located on the right handlebar.
- Page 13 Main stand Side stand The main stand is located at the bottom of the center of The side stand is located on the lower left side of the the scooter. When using the main stand to park, the left scooter. When parking with the side stand, hold the hand holds the rear brake lever tightly to prevent it from rear brake lever tightly with your left hand to prevent it moving, the right hand holds the left position of the...
- Page 14 Inspection before riding Damage or contamination of the Inspection of power supply circuit and reflector and the license lighting circuit 1.Check whether the reflector is dirt and damaged and do not use it if there is dirt or damage. 1.Turn on the power supply, operate the lighting switch, 2.Check whether the license plate is firmly installed, and check whether the headlights and taillights are on the number is clear, and there is no dirt or damage.
- Page 15 Inspection of tire Correct driving Start and driving 1.Whether the tire pressure is normal. According to the depression of the tire grounding part, judge whether 1.Insert the key into the electric door lock, turn the power the air pressure is appropriate. If the air pressure is switch clockwise to turn on the whole vehicle circuit.
- Page 16 3.When parking, stand on the left and flat ground, it shall immediately stop operation and send it to the propping up the support. authorized repair shop designated by YADEA for 4.When you leave the scooter, Please be sure to lock the repair and replacement.
- Page 17 5.If the controller is found to be working abnormally, it shall immediately stop operation and send it to the ●Protect the battery from water or other moisture. Protect authorized repair shop designated by YADEA for repair the discharge and charge terminals of the battery from and replacement.
- Page 18 Charging the battery ●If you have any questions about this battery or its usage, please do not hesitate to contact the Customer Service 1.Connect the battery to the charger, ensure the output Department terminal of the charger and the input terminal of the battery are firmly connected.
-
Page 19: Inspection,Maintenance&Repair
Storage,maintenance and transport 5.INSPECTION, MAINTENANCE AND REPAIR 1.If the battery needs to be stored for an extended period , Dear customers: it should be kept at around 50% state of charge (or charge Please check and maintain the scooter regularly . when the battery for 2~3hours after used up), and should be it is stopped for a long time, it should also be checked placed in a dry and ventilated circumstance. - Page 20 Inspection of the wheels Inspection of tire 1.Check whether the wheels rotate smoothly, whether 1.With the tire cooling, check with the tire pressure gauge. there is abnormal noise, and whether the front and 2.Check whether there are obvious cracks and damages on rear wheel fixing screws are tightened.
- Page 21 Check the lubrication condition of various 4.Do not directly splash water on brakes, motors and parts of the vehicle front and rear axles to prevent water from affecting the service life of vehicle components. Check whether the amount of lubricating oil filled in each 5.Do not use steam or high pressure water pipes part of the vehicle is sufficient, and whether each for washing vehicles.
- Page 22 3.After replacing the headlamp, adjust the headlamp the brake pad is worn or the brake system leaks. Please beam if necessary. go to YADEA authorized service station for inspection Replacement of fuse and maintenance. Add brake fluid or replace brake pads, Turn off the power supply and check whether the fuse please use the same model.
- Page 23 Users self-inspection items Schedule of maintenance contents for regular maintenance projects Inspection items Everyday 60days 180days 360days Inspection items Inspection contents 1.Whether the handlebar rotates and steering parts are loose and worn. Headlight, Turning lights, Taillight, Whether it works normally. 2.Whether the pedal parts are worn or not and Brake light whether the rotation is flexible.
- Page 24 Trouble shooting list 6.Specification Failure phenomena Failure reason and troubleshooting methods Electric schematic diagram ●Power lock failure: Repair or replace the power lock or plug-in. The scooter is not powered on ●Fuse open: Find out the reason and replace the fuse. ●Poor circuit contact: Retighten the power lead plug.
-
Page 25: Specification
Specification 7.Maintenance Record Model Malfuntion Malfuntion Service Dimension 1790*720*1210mm Date Serviced by Remarks Description Description Station Wheel base(mm) 1260mm Min ground clearance 130mm 95kg Rated load 180kg Brake system F: disc R: disc Wheel rim F: 2.15-12 R: 2.15-12 Tire size F: 90/90-12 R: 100/80-12 Tire pressure F: 175kpa R: 250kpa... -
Page 26: Maintenance Record
Maintenance Record Malfuntion Malfuntion Service Date Serviced by Remarks Description Description Station...
Need help?
Do you have a question about the C1S and is the answer not in the manual?
Questions and answers