
Related Manuals for Exaco Riga XL VI


Summary of Contents for Exaco Riga XL VI
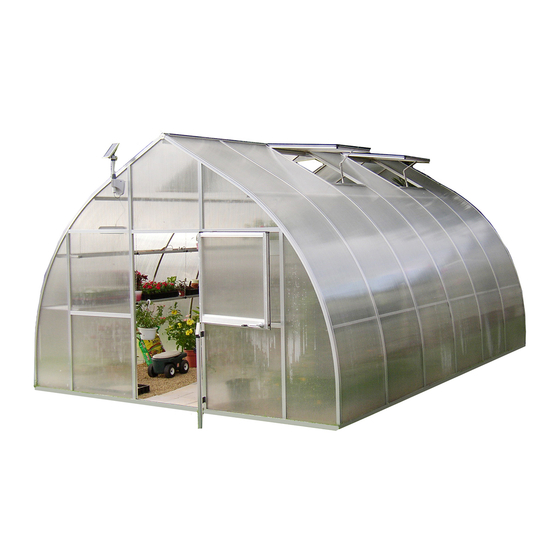
- Page 1 Riga XL VI Assembly Guide January 31, 2013 Exaco Trading Co. 10203 Metropolitan Drive Austin, Texas 78758-4944 512-407-8500...
-
Page 2: About This Document
This document is an Assembly Guide intended for persons who have a moderate level of experience building small structures. It is specific to the six-meter Riga XL VI, but can be applied to Riga XL models of other lengths. If you are an experienced Riga greenhouse builder, this is the guide for you. -
Page 3: Table Of Contents
Table of Contents ABOUT THIS DOCUMENT ..........................2 Download the Riga XL Owner’s Reference Manual ................2 INTRODUCTION ............................. 6 Welcome to the Exciting World of Riga XL Ownership ................6 Riga XL Models ............................6 Available Options ............................6 Tools and Additional Materials You Will Need .................. - Page 4 STEP-BY-STEP ASSEMBLY GUIDE ......................... 24 Summary of Assembly Steps ........................24 Steps 1 and 2: Assemble the roof windows and doors..............24 Steps 3 through 10: Build the first gable.................... 24 Steps 11 through 16: Build the roof and side walls................24 Step 17: Build the second gable and join it to the side walls.
- Page 5 Step 17 Assemble and Set the Second Gable ..................50 Step 18 Install the South Gable Mounting Brackets ................51 Step 19 Install the Lateral Supports ....................... 52 Step 20 Install Interior Seals ........................53 Step 21 Apply Exterior Sealant ....................... 54 Step 22 Hang the Doors .........................
-
Page 6: Introduction
The Riga XL VI is the standard 6-meter length and is the subject of this manual. Available by special order are the smaller Riga XL IV and Riga XL V, which are 4 and 5 meter lengths respectively. Also available by special order are the stretch models Riga XL VII, Riga XL VIII, and Riga XL IX, which are 7, 8, and 9 meters long respectively. -
Page 7: Tools And Additional Materials You Will Need
Tools and Additional Materials You Will Need Mandatory tools and materials 8-foot step ladder #2 Phillips screwdriver Bubble level 2 to 3 ft. long Powered screw driver with #2 Phillips bits Rubber mallet 28 anchor fasteners appropriate for your foundation substrate (must fit 3/8” hole) Material to erect temporary bracing for the gables and roof beam Recommended additional tools 10 millimeter socket wrench or nut driver... -
Page 8: Receiving Inspection
Exaco Customer Service within 30 days. Your Riga XL VI will arrive on a very long pallet. Bound to the pallet are two large flat bundles of glazing, two curved wrapped bundles, and three long boxes. In addition to the pallet is a very long cardboard tube containing a fourth long box. -
Page 9: Box 3: Small Parts
Box 3: Small Parts Box 3 contains the small parts, most of which are fasteners. Several sizes of screws may be mixed in a single bag. Sort and count them, then put each size in an individual marked bag. Count carefully; extra screws are rarely provided. - Page 10 Identifier and Quantity expected Quantity Illustration description and where used received Pos. 110 1 dual-strand coil Insulation seal, 6 x 8 mm Install in gap inside greenhouse thick shipped as dual-strand between glazing and floor profile, coil. Separate the strands 20 places.
- Page 11 Identifier and Quantity expected Quantity Illustration description and where used received Pos. 127B Plastic corner connector, 2 for each of 4 roof windows black, used at upper right 2 for each of 2 bottom doors and lower left window and 1 for each of 2 top doors, upper door corners corners only...
- Page 12 Identifier and Quantity expected Quantity Illustration description and where used received Pos. 158 Two-part door holder set 1 set at each of 2 top doors Pos. 159 Phillips head screws, 3.5 x 16 Intended to fasten door holder mm pan head sets (Pos.
-
Page 13: Box 2: Window And Door Profiles
Box 2: Window and Door Profiles Box 2 contains the profiles to construct four roof windows and two each upper and lower Dutch doors. All of the window and door profiles except Pos. 43 and Pos. 47 are cut from the same extrusion, differing only in length and borings for hinges or other attachments. -
Page 14: Box 1: Profiles For Gables
Box 1: Profiles for Gables Box 1 contains the straight vertical and horizontal profiles used for the two gables, and the crossbars used beneath the roof windows. All of these profiles are cut from the same extrusion, differing only in length, end finishing, and borings. -
Page 15: Box 4: Long Profiles
Box 4: Long Profiles Box 4 is shipped inside of a heavy cardboard tube for additional protection during shipment. This box contains the longest straight parts; the floor profiles, the lateral supports, the roof beam, and the roof beam reinforcement bar. Identifier and Quantity expected Quantity... -
Page 16: Arch Bundles 1 And 2: Curved Profiles
Arch Bundles 1 and 2: Curved Profiles There are two models of curved profiles. The curved center profiles (Pos. 19) form the arched framing for the side walls, and the edge stay bars (Pos. 2 and 3) form the arches of the gables. The curved center profiles are all identical, but the edge stay bars come in left and right configurations. -
Page 17: Glazing Bundles 1 And 2
Glazing Bundles 1 and 2 There are eight shapes of polycarbonate glazing panels, two of which exist in both left and right side version. All panels are 16 mm thick triple-wall. The illustration is as viewed from outside the greenhouse, looking at the ultraviolet-protected face. Do not store glazing where any portion of it will be exposed to direct sunlight. - Page 18 Illustration Overall dimensions (width x Quantity expected Quantity (Not to scale) height) in millimeters and where used received 888 x 835 Top and bottom door panels in each gable 980 x 3893 Side wall bays without roof windows 980 x 2830 Side wall bays with roof windows 888 x 943 Roof window panels...
-
Page 19: Options And Accessories
Options and Accessories Aluminum foundation frame Identifier and Quantity expected Quantity Cross section or illustration description and where used received Pos. 6.1 Foundation frame profile Supports each gable floor for gables, 4100 mm long profile Pos. 6.2 Foundation frame profile Supports each side wall floor for sides, 5858 mm long profile... -
Page 20: Shelf Kit
Shelf kit This is preliminary information will be completed a future release of this manual. A new style shelf system for Riga greenhouses began shipping in 2012. The suspension chains of the older system have been replaced by brackets attached to the arches. Door extension kit This preliminary information will be completed in a future release of this manual. -
Page 21: Site Preparation
The bottoms of footings and piers must be well below the ground frost line. Descriptions of some popular foundations and substrates follow. Greenhouse dimensions The footprint of your six-meter-long Riga XL VI forms a rectangle of dimensions shown. The thickness of this footprint includes the floor profiles and mounting brackets, which must be anchored. -
Page 22: Stem Wall Foundation
Stem wall foundation A stem wall is a low wall made of wood, grouted concrete blocks, or cast concrete. It is a solution for sloped sites. The wall elevates the greenhouse well above the floor level to provide additional interior height. -
Page 23: Aluminum Foundation Frame
Aluminum foundation frame A grade-level foundation can be implemented with an optional aluminum foundation frame made specifically for the Riga XL. The frame is buried with the greenhouse floor profiles already attached, and then the greenhouse is erected on the floor profiles. The frame cannot elevate any portion of the greenhouse above grade and is therefore appropriate only for sites that are perfectly level. -
Page 24: Step-By-Step Assembly Guide
STEP-BY-STEP ASSEMBLY GUIDE Some of the assembly steps will differ if your Riga is built on the optional aluminum foundation frame. Summary of Assembly Steps Steps 1 and 2: Assemble the roof windows and doors. Assembling windows and doors is a good starting point because it helps initiate the builder and can be done indoors. -
Page 25: Locations Of Frame Components
Locations of Frame Components The components of your Riga XL are cataloged by Pos. number. Here are shown the Pos. numbers, names, and placements of the frame components. Pos. 1 Gable floor profile, 2 places Pos. 2 Right side edge stay bar, 2 places Pos. -
Page 26: Step 1 Roof Windows
Step 1 Roof Windows Plastic corner connector (Pos. 127B) Roof window profile (Pos. 34) Plastic corner connector Top (hinge side, no T-seal here) (Pos. 127A) 4.2 x 60 mm Phillips flat head screw (Pos. 112) 8 places. Important: At each Roof window side corner, drive inner screw (1) Suggested assembly order... -
Page 27: Step 2A Upper Doors
Step 2a Upper Doors Plastic corner connector (Pos. 127B). Plastic corner connector (Pos. 127A). 4.2 x 60 mm Phillips flat head screw (Pos. 112) 8 places. Important: At each corner, drive inner screw (1) Upper door profile Glazing block. first, then outer screw (2). top side (Pos. -
Page 28: Step 2B Lower Doors
Step 2b Lower Doors Plastic corner connector End cap (Pos. 137) 2 places. Rectangular tube (Pos. 47) (Pos. 127B) Plastic corner connector (Pos. 127A) 4.2 x 60 mm Phillips flat head screw (Pos. 112) 8 places. Important: At each 4.2 x 50mm Phillips corner, drive inner screw (1) pan head screw (Pos. -
Page 29: Step 3 Gable Floor Profile And Vertical Door Profiles
Step 3 Gable Floor Profile and Vertical Door Profiles Vertical door profile right (Pos. 7) Vertical door profile left (Pos. 6) The drawing view is from inside the greenhouse, so left Outside slot not used Inside slot and right callouts are reversed. Load M6 screw in floor profile Fasten each vertical door profile to the floor profile... -
Page 30: Step 4 Lower 980 X 944 Mm Glazing Panels (1 & 2 Of 4)
Step 4 Lower 980 x 944 mm Glazing Panels (1 & 2 of 4) Install 980 by 944 mm glazing panel with UV protected face outward (far side), 2 places. = M6x12 mm screw loaded in a previous step Parts required (No Pos. -
Page 31: Step 5 Lower Crossbars (1 & 2 Of 5M)
Step 5 Lower Crossbars (1 & 2 of 5m) M6x12 screw as needed for shelf Crossbar (Pos. 8), support. 2 places. = M6x12 mm screw loaded in this step, 8 places = M6x12 mm screw loaded in a previous step = M6x12 mm screw optional for shelving Parts required Pos. -
Page 32: Step 6 T-Connectors And Upper 980 By 944 Mm Glazing Panels (3 & 4 Of 4)
Step 6 T-connectors and Upper 980 by 944 mm Glazing Panels (3 & 4 of 4) Install 980 by 944 mm glazing panel with UV protected face outward (far side), 2 places. T-connector (Pos. 103) fastened with M6x12 screws, 2 places. = M6x12 mm screw loaded in a previous step Parts required Pos. -
Page 33: Step 7 Vertical Middle Profiles
Step 7 Vertical Middle Profiles Vertical middle profile Vertical middle profile right (Pos. 5) left (Pos. 4) Fasten each vertical middle profile to the floor profile with a 4.2x13 mm Phillips pan head screw (Pos. 111) through the pre-drilled hole on the far side. -
Page 34: Step 8 T-Connectors And Upper Crossbars (3, 4, & 5 Of 5)
Step 8 T-connectors and Upper Crossbars (3, 4, & 5 of 5) Crossbar (Pos. 8) 3 places. 4.2 x 50 mm Phillips pan head screw (Pos. 142) through pre-drilled hole T-connector in vertical door profile (Pos. 103) into crossbar channel 2 places 2 places. -
Page 35: Step 9 Curved & 5-Sided Glazing, Straight, K, And Slanted T-Connectors
Step 9 Curved & 5-sided Glazing, Straight, K, and Slanted T-connectors 980x1008mm 5-sided Slanted T-connector glazing 2 places (Pos. 102) 2 places 980x727mm curved glazing 2 places K-connector (Pos. 104) 602x1922mm 2 places curved glazing 2 places Straight connector (Pos. 101) 2 places = M6x12 mm screw loaded in a previous step Parts required Pos. -
Page 36: Step 10 Edge Stay Bars With Pressed-On Plastic Corner Connectors
Step 10 Edge Stay Bars with Pressed-on Plastic Corner Connectors Edge stay bar right (Pos. 2) Edge stay bar left (Pos. 3) Optional M6x16 mm screws accommodate extra lateral supports, 2 places. Optional M6x16 mm screws for alternate location of upper lateral supports, 2 places. -
Page 37: Step 11 Load Screws In The Curved Center Profiles
Step 11 Load Screws in the Curved Center Profiles Anywhere near the top and out of the way Optional M6x16 with washer for extra lateral support, each profile. 2808 mm Optional M6x16 with 2 washers for window 2766 mm uplift restraint, 8 window-bearing profiles only. M6x12 for crossbar connector plate, 8 window-bearing profiles only. -
Page 38: Step 12 Prepare The Floor Profiles, Crossbars, And Roof Beam
Step 12 Prepare the Floor Profiles, Crossbars, and Roof Beam Parts required Pos. 18 Side floor profiles Pos. 1 Gable floor profile Pos. 25 Crossbar Pos. 28 Roof beam Pos. 31 Roof beam reinforcement bar Pos. 107.12 M6x12 hex head cap screw with nut Pos. -
Page 39: Prepare The Roof Beam Reinforcement Bar
Prepare the roof beam reinforcement bar The reinforcement bar (Pos. 31) is bound to the roof beam (Pos. 28). Measure and mark the reinforcement bar at 990, 1985, 2980, 3975, and 4970 millimeters. No screws need to be loaded into the reinforcement bar unless you expect to install equipment on it for plant support or other purposes. -
Page 40: Step 13 Set The Floor Profiles
Step 13 Set the Floor Profiles Step 13 detail Floor profile corner connection Legends for steps 13 through 19 For reference, consider the greenhouse to be oriented as shown by the compass rose. The work of each step is highlighted red and reverts to gray tones in subsequent steps. Parts required Pos. -
Page 41: Step 14 Install The North, East, And West Mounting Brackets
Step 14 Install the North, East, and West Mounting Brackets Step 14 detail Use a lateral profile to locate mounting brackets Proceed with this step only if your substrate is square, flat, and true. You must maintain the floor profiles square and straight throughout anchoring process. Your anchoring method must allow the bracket to be loosened or removed. -
Page 42: Step 15 Set The Roof Beam
Step 15 Set the Roof Beam Step 15 detail Install the roof beam end cap Parts required Pos. 28 Roof beam Pos. 31 Reinforcement bar engaged with roof beam and previously marked in Step 12 Pos. 114 Roof beam end cap cover (plate) Pos. -
Page 43: Step 16 Assemble The Side Walls
Step 16 Assemble the Side Walls Introduction to Step 16 Step 16 is implemented in 26 individual operations numbered Step 16.01 through Step 16.26. Each operation is illustrated with a drawing. It is important that you perform these operations in order. The following terms are used to describe the operations of Step 16: 1. -
Page 44: General Instructions For Step 16
General instructions for Step 16 Parts required for Step 16 Pos. 19 Curved center profile, previously loaded with screws in Step 11 Pos. 25 Crossbar, previously marked and loaded with screws in Step 12 Pos. 115 Connector plate for crossbar Roof window, previously assembled and sealed in Step 1 Glazing panel for windowed bays, 980 x 2830 mm Glazing panel for non-windowed bays, 980 x 3893 mm... - Page 45 Step 16.02 Glazing 1W Step 16.01 Arch 2W Step 16.03 Arch 2E Step 16.04 Glazing 1E Step 16.06 Arch 3W Step 16.05 Window 2W...
- Page 46 Step 16.07 Glazing 2W Step 16.08 Arch 3E Step 16.09 Glazing 2E Step 16.10 Window 3E Step 16.12 Glazing 3E Step 16.11 Arch 4E...
- Page 47 Step 16.13 Arch 4W Step 16.14 Glazing 3W Step 16.15 Window 4W Step 16.16 Arch 5W Step 16.17 Glazing 4W Step 16.18 Arch 5E...
- Page 48 Step 16.19 Glazing 4E Step 16.20 Window 5E Step 16.21 Arch 6E Step 16.22 Glazing 5E Step 16.24 Glazing 5W Step 16.23 Arch 6W...
- Page 49 Step 16.26 Glazing 6E Step 16.25 Glazing 6W If your greenhouse is built on the optional aluminum foundation frame you must defer installing Glazing 6W and 6E until after the second gable is built (Step 17). If you are building on a wood or concrete substrate you may still find it more convenient to defer these.
-
Page 50: Step 17 Assemble And Set The Second Gable
Step 17 Assemble and Set the Second Gable Parts required Completed gable per Steps 3 through 10 1 Pos. 114 Roof beam end cap cover 2 Pos. 111 4.2 x 13mm Phillips head screw 2 Pos. 116 floor profile corner connector cover 8 Pos. -
Page 51: Step 18 Install The South Gable Mounting Brackets
Step 18 Install the South Gable Mounting Brackets Step 18 detail if Step 14 was deferred Use a lateral profile to locate mounting brackets For the aluminum foundation Parts required frame use Pos. 6.4 hold down plates Pos. 6.7 Mounting bracket instead of mounting brackets. -
Page 52: Step 19 Install The Lateral Supports
Step 19 Install the Lateral Supports Optional Optional Parts required Pos. 22 Lateral supports Pos. 22 Optional extra lateral supports for lighting and plant support If an optional shelving kit will be installed the shelf height is fixed by the lateral support elevations. -
Page 53: Step 20 Install Interior Seals
Step 20 Install Interior Seals The interior insulation seal (Pos. 110) is delivered as two joined strands in a single coil. Its purpose is to seal the openings at the base of each glazing panel against debris and condensate that runs down the glazing surface. Segments are pressed into the floor profile slot between vertical profiles, fitting tightly against the inside face of the glazing. -
Page 54: Step 21 Apply Exterior Sealant
Step 21 Apply Exterior Sealant Seal the bottom edge of every glazing panel. Mask with Scotch Blue painter’s tape to form a bead on the glazing surface 3 to 5 millimeters wide from the profile edges. Apply the sealant and tool it to slope from glazing surface to profile edge. -
Page 55: Step 22 Hang The Doors
Step 22 Hang the Doors Parts required Pos. 135 Hinge set Pos. 140 Stainless 4.8 x 16 mm self-tapping Phillips flat head screw Pos. 139 Stainless 4.8 x 25 mm self-tapping Phillips flat head screw Pos. 136 Sash lock Pos. 141 Stainless 3.5 x 22 mm self-tapping Phillips flat head screw Pos. -
Page 56: Step 23 Install The Window Openers
Step 23 Install the Window Openers Parts required (No Pos.) Automatic window opener assembly The window openers are easier to install if you temporarily remove the springs and leave the actuator detached. Washers are not called for, but ¼ inch stainless flat washers over the slots of the upper foot will make it easier to keep the foot in position while tightening the nuts. -
Page 57: Install Options
INSTALL OPTIONS Install the Optional Shelving This preliminary information will be completed in a future release of this manual. A new style shelf system for Riga greenhouses began shipping in 2012. The suspension chains of the older system have been replaced by brackets attached to the arches. -
Page 58: Install The 500 Millimeter Door Extension Kit
Install the 500 Millimeter Door Extension Kit This preliminary information will be completed in a future release of this manual. A kit is available for a Riga XL built on a stem wall. Use the door extension kit to relocate the doorway 500 millimeters downward for easy entry through the stem wall. -
Page 59: Assemble The Aluminum Foundation Frame
Assemble the Aluminum Foundation Frame Compact view of an assembled foundation frame with floor profiles attached The floor profiles must be installed on the foundation frame profiles before the greenhouse assembly begins. Some deviations from the normal assembly instructions will be necessary. Place the foundation in a trench with the bottom surface of the floor profiles at grade level. - Page 60 Mark the floor profiles per Step 12 but load only two M6x12 cap screws in each. Load 6 M6x12 cap screws in each foundation frame for gables (Pos. 6.1). Load 7 M6x12 cap screws in each foundation frame for sides (Pos. 6.2). ...
-
Page 61: Supplemental Information
SUPPLEMENTAL INFORMATION All About Anchoring Your Riga XL is equipped with a robust anchoring system which when properly installed will safely tolerate very high wind loads. Proper installation requires the included mounting brackets (Pos. 6.7) to be fastened to a strong and massive substrate with appropriate anchors. About installing mounting brackets Mounting brackets can be installed in Step 14 before the side walls are assembled, or in Step 18 after the second gable is in place. -
Page 62: Anchoring To Concrete: A Special Case
Anchoring to Concrete: A Special Case A popular method for anchoring to concrete makes use of a threaded stud embedded into the concrete with very high pull-out resistance. One such device that is appropriate for anchoring your Riga XL is ITW RED HEAD Trubolt Wedge Anchor, part number SWW-3822 or equivalent. -
Page 63: Frequently Asked Questions
The Riga XL Essentials Kit is a collection of parts and materials that are needed to make assembly easier and assure the high quality of the finished greenhouse. These important items are not provided by the manufacturer but are added for your convenience by Exaco Trading Company, the U. S. Riga distributor. Why are ratcheting cargo straps recommended? -
Page 64: Why Unc ¼-20 Cap Screws Instead Of M6 In The Windows, And Why Extras
Why UNC ¼-20 cap screws instead of M6 in the windows, and why extras? The capture slots in the window profiles are too wide to bind the heads of M6 screws. An M6 screw will turn in the slot as you try to tighten a nut on it but a UNC ¼-20 cap screws will be properly anchored. Two cap screws are required in the lowest profile of each roof window to fasten the automatic window opener. -
Page 65: What Is A Roof Beam Fitment Tool
What is a roof beam fitment tool? A roof beam fitment tool is a replica of one end of a roof beam. Use it during construction of each gable to assure proper alignment of the edge stay bars (gable arches, Pos. 2 & 3) so they will be ready to receive the roof beam in a subsequent operation. -
Page 66: What Is A Medium Modulus Neutral Cure Silicone Sealant
What is a medium modulus neutral cure silicone sealant? It is recommended to seal certain areas of your Riga XL to prevent rainwater intrusion. Sealant also adds diaphragm strength that helps keep windows and doors square and true. Silicone sealant delivers the best performance for this application.
Need help?
Do you have a question about the Riga XL VI and is the answer not in the manual?
Questions and answers