
Related Manuals for Woodward Peak 150


Summary of Contents for Woodward Peak 150
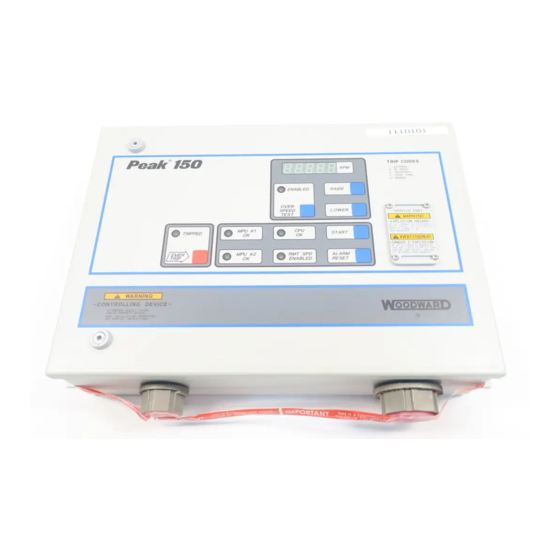
- Page 1 Installation and Operation Manual ® Peak 150 Digital Control for Steam Turbines 8200-008/009/010/011/012/013/014/015/016/017/018/019 9905-857/858/860/861/863/864/866/867 Manual 85565 (Revision C)
- Page 2 Revisions—Text changes are indicated by a black line alongside the text. Woodward Governor Company reserves the right to update any portion of this publication at any time. Information provided by Woodward Governor Company is believed to be correct and reliable. However, no responsibility is assumed by Woodward Governor Company unless otherwise expressly undertaken.
-
Page 3: Table Of Contents
Manual 85565 Peak 150 Contents ..........LECTROSTATIC ISCHARGE WARENESS 1. G ............1 HAPTER ENERAL NFORMATION 2. I ................2 HAPTER NSTALLATION Packaging.......................2 Mounting .........................2 Electrical Connections....................2 3. C ............7 HAPTER ONTROL ESCRIPTION Introduction......................7 Starting Modes .......................7 Operating Modes ....................8 Communication.......................8... - Page 4 Peak 150 Manual 85565 Contents 7. P ..............34 HAPTER ROGRAMMING Introduction ......................34 Hand-Held Programmer ..................34 Configure Mode ....................37 Service Mode......................38 Basic Program Architecture..................39 Speed Relationships.....................40 Configuration Mode Programming ...............40 Service Mode Programming .................42 8. S ..............44 HAPTER ERVICE ENUS Introduction ......................44 Alarms Menu......................44...
- Page 5 Other Operating Problems ...................93 13. S ............... 94 HAPTER ERVICE PTIONS Product Service Options..................94 Returning Equipment for Repair................95 Replacement Parts ....................96 How to Contact Woodward...................96 Engineering Services ...................97 Technical Assistance....................98 ..........99 PPENDIX ROGRAM ORKSHEETS Introduction......................99 Configure Mode Program ..................99 Service Mode Program..................103...
- Page 6 Figure 4-8. Connections for Analog Input............14 Figure 4-9. Jumper and Test Point Locations and Functions ......15 Figure 5-1. System Overview ................16 Figure 6-1. Front Panel of Peak 150 Control .............24 Figure 7-1. Hand-held Programmer ..............36 Figure 7-2. Basic Program Architecture .............39 Figure 7-3.
-
Page 7: Electrostatic Discharge Awareness
PCB from the control cabinet, place it in the antistatic protective bag. CAUTION—ELECTROSTATIC DISCHARGE To prevent damage to electronic components caused by improper handling, read and observe the precautions in Woodward manual 82715, Guide for Handling and Protection of Electronic Controls, Printed Circuit Boards, and Modules. Woodward... - Page 8 Peak 150 Manual 85565 Woodward...
-
Page 9: Chapter 1. General Information
(9905-292) for the Peak 150 control. The Peak 150 control is UL Listed for the US and Canada (cUL) for use in Class I, Division 2, Groups A, B, C, and D or non-hazardous locations only. -
Page 10: Chapter 2. Installation
* Modbus is a trademark of Modicon, Inc. Mounting The standard Peak 150 control enclosure must be vertically mounted on a wall or 19" (483 mm) rack, allowing sufficient room for lid opening and wiring access. Two welded flanges, one on the right side and one on the left side, permit secure mounting. - Page 11 Peak 150 Make sure that all inputs and outputs, including all shields, are NOT grounded outside the Peak 150 control box. Terminal block 1 (ground) is the only connection that should be wired to external ground. See Figure 2-2 for the control wiring diagram and terminal block numbers.
- Page 12 Peak 150 Manual 85565 Figure 2-1. Peak 150 Control Outline Drawing Woodward...
- Page 13 Manual 85565 Peak 150 Use this Wiring Diagram with part Use this Wiring Diagram with all numbers 8200-004, -020, -021, other part numbers referenced in -022, and -023 this manual. Figure 2-2. Control Wiring Diagram Woodward...
- Page 14 Peak 150 Manual 85565 Power Supply Run the power leads directly from the power source to the control box. Use 12 AWG or larger wire for the power supply. Shield the power supply wires and connect the shield to an external point. DO NOT POWER OTHER DEVICES WITH LEADS COMMON TO THE CONTROL.
-
Page 15: Chapter 3. Control Description
Starting Modes The Peak 150 control has two starting modes: manual start mode and automatic start mode. Manual Start Mode With the manual start mode, speed control begins at minimum governor speed (as opposed to idle speed) (see Figure 3-1). -
Page 16: Operating Modes
Peak 150 Manual 85565 Operating Modes The Peak 150 control has three operating modes: manual mode, remote speed set mode, and combination mode. Manual Mode If the manual mode is configured, the turbine speed is adjusted solely by the front panel keys and the remote raise and lower discrete inputs. The remote speed setting analog input is ignored in this mode. -
Page 17: Chapter 4. Wiring
® All inputs and outputs to the Peak 150 control are made through terminal blocks inside the Peak 150 control enclosure. Wiring passes through two wiring ports on the bottom of the control. Inputs and outputs to the control are: •... - Page 18 Peak 150 Manual 85565 Version Input Voltage Frequency 1 (24 Vdc) 18–32 Vdc 2 (ac/dc) 90–150 Vdc 88–132 Vac 47–63 Hz No power switch is provided, the unit operates whenever power is applied. Input over-or under-voltage shutdown is not provided; if the +5 Vdc supply in the unit goes below 4.7 volts, the microprocessor will be reset.
- Page 19 Manual 85565 Peak 150 Discrete Inputs There are eight discrete inputs (shown in Figure 4-3), powered either by an internal 24 Vdc supply or by an external 5–28 Vdc supply: • Input #1 = Lower Speed • Input #2 = Raise Speed •...
- Page 20 Peak 150 Manual 85565 Modbus Communications Figure 4-5 shows the connections for Modbus communications. Refer to Chapter 11 for additional Modbus information. If terminals 21–34 are not installed, your unit is not capable of Modbus communications. Figure 4-5. Modbus Connections Analog Outputs •...
Need help?
Do you have a question about the Peak 150 and is the answer not in the manual?
Questions and answers