Sentry Buildings the Pinewood Assembly Book
Hide thumbs
Also See for the Pinewood:
- Assembly book (30 pages) ,
- Assembly book (29 pages) ,
- Assembly book (28 pages)
Advertisement
Quick Links
Sentry Buildings
Assembly Book
!"#$%"&'(")"*+",'-.'/0//
the Pinewood
1234/03'56$7&$89
Manufactured by RBS Holdings, LLC
205 Arlington Drive
Greenville, PA 16125
:;$%'*<86<7'$%')=>?,$9;@"&A'B8&",'@;"')=>?,$9;@'7<C%.'@;$%'*<86<7
*<?'8=@'+"')=>$"&.'$8'C;=7"'=,'$8'><,@.'C$@;=6@')=8%"8@'D,=*
''''''!5E'F=7&$89%.'GGH '''''I''H=>?,$9;@'/0//
Advertisement

Related Manuals for Sentry Buildings the Pinewood


Summary of Contents for Sentry Buildings the Pinewood
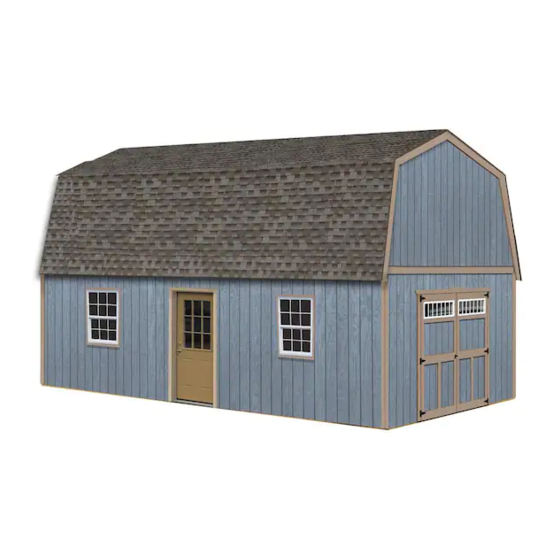
- Page 1 Sentry Buildings Assembly Book !"#$%"&'(")"*+",'-.'/0// the Pinewood 1234/03'56$7&$89 Manufactured by RBS Holdings, LLC 205 Arlington Drive Greenville, PA 16125 :;$%'*<86<7'$%')=>?,$9;@"&A'B8&",'@;"')=>?,$9;@'7<C%.'@;$%'*<86<7 *<?'8=@'+"')=>$"&.'$8'C;=7"'=,'$8'><,@.'C$@;=6@')=8%"8@'D,=* ''''''!5E'F=7&$89%.'GGH '''''I''H=>?,$9;@'/0//...
- Page 2 MPORTANT NFORMATION BOUT H;")M C$@; ?=6, 7=)<7 FYW =, +6$7&$89 )=&" =DD$)" D=, <8? ,"N6$,"*"8@%. Building Permits: ,"%@,$)@$=8%'=,'>",*$@%'8")"%%<,?'D=,')=8%@,6)@$=8A 5?'=C8",A'!"D",'@='8"4@'><9"'D=,'D=68&<@$=8'%699"%@$=8%'<8&'%$Z"A Foundation: Y6, ><)M<9" $8)76&"% >,"[)6@ *<@",$<7% D=, @;" /8& D7==, ,==D 9<+7"%. ,==D What's Included: @,6%%"% <8& 9<+7" @,$*A :C= K/L /2\ 4 ]-\ %$897" ;689 C$8&=C% C$@; %),""8 <8& >,"[+6$7@ +<,8 &==,% C$@;...
- Page 3 Suggested Constructing Details for Heavy Duty Floor System Do Not *<M" @;" D=68&<@$=8 7<,9", @;<8 123 4 /03A H;")M 7=)<7 +6$7&$89 )=&"%. @;" )=8%@,6)@$=8 *<? ;<#" @= );<89"A (">"8&$89 =8 ?=6, $8@"8&"& 6%" < )"*"8@ %7<+ *<? +" *=," <>>,=>,$<@"A 2x4-2' Blocks 1A H6@'K/L'@C='/42[T3'+=<,&%'$8@='/3'7=89'+7=)M%A 56@@'K/L'@C='242[103'@$*+",%'@=9"@;",'@='*<M"...
- Page 4 Constructing Details for Floor System continued Stagger Solid Blocking over Center Runners dA H6@ 7"D@=#", /4- +=<,&% @= 7"89@; <8& $8%@<77 +"@C""8 @;" D7==, O=$%@ =#", @;" )"8@", 242 ,688",%A E@<99", @;" /4- +7=)M% @= *<M" $@ "<%$", @= 8<$7 @;" +7=)M +"@C""8 @;"'O=$%@A 10A e@'$%'$*>=,@<8@'@;<@'@;"'D7==,'+"'7"#"7'<8&'%N6<,"A'Q"<%6,"'@;"...
- Page 5 Step 1 Assemble (1) One 8' Back Wall Frame 1A H6@.'$D'8")"%%<,?.'K/L'@C='/42[T3'K=8"'C$77'+"'@,"<@"&L'@='<'7"89@;'=D'd-\A'P=%$@$=8'@;" +=<,&%'@=9"@;",'<8&'$8&$)<@"'C$@;'3f3''*<,M%'C;","'@;"'C<77'%@6&%'C$77'+"'7=)<@"&A 96" Top Wall Plate 96" Treated Bottom Plate 23-1/4" 24" 24" Stud Spacing The length of pre-cut wall studs will vary from 92-1/4" to 93" depending on your locality. Pre-cut 2x4 Wall Studs Treated Bottom Plate...
- Page 6 Step 2 Assemble (1) One 8' Frame w/ Window Openings 1A H6@.'if necessary.'K/L'@C='/42[T3'K=8"'C$77'+"'@,"<@"&L'@='<'7"89@;'=D'd-\A'P=%$@$=8'@;" +=<,&%'@=9"@;",'<8&'$8&$)<@"'C$@;'3f3''*<,M%'C;","'@;"'C<77'%@6&%'C$77'+"'7=)<@"&A 96"Top Wall Plate 96" Treated Bottom Plate 23-1/4" 24" 26" Stud Spacing /A e8%@<77'K_L'D$#"'>,"[)6@'C<77'%@6&%'+"@C""8'@;"'@=>'<8&'+=@@=*'>7<@"%A''c<$7'@;" @,"<@"&'+=@@=*'>7<@"'@='"<);'C<77'%@6&'C$@;'K/L'@C='1-&'9<7#<8$Z"&'&")M'8<$7%A B%"'K/L'@C='10&')=<@"&'%$8M",'8<$7%'>",'%@6&'@='%")6,"'@;"'@=>'>7<@"A 36" 42" Pre-cut 2x4 Wall Studs Treated Bottom Plate ]A H6@.'D,=*'<'>,"[)6@'C<77'%@6&.'K/L'@C='/42'@='<'7"89@;'=D'/2[1g/\A'E<#"'@;"')6@=DD%A 2A P=%$@$=8 @;"...
- Page 7 Step 3 Assemble 12' Front Wall Frame 1A :,$*.'if necessary.'K/L'@C='/42[1/3'+=<,&%'K=8"'C$77'+"'@,"<@"&L'@='<'7"89@;'=D'122\A'P=%$@$=8 @;"'+=<,&%'@=9"@;",'<8&'$8&$)<@"'C$@;'3f3'*<,M%'C;","'@;"'C<77'%@6&%'C$77'+"'7=)<@"&A'Q<,M'<8 3E3'=8'+=@@=*'>7<@"'C;","'@;"'&==,';"<&",'%6>>=,@%'C$77'+"'7=)<@"&A'See drawing below. /A e8%@<77'KTL'"$9;@'>,"[)6@'%@6&%.'shown in gray.'=#",'@;"'3f3'*<,M%'+"@C""8'@;"'C<77'>7<@"%A'B%" 10&'%$8M",%'=8'@=>'>7<@"'<8&'1-&'9<7#A'8<$7%'=8'+=@@=*'>7<@"A !"D",'@='@;"'&==,'*<86D<)@6,",%'%>")$D$)<@$=8%'D=,')=,,")@',=69;'=>"8$89'%$Z"A'H 6@'K/L @C= >,"[)6@ C<77 %@6&% @= )=,,")@ 7"89@; K,"*"*+", @;" /42 +=@@=* >7<@" C$77 +" ,"*=#"&L <8& $8%@<77 =#", 3E3 *<,M% <% ;"<&", %6>>=,@%A c<$7 @= %@6&% C$@; K10L @"8 10& %$8M",%A E<#" )6@=DD%A 2A e8%@<77 @;"...
- Page 8 Step 4 Assemble 12' Back Wall Frame 1A H6@. if necessary. K/L @C= /42[1/3 K=8" C$77 +" @,"<@"&L @= < 7"89@; =D 122\A P=%$@$=8 @;" +=<,&%'@=9"@;",'<8&'$8&$)<@"'C$@;'3f3''*<,M%'C;","'@;"'C<77'%@6&%'C$77'+"'7=)<@"&A 144"Top Wall Plate 144" Treated Bottom Plate 23-1/4" 24" 24" Stud Spacing Pre-cut 2x4 Treated Bottom Plate Wall Studs /A e8%@<77 K^L %"#"8 >,"[)6@ C<77 %@6&% +"@C""8 @;"...
- Page 9 Step 5 Assemble a 13'-5" Long End Wall Frame If 2x4-14' boards are not available 16' long 2x4 will be substituted. 1A H6@'K/L'@C='/42[123'K=8"'C$77'+"'@,"<@"&L'@='<'7"89@;'=D'1-1\A'P=%$@$=8'@;"'+=<,&%'@=9"@;", <8&'$8&$)<@"'C$@;'3f3''*<,M%'C;","'@;"'C<77'%@6&%'C$77'+"'7=)<@"&A 161" Top Wall Plate 161" Treated Plate Stud Spacing 24" 24" 24" 24" 24" 24" 7-3/4" Pre-cut 2x4 Wall Studs Treated Bottom Plate...
- Page 10 Step 7 Assemble a 13'-5" Long End Wall Door Frame 1A H6@'K/L'@C='/42[123'K=8"'C$77'+"'@,"<@"&L'@='<'7"89@;'=D'1-1\A'P=%$@$=8'@;"'+=<,&%'@=9"@;", <8&'$8&$)<@"'C$@;'3f3''*<,M%'C;","'@;"'C<77'%@6&%'C$77'+"'7=)<@"&'<8&'<8'3E3'C;","'@;"'&==, ;"<&",'%6>>=,@'%@6&%'C$77'+"'7=)<@"&A'See drawing belowA /A W%%"*+7" @;" D,=8@ C<77 D,<*" 6%$89 @;" C<77 >7<@"% )6@ <+=#" <8& $8%@<77 K-L %$4 >,"[)6@ C<77 %@6&%'=#",'@;"'3f3'*<,M%A ]A H6@'K/L'@C='>,"[)6@'%@6&%'@='<'7"89@;'=D'T/\A'e8%@<77'=#",'3E3'*<,M%'<%';"<&",'%6>>=,@%'6%$89 K10L @"8 10& %$8M",%A e8%@<77 @;" /4T ;"<&", +? @="[8<$7$89 @;" "8&% @= @;" <&O<)"8@ %@6&% C$@; 10&'%$8M",%A 2A R,=* /42 )6@=DD% 7"D@ =#", D,=* >,"#$=6% %@">% )6@ K_L D$#"...
- Page 11 Step 8 Install Wall Frames & 2x4 Tie Plates The 13'-5" long wall frames are positioned between 8' side walls. 1A `,")@'@;"'1]3[_\'7=89'C<77'D,<*"'C$@;=6@'&==,'=>"8$89'=8'@;"'"8&'=D'@;"'D7==,A'eQPY!:Wc:V *<M"'%6,"'D,<*"%'<,"'%N6<,"'<8&'>76*+A 8' Back Wall Frame /A e8%@<77 @;" T3 7=89 C<77 D,<*"% =8 @;" +<)M'%$&"'=D'@;"'D7==,A ]A E")6," @;" D,<*"% @=9"@;", <@ @;" )=,8", 6%$89'K2L'D=6,'10&'%$8M",%A 2A e8%@<77'T3'7=89'C<77'D,<*"'C$@;...
- Page 12 Step 9 Install Siding Install siding with a damage edge at a corner where it will be covered with corner trim. If installing building on concrete slab, install siding flush with the bottom plate. For wood floor, extend siding 3/4" below bottom plate. 1A E"7")@'K/L'24T'%$&$89'><8"7%'<8&')6@'><8"7%'@='@;"'C$&@;%'%;=C8'+"7=CA Q<,M'@;"'><8"7%.'on the frimed side.'%='@;"?')<8'+"'$&"8@$D$"&'7<@",A 3 6 "...
- Page 13 Step 10 Install 2x8 Joist Headers on Back Walls 1A H6@ < T3 7=89 /4T +=<,& @= d1\A e8%@<77 @;$% /4T @= @;" T3 +<)M C<77 ><8"7. <9<$8%@ @;" 1]3[_\ "8& C<77'C$@;=6@'&==,'=>"8$89A'e8%@<77'@;"'/4T'D76%;'C$@;'@;"'@=>'=D'@;"'/42'@$"'>7<@"A'E")6,"'C$@; K/L'@C=',=C%'=D'10&'%$8M",'8<$7%'%><)"&'2\'<><,@'<),=%%'@;"'@=>'/42'>7<@"A'W7%='8<$7'@;"'/4T'@= "<);'C<77'%@6&'C$@;'=8"'10&'%$8M",A'See detail belowA 2 Rows 10d Sinker 2x8 Joist Header 10d Sinker Nail /A !">"<@'@='$8%@<77'/4T'O=$%@';"<&",'=8'@;"'D,=8@'C<77A...
- Page 14 Step 11 Install 2x8 Floor Joist 1A e8%@<77'O=$%@';<89",%.'on all 2x8 joist headers.'=#",'@;"'3f3'*<,M%. D76%;'C$@;'@;"'+=@@=*'=D'@;"'/4T%A'B%"'1[1g/\';<89",'8<$7%A Joist Hanger If 2x8-14' boards are not available 16' long 2x8 will be substituted. /A H6@ < /4T[123 @= 1-1\ <8& $8%@<77 @= @;" "8& =D @;" /4T O=$%@ ;"<&",%C$@; K]L @;,"" 10& %$8M",%A ]A H6@'K_L'D$#"'/4T'@='1_T\'<8&'$8%@<77'+"@C""8'@;"...
- Page 15 Step 12 Install Loft Flooring 1A e8%@<77'_gT\'@;$)M'%;""@%.'per layout below.'D76%;'C$@;'@;"'/42'C<77'>7<@"%A'E")6,"'@;" D7==,$89'C$@;'T&'9<7#<8$Z"&'%>$,<7'8<$7%'%><)"&'1/\'<><,@A /A G=)<@"'K/L'@C=''][1g/\'4'2T\'>7?C==&'D$77",'%@,$>%A'H6@'@;"%"'><8"7'@='<'7"89@;'=D']/\ <8&'$8%@<77'@;"'><8"7%'+"@C""8'7=D@'D7==,%A Step 13 Install Trim on End Walls IMPORTANT: Trim Must Be Installed Before Installing Roof Gables! (">"8&$89 =8 @;" >,"[)6@ %@6& 7"89@; <8& $D @;" %$&$89 "4@"8&% +"7=C @;" +=@@=* >7<@". ?=6 *<? ;<#"...
- Page 16 Step 14A Assemble Gable Frame 1A H6@'<'1-3'7=89'/42'@='<'7"89@;'=D'123[/\A /A S<@;",'K/L'-/[1gT\'7=89'<8&'K/L'^0[]gT\'7=89'/42%A'P7<)"'+76"'*<,M"&'"8&%'=D'^0[]gT\'/42% @=9"@;", <@ @;" ,$&9"A P=%$@$=8 -T[1gT\ +=<,&% <% %;=C8 +"7=CA E"@ @;" 123[/\ 7=89 /42 =8 "&9" <8&'8"<,"%@'@='123'"8&'C<77A':;"'9<+7"'D,<*"'C;"8')=*>7"@"'C$77'+"'/\'C$&",'@;<8'7=D@'D7==,A ]A H;")M'@;"'D,<*"'D=,'%N6<,"8"%%A'Q"<%6,"'D,=*'@;"'M8""'@='@;"')=,8",'=D'@;"'123[/\'7=89'/42A Q"<%6,"'<9<$8'D,=*'=>>=%$@"'M8""A':;"'*"<%6,"*"8@%'%;=67&'+"'@;"'%<*".'%""'("@<$7'3H3A 1x4 Block Blue Ends Together 70-3/8" Long 2x4 62-1/8" Long 2x4 62-1/8"...
- Page 17 Step 14B Assemble Gable Frame continued -A e8%@<77 >,"[)6@ 9<+7" %@6&% $8%$&" @;" 9<+7" D,<*"A B%" < D,<*$89 %N6<," @= *<M" %6," @;" %@6&% <," >76*+ <8& D$@ @$9;@ @= @;" @=> /42 @=> D,<*" <8& +=@@=* >7<@"A B%" ][1g/\ 4 T\ YE5 96%%"@% @='@"*>=,<77?'%")6,"'@;"'@=>%'=D'@;"'9<+7"'%@6&%'68@$7'@;"'%$&$89'$%'<>>7$"&A'B%"'-&')=**=8 8<$7%A'E")6,"'@;"'%@6&'@='@;"'+=@@=*'/42'>7<@"'6%$89'K/L'@C='10&'%$8M",'8<$7%A'See Detail 'E'.
- Page 18 Step 15 Install Siding on Gable Frame 1A E"7")@ @;" D$,%@ 9<+7" D,<*" <%%"*+7"& <8& >=%$@$=8 @;"'9<+7"'D,<*"'%='@;"'C==&'96%%"@%'<,"'D<)$89 @=C<,&%'@;"'D7==,A /A :;" +=@@=* /42 >7<@" >,"#"8@% @;" 9<+7" D,=* 7<?$89 D7<@ =8 @;" D7==,A G=)<@" -3 7=89 /42% @;<@ ;<#" < 14] +=<,&...
- Page 19 Step 16 Install Gable 2x4-12' Vertical Boards 1A e8%@<77'K/L'@C='/42[1/3'+=<,&%'=8'@;"'"8&'C<77'@='>,"#"8@ @;" 9<+7" D,=* D<77$89 =DD &6,$89 $8%@<77<@$=8A e8%@<77 K/L @C= *=," /42[1/ +=<,&% @= +,<)" @;" #",@$)<7 /42 $8 >7<)"A 5"[ D=,"'$8%@<77$89'@;"'#",@$)<7'/42%'<@@<);'K/L'@C='/42'+7=)M% @='@;"'+<)M'=D'@;"'/42%A'E""'("@<$7'3R3A':;$%'C$77'),"<@"'@;" >,=>",'%><)$89'@='%"@'@;"'9<+7"'=#",'@;"'7=C",'C<77A DETAIL 'F' 2x4 Block 2x4-12' 2x4-Block 2x4-12' Brace 2x4 Stake 2x4-12' Brace /A `,")@'@;"'9<+7"'=8'@;"'"8&'C<77'C$@;'@;"'9<+7"'%$&$89'"4@"8&$89'=#",'@;"'@,$*'=8'@;"'"8&'C<77A...
- Page 20 Step 17 Assemble 2x6 Roof Trusses 1A G<?'@,6%%'><,@%'$8%$&"'@;"'142'+7=)M%'6%"&'<,=68&'9<+7"'D,<*"%A'Y8"'"8&'=D'@;"'^0[]gT\'7=89 /4- +=<,&% ;<#" < +76" *<,MA P7<)" @;"%" "8&% @=9"@;", <@ @;" ,$&9"A Q=#" K/L @C= 142 +7=)M% @='@;"'+=@@=*'=D'@;"'@,6%%'7"9%'@='M"">'@;"%"'D,=*'*=#$89A /A E")6,"'@;"'/4-'+=<,&%'@=9"@;",'6%$89'>,"[)6@'96%%"@%A'e8%@<77'@;"'7<,9",'96%%"@%'<@'@;"'M8""'=D @;"'@,6%%"%A'W>>7?'C==&'976"'C$@;'<'+,6%;'+"@C""8'@;"'96%%"@%'<8&'@;"'/4-'+=<,&%A'E")6," 96%%"@%'C$@;'K]L'@;,""',=C%'=D'-&')=**=8'8<$7%'%><)"&'-\'<><,@A Larger Gusset 1x4 Block 70-3/8" Long 2x6 62-1/8" Long 2x6 Move 1x4 Block ]A :6,8 @,6%% =#", <8&...
- Page 21 Step 19 Install Trusses 1A E@<,@$89 <@ @;" "8& C<77 C$@;=6@ @;" &==, =>"8$89 $8&$)<@" C$@; 3f3 *<,M% C;"," @;" @,6%%"% C$77 +"'7=)<@"&A':;"'7<%@'%><)"'C$77'+"'C$&",'@;<8'@;"'D$,%@'K/1[]gT\L'%><)"A Q<,M'/4-'P7<@"'=8'R,=8@'<8&'5<)M'a<77% 24" 24" 24" 24" 24" 21-3/8" /A e8%@<77 F1 @,6%% ;<89",% @= @;" /4- @,6%% >7<@"A P=%$@$=8 @;"...
- Page 22 Step 20 Install Side Wall Overhangs 1A G=)<@" K2L D=6, ^[1g2\ 7=89 142 @,$* +7=)M% ><)M"& $8 =6, M$@A e8%@<77 =8" =D @;" 142 @,$* +7=)M% <@'"<);')=,8",'=D'D,=8@'C<77A'e8%@<77'@;"'142'@,$*'+7=)M%'68&",'@;"'/42'9<+7"'>7<@".'D76%;'C$@; @;"'%$&$89'=8'@;"'gableA':;"'+7=)M'C$77'"4@"8&']gT\'><%@'@;"')=,8",'@,$*'=8'@;"'"8&'C<77A'B%" -&'9<7#A'8<$7%A /A e8%@<77'<'23'7=89'>,"[+6$7@'%=DD$@'+=<,&'=8'@;"'D,=8@'C<77'68&",'@;"'142'@,$*'+7=)MA'B%"'=8" =D @;" ^[1g2\ 7=89 142 +7=)M <% < 9<69" @= $8%@<77 @;" %=DD$@ +=<,& 7"#"7 <),=%% @;" D,=8@ C<77A e8%@<77'@;"'%=DD$@'+=<,&'@='@;"'C<77'%@6&%'6%$89'/[1g/\'&")M'%),"C%A'(,$77';=7"%'$8'@;"'14]'@= >,"#"8@'@;"'14]'D,=*'%>7$@@$89A 2x4 Gable Plate...
- Page 23 Step 21 Install Roof Sheathing H6@ K_L D$#" %;""@% =D ^g1-\ YE5 $8@= @;" N6<8@$@? <8& %$Z"% %;=C8 +"7=CA Cut (1) one 4x8 Sheet Cut (4) Four 4x8 Sheets 20-3/4" x 96" 48" x 48" 48" x 48" 27" x 96" /A G=)<@"'K/L'@C='2T\4T2\'YE5'%;""@%'<8&')6@'@='<'7"89@;'=D'^_\A ]A Q<M"...
- Page 24 Step 22 Install Gable Trim 1A e8%@<77 ^0[1g2\ 7=89 14- @,$* +=<,&% <@ @;" @=> =D @;" 9<+7"A e8%@<77 @;" @,$* C$@; @;" #",@$)<7 )6@ 7=)<@"& <@ @;" >"<M =D @;" 9<+7"A e8%@<77 14- D76%; C$@; @;" @=> =D @;" ,==D %;"<@;$89A B%" -&'9<7#A'8<$7%'%><)"&'1/\'<><,@A Vertical Cut /A e8%@<77'^_[1g2\'7=89'14-'@,$*'+=<,&%'<@...
- Page 25 Step 23 Install Door Trim 1A e8%@<77 ][^gT\ 4 T2\ >,$*"& GP &==, O<*+ *<@",$<7 @= @;" %$&"% =D @;" &==, =>"8$89A e8%@<77 &==, O<*+'D76%;'C$@;'@;"'%$&$89A'B%"'-&'9<7#A'8<$7%A /A e8%@<77'K/L'@C='2T[]g2\'7=89'142'@,$*'+=<,&%'<8&'<'14-'M"?%@=8"'<),=%%'@;"'@=>'=D'@;"'&==, =>"8$89A'e8%@<77'@;"'@,$*'+=<,&%')"8@","&'<),=%%'@;"'=>"8$89'<8&']g2\'<+=#"'@;"'%$&$89A':;" "4>=%"&'%$&$89'C$77'%",#"'<%'<'&==,'%@=>'C;"8'@;"'&==,%'<,"')7=%"&A'B%"'-&'9<7#A'8<$7%'%><)"& 1/\'<><,@A 1x6 Keystone 48-1/2" Door Trim e8%@<77 K/L @C= 142[T2[]g2\ 7=89 @,$* +=<,&% D76%;...
-
Page 26: Install Doors
Step 24 Install Doors If your door opening is out of square, the space around the doors will not be even. You can remove and re-position the side trim to make allowances for this. The side trim does not have to be flush with the frame of the door opening. You can move the trim in or out to make the door spacing equal. - Page 27 Step 25 Install Windows 1A W>>7?')<67M$89'<,=68&'@;"'C$8&=C'=>"8$89'+"D=,"'$8%@<77$89'@;"'C$8&=C%A /A F=7& @;" C$8&=C $8 @;" =>"8$89 6%$89 < D"C 8<$7% C$@; < D7<@ ;"<& %= @;" @,$* )<8 +" $8%",@"&'$8'@;"'%7=@A'c<$7%'6%"&'@='$8%@<77'%;$897"%'C=,M'C"77A ]A e8%",@ ]T[1g/\ 7=89 14] @,$* +=<,&% <7=89 "<); %$&" =D @;" C$8&=C. D76%; C$@; @;" @=> D,<*"A Note;...
- Page 28 Step 29 Install Roofing — Not Supplied in Kit 1A e8%@<77'*"@<7',==D'3&,$>3'"&9$89'<7=89'@;" Optional Roof Covering >",$*"@",'=D'@;"',==DA +&7A !==D'E;$897"% /A e8%@<77'D"7@'><>",'<8&'%;$897"%'<))=,&$89'@= >)%A !==D'3&,$>3'`&9"[103 @;"'$8%@,6)@$=8%'=8'@;"'C,<>>", _00 %NA'D@A R"7@'P<>", k@?A Material Shipped in 48" Door Ctn. Qty. Material Shipped by Local Supplier "<A 2T\'4'T2\ P,"[+6$7@'(==,% P,"[)6@'a<77'E@6&% "<A...
- Page 29 Qty. Material Shipped on Pallet Qty. Hardware Breakdown :,6%%'[':=>'H=,&% 4 ^0[]gT\ 7+%A 1-& S<7#<8$Z"&'E>$,<7'c<$7% :,6%%'G"9% 4 -/[1gT\ 7+%A 10& H=<@"&'E$8M",% P,"[+6$7@'(==,'F"<&", 4 ]^[1g/\ 7+%A -& S<7#<8$Z"&'c<$7% P,"[+6$7@'E=DD$@'Y#",;<89% 7+%A T& S<7#<8$Z"&'E>$,<7'c<$7% S<+7"':=>'a<77'P7<@"% 4 ^0[]gT\ 7+%A -& H=**=8'c<$7% S<+7"'E$&"'a<77'P7<@"% 4 -/[1gT\ 7+%A ^&...
Need help?
Do you have a question about the the Pinewood and is the answer not in the manual?
Questions and answers