Table of Contents
Advertisement
Quick Links
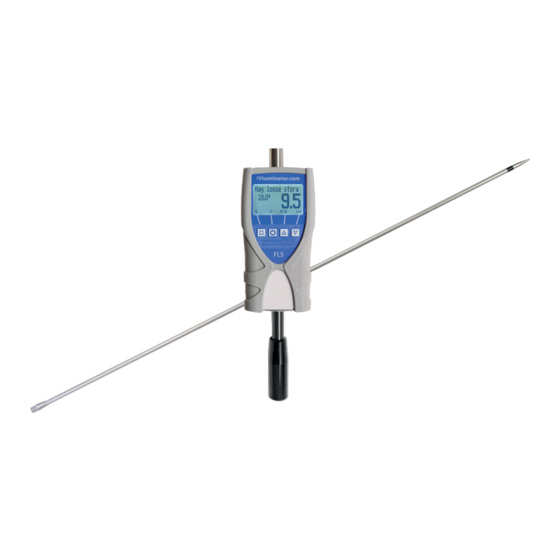
Moisture meter
Operating Manual
humimeter FLS
Moisture meter with insertion probe
for measuring the moisture content of hay
78,0 °F | 6,16 % | 456 kg/m
| -27,3 td | 0,64 aw | 51,9 %r.H. | 14,8 % abs | 100,4 g/m
| 09 m/s | 4,90 Ugl | 1
3
2
Always read this operating manual before using the humimeter FLS
Version 1.2
Advertisement
Table of Contents

Related Manuals for Schaller humimeter FLS


Summary of Contents for Schaller humimeter FLS
- Page 1 78,0 °F | 6,16 % | 456 kg/m | -27,3 td | 0,64 aw | 51,9 %r.H. | 14,8 % abs | 100,4 g/m | 09 m/s | 4,90 Ugl | 1 Always read this operating manual before using the humimeter FLS Version 1.2...
-
Page 2: Your Humimeter Fls At A Glance
FLS Operating Manual Your humimeter FLS at a glance The main unit Name Measuring head Insertion probe Insertion probe Electronics in plastic housing Page 2... -
Page 3: The Main Unit In Detail
The main unit in detail Name USB port (optional) Display Keypad Rubber protection cover Rear of the main unit Name Battery compartment Handle bar Page 3... -
Page 4: The Display
FLS Operating Manual The display Name Product type Moisture content % ("6.1 How moisture is defined") Display symbols Temperature display The display symbols Symbol Name Symbol Name Enter Change input level Down Back Change menu Enter numbers Enter data... -
Page 5: The Menus
The menus The device has four different menus: Data Log, product selection, additional function and main menu: Data Log menu Name Change menu Display illumination / device on/off Save measured value Show the last recorded values Product selection menu Name Change menu Display illumination / device on/off For changing the product type... - Page 6 FLS Operating Manual Additional function menu Name Change menu Display illumination / device on/off Mirror display Main menu The main menu comprises the following menu items: • Edit Logs: Manual Logs, Clear Logs • Print Logs: Last Log, All Logs, Clear Logs •...
-
Page 7: Table Of Contents
Table of contents Your humimeter FLS at a glance �������������������������������������������������� 2 The main unit ......................2 The main unit in detail ..................... 3 Rear of the main unit ....................3 The display ....................... 4 The display symbols ....................4 The menus ....................... 5 1�... - Page 8 FLS Operating Manual Taking a measurement ................17 Mirroring the display ................17 Switching the device off ................ 17 5� The measuring process ������������������������������������������������� 18 Preparing a measurement ..............18 Taking a measurement ................18 Hold function - Freezing the displayed values ........20 5.3.1...
- Page 9 Selecting a language ................33 Activating options ................. 33 Deactivating options ................34 Selecting °C/°F ..................34 Reducing the device's power consumption ..........35 9.7.1 Configuring the display illumination time ..........35 9.7.2 Configuring automatic switch-off ............35 Configuring the material calibration function ........35 Changing the password ................
-
Page 10: Introduction
Introduction Information about this operating manual This operating manual is designed to enable you to use the humimeter FLS safely and effectively. It is part of the device, has to be stored nearby and must be easily accessi- ble to users at all times. -
Page 11: Symbols Used In This Manual
For technical advice, please contact our customer service department at: Schaller GmbH Max-Schaller-Straße 99 A - 8181 St.Ruprecht an der Raab Telefon: +43 (0)3178 28899 Fax: +43 (0)3178 28899 - 901 E-Mail: info@humimeter.com Internet: www.humimeter.com © Schaller Messtechnik GmbH 2022 Page 11... -
Page 12: For Your Safety
FLS Operating Manual For your safety The device complies with the following European directives: • Restriction of Hazardous Substances in Electrical and Electronic Equipment (RoHS) • Electromagnetic compatibility (EMC) The device corresponds to state-of-the-art technology. However, it is still associated with a number of residual hazards. -
Page 13: Warranty
• In case of damages or loose parts on the device, remove the batteries and con- tact Schaller GmbH or your dealer. All of the device’s technical features have been inspected and tested before delivery. Every device has a serial number. Do not remove the tag with the serial number. -
Page 14: On Receipt Of Your Device
FLS Operating Manual On receipt of your device Taking the device out of its packaging • Take the device out of its packaging. • Next, make sure that it is not damaged and that no parts are missing. Making sure that all of the components have been included... -
Page 15: Assembling The Insertion Probe
Assembling the insertion probe Put the device and the second part of the insertion probe on a flat surface (e.g. on a table). » The two ends with cables must be adjacent to each other (figure 1). Connect the plug-in connector (figure 2). »... -
Page 16: Using The Device - Basics
FLS Operating Manual Insert the batteries with negative and positive terminals matching those indicated on the battery compartment. Press down the batteries so that they lay flat on the bottom of the housing (figure 10). » As soon as all batteries have been inserted, the device switches on automatically. -
Page 17: Taking A Measurement
Confirm your selection by pressing » The product type you selected will now be shown at the top of the display. Taking a measurement • For information on how to take a measurement, see section "5. The measuring process". Mirroring the display To do so: The device has to be in the additional function menu (figure 15). -
Page 18: The Measuring Process
FLS Operating Manual The measuring process Preparing a measurement To do so: The device has to have nearly the same tempe- rature than the product to measure. It is recommended to let your humimeter device adjust to the surrounding temperature before the measurement. - Page 19 CAUTION Risk of injury Risk of injury due to the measuring head ► Keep the measuring head away from your body throughout all activities. ► Keep the measuring head away from other people throughout all activities. ► Keep the measuring head away from current lines. ►...
-
Page 20: Hold Function - Freezing The Displayed Values
FLS Operating Manual Hold function - Freezing the displayed values The device can be configured in such a way that the information being shown on the display will freeze at the touch of a button until a new button is pressed. This function can be very useful when e.g. -
Page 21: Saving Individual Readings
Saving individual readings The device can be configured in such a way that the device will save a reading every time a button is pressed. This option (manual saving function) is the device’s default setting. 5.4.1 Activating the manual saving function in the options menu To do so: The device has to be switched on and be in the product selection menu. -
Page 22: Saving Several Readings (A Measurement Series) At The Same Time
FLS Operating Manual Inputting letters: Press and hold to quickly scroll to the required letter and either press it for 3 seconds or press to confirm the selected letter (figure 29). Inputting numbers: Press and hold to quickly scroll to the... - Page 23 Inputting letters: Press and hold to quickly scroll to the required letter and either press it for 3 seconds or press to confirm the selected letter (figure 32). Inputting numbers: Press and hold to quickly scroll to the required number and either press it for 3 seconds or press to confirm the selected number.
-
Page 24: Viewing Individual Readings
FLS Operating Manual Viewing individual readings To do so: You must have saved a reading (e.g. 1 Log). The display will now appear as shown in figure 33. Press Select the required reading. To do so, press » The display will now appear as shown in figure 34. -
Page 25: Deleting All Measured Values (Data Log)
Deleting all measured values (data log) To do so: You must have taken and saved one or several readings. Press three times or hold for 2 seconds. Select Edit Logs (figure 39). To do so, press and confirm by pressing Select Clear Logs (figure 40). -
Page 26: Deleting Single Values From A Series Of Measurements
FLS Operating Manual » The display will then show the message clear? (figure 45). Confirm by pressing » The value has been deleted. 5.10 Deleting single values from a series of measurements To do so: You must have saved a series of measurements comprising of at least 2 logs. -
Page 27: Product Types
Product types Product type Product type Measuring range Hay loose storage loose hay 8 % - 30 % Empty 1 free curve for special products Empty 2 free curve for special products Reference ! Only for testing the moisture meter ! How moisture is defined The device measures and shows the material moisture content. -
Page 28: Using The Logmemorizer Program
Exporting measured values to a computer To do so: The LogMemorizer program is installed. You must have taken and saved one or several moisture readings. Options: You can export moisture readings from the humimeter FLS or initiate the export at your computer. Page 28... - Page 29 All measuring values saved on the humimeter FLS will now be sent to your computer. Initiating the data export at your computer Connect the humimeter FLS to your computer using the supplied USB cable: Insert the USB Mini B connector into the humi meter FLS (figure 57).
- Page 30 Import most recent manual log (for importing the most recent manually saved logs). Name Import all manual logs Import most recent manual » The measuring values saved on the humimeter FLS will now be sent to your computer. Page 30...
-
Page 31: Checking On The Device's Status
Checking on the device's status Press three times or hold for 2 seconds. Select Status. To do so, press and confirm by pressing » The display will then show the status indicator humimeter. » The display will show the following information: Name Serial number Software version... -
Page 32: Configuring The Device
FLS Operating Manual Configuring the device Turning on Bluetooth The information on Bluetooth is provided in a separate operating manual. Adjust the date/time Press three times or hold for two seconds. Select Options. To do so, press and confirm by pressing Select Date/Time. -
Page 33: Selecting A Language
Selecting a language Press three times or hold for two seconds. Select Options. To do so, press and confirm by pressing Select Date/Time. To do so, press and confirm by pressing Navigate to the required language. To do so, press and confirm by pressing »... -
Page 34: Deactivating Options
FLS Operating Manual » The settings have been saved. » The °C/°F, BL On Time, Auto Off Time, Materialcalib., Password, Reset options are now activated. Press to leave the Options menu. Press to leave the main menu. Deactivating options Once the device has been restarted, the °C/°F, BL On Time, Auto Off Time, Materialcalib.,... -
Page 35: Reducing The Device's Power Consumption
Reducing the device's power consumption 9.7.1 Configuring the display illumination time To do so: All of the options must be activated (see "9.4 Activating options"). Press three times or hold for two seconds. Select Options. To do so, press and confirm by pressing Select BL On Time. -
Page 36: Changing The Password
FLS Operating Manual Changing the password To do so: All of the options must be activated (see "9.4 Activating options"). Press three times or hold for two seconds. Select Options. To do so, press and confirm by pressing Select Password. To do so, press and confirm by pressing »... -
Page 37: Resetting The Device To Its Factory Settings
9.10 Resetting the device to its factory settings To do so: All of the options must be activated (see "9.4 Activating options"). Press three times or hold for two seconds. Select Options. To do so, press and confirm by pressing Select Reset. -
Page 38: Care Instructions
FLS Operating Manual 10.2 Care instructions • Do not leave the device out in the rain. The device is not waterproof. • Do not expose the device to extreme temperatures. • Protect the device from strong mechanical shocks and loads. -
Page 39: Faults
11. Faults If the measures listed below fail to remedy any faults or if the device has faults not listed here, please contact Schaller GmbH. Fault Cause Remedy Measuring error The temperature of the mate- The temperature of the rial being measured is too low... -
Page 40: Storage And Disposal
FLS Operating Manual 12. Storage and disposal 12.1 Storing the device The device must be stored as follows: • Do not store outdoors. • Store in a dry and dust-free place. • Protect the device from sunlight. • Avoid mechanical shocks/loads. -
Page 41: Device Information
13. Device information 13.1 CE declaration of conformity _______________ KONFORMITÄTSERKLÄRUNG DECLARATION OF CONFORMITY Schaller Messtechnik GmbH Name/ Adresse des Herstellers: Max-Schaller-Straße 99 Name/ address of manufacturer: A – 8181 St. Ruprecht Produktbezeichnung: humimeter Product designation: Typenbezeichnung: BL2 ; BLL ; BLH ; BLW ; FL1 ; FL2 ; FLH ; FLM ; FLS ; RM1;... - Page 42 FLS Operating Manual Für das angeführte Produkt ist eine vollständige Dokumentation mit Betriebsanleitung in Originalfassung vorhanden. For the mentioned product a complete documentation with manual of instruction in original version is available. Bei Änderungen, die nicht vom Hersteller spezifiziert sind, verliert diese Konformitätserklärung die Gültigkeit.
- Page 43 _______________ DECLARATION OF CONFORMITY Schaller Messtechnik GmbH Name/ address of manufacturer: Max-Schaller-Straße 99 A – 8181 St. Ruprecht Product designation: humimeter BL2 ; BLL ; BLH ; BLW ; FL1 ; FL2 ; FLH ; FLM ; FLS ; RM1;...
- Page 44 FLS Operating Manual For the mentioned product, a complete documentation with manual of instruction in original version is available. In case of any changes not agreed upon with the manufacturer, this declaration of conformity loses its validity. St. Ruprecht a.d. Raab, 31.07.2022 …............
-
Page 45: Technical Data
13.2 Technical data Display resolution 0.1 % moisture content, 0.5 °C/°F temperature Measuring range 8 % to 30 % water content Operating temperature 0 °C to +40 °C Temperature measuring -20 °C to +120 °C (only measuring head) range Storage temperature -20 °C to +60 °C Temperature compensation Automatic... -
Page 46: Notes
FLS Operating Manual 14. Notes Page 46... - Page 47 Page 47...
- Page 48 Schaller Messtechnik develops, produces and sells professional moisture meters and turnkey solutions. Schaller Messtechnik GmbH Max-Schaller-Straße 99, A - 8181 St. Ruprecht an der Raab Tel +43 (0)3178 - 28899 , Fax +43 (0)3178 - 28899 - 901 info@humimeter.com, www.humimeter.com...
Need help?
Do you have a question about the humimeter FLS and is the answer not in the manual?
Questions and answers