Table of Contents
Advertisement
Quick Links
Moisture meter
Operating Manual
humimeter BMA-2
Moisture meter for measuring the moisture content of
biomass
78,0 °F | 6,16 % | 456 kg/m
| -27,3 td | 0,64 aw | 51,9 %r.H. | 14,8 % abs | 100,4 g/m
| 09 m/s | 4,90 Ugl | 1
3
2
Always read this operating manual before using the humimeter BMA-2!
Version 3.8
Advertisement
Table of Contents

Subscribe to Our Youtube Channel
Related Manuals for Schaller humimeter BMA-2


Summary of Contents for Schaller humimeter BMA-2
- Page 1 78,0 °F | 6,16 % | 456 kg/m | -27,3 td | 0,64 aw | 51,9 %r.H. | 14,8 % abs | 100,4 g/m | 09 m/s | 4,90 Ugl | 1 Always read this operating manual before using the humimeter BMA-2! Version 3.8...
-
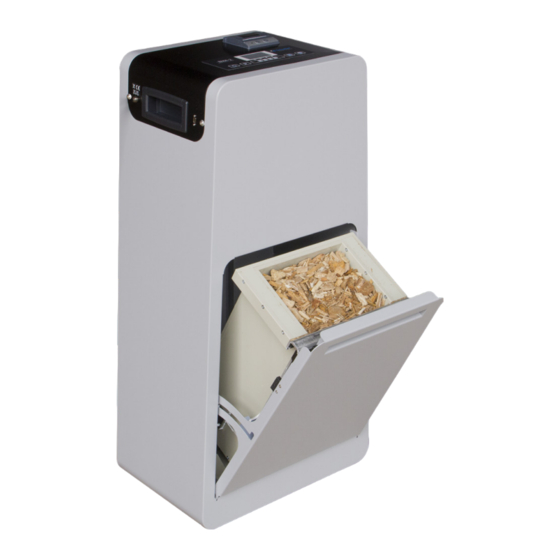
Page 2: Your Humimeter Bma-2 At A Glance
BMA-2 Operating Manual Your humimeter BMA-2 at a glance The main unit Name Control panel and display Measuring chamber Drawer USB port Power supply Page 2... -
Page 3: The Control Panel
The control panel Name Print button Save button Control buttons for display Start button On/off button Display LED light solid blue: ready for use flashing blue: measurement in progress flashing red: fault (see"11. Faults") Page 3... -
Page 4: The Display
BMA-2 Operating Manual The display Name Temperature Moisture content in % (see "6.1 How moisture defined") Display symbols Atro weight/m³ (optional) Bulk density (optional) Product type Overview display with calorific value display Bezeichnung Temperature Water content in % (see "6.1 How moisture is... -
Page 5: The Display Symbols
The display symbols Symbol Name Symbol Name Enter Change input level Down Back Change menu Enter numbers Enter data Enter letters View measurements Continue / go right Delete measurements Left Page 5... -
Page 6: The Menus
BMA-2 Operating Manual The menus The device has two different menus: product selection menu and main menu: Product selection menu Name Open main menu Show the last recorded values For changing the product type Main menu The main menu comprises the following menu items: •... -
Page 7: Table Of Contents
Table of contents Your humimeter BMA-2 at a glance �������������������������������������������� 2 The main unit ....................2 The control panel ....................3 The display ......................4 Overview display with calorific value display ............. 4 The display symbols ..................5 The menus ......................6 1�... - Page 8 BMA-2 Operating Manual Automatic adjustment ..............17 Taking a measurement ..............17 Switching the device off ..............17 5� The measuring process ������������������������������������������������� 18 Preparing a measurement ............... 18 Taking a measurement ..............18 Saving individual readings ............... 20 Saving several readings (a measurement series) at the same time ..
- Page 9 Adjust the date/time ..............44 Selecting a language ............... 45 Activating options ................45 Deactivating options ............... 46 Selecting °C/°F ................46 Reducing the device's power consumption ........47 Configuring the material calibration function ........48 Changing the password ..............48 9.10 Resetting the device to its factory settings ........
-
Page 10: Introduction
Introduction Information about this operating manual This operating manual is designed to enable you to use the humimeter BMA-2 safely and effectively. It is part of the device, has to be stored nearby and must be easily ac- cessible to users at all times. -
Page 11: Symbols Used In This Manual
For technical advice, please contact our customer service department at: Schaller Messtechnik GmbH Max-Schaller-Straße 99 A - 8181 St.Ruprecht an der Raab Telephone: +43 (0)3178 28899 Fax: +43 (0)3178 28899 - 901 E-mail: info@humimeter.com Internet: www.humimeter.com © Schaller Messtechnik GmbH 2024 Page 11... -
Page 12: For Your Safety
BMA-2 Operating Manual For your safety The device complies with the following European directives: • Restriction of Hazardous Substances in Electrical and Electronic Equipment (RoHS) • Electrical equipment (Low Voltage Directive, LVD) • Electromagnetic Compatibility Directive (EMC) • Machinery The device corresponds to state-of-the-art technology. -
Page 13: Danger From Electric Current
Danger from electric current WARNING Electric shock Danger to life due to electric shock when operating with a defective mains cable or defective device. ► Disconnect the device from the power supply and secure it against being switched on again. Observe the following safety instructions to avoid hazards from electric current: •... -
Page 14: On Receipt Of Your Device
BMA-2 Operating Manual On receipt of your device Taking the device out of its packaging • Take the device out of its packaging. • Next, make sure that it is not damaged and that no parts are missing. • Do not discard the packaging! In case of shipping the device, the original packaging must be used. -
Page 15: Setting Up The Device
• External battery - Is described in a separate operating manual. • Bluetooth module - Described in a separate operating manual. • Test equipment - Described in a separate operating manual. • Transport wheels Setting up the device Note the following: •... -
Page 16: Using The Device - Basics
BMA-2 Operating Manual Using the device - Basics Inserting the measuring chamber Open the drawer of the device by lift- ing and pulling the handle towards you (figure 1). Hang the empty measuring chamber in the drawer. » The handle and the suspension of the measuring chamber must hang in the plastic brackets of the drawer (figure 2). -
Page 17: Automatic Drawer Check
Automatic drawer check » After switching on, the device goes through a sen- sor check of the drawer. The display will show the message Check Door. » The display shows Open Door (figure 5). • Now the drawer has to be lifted first and then opened. -
Page 18: The Measuring Process
BMA-2 Operating Manual The measuring process Preparing a measurement To do so: The display has to show the measuring window (figure 10). Open the drawer of the device by lifting and pulling the handle towards you (figure 11). Take out the measuring chamber. - Page 19 Keep pressed to scroll through the types and confirm by pressing Press to start the measurement. » The LED is blinking in blue during the entire mea- surement. » The display shows the active measurement process (figure 15). » After completion of the measurement, the LED is shining in blue.
-
Page 20: Saving Individual Readings
BMA-2 Operating Manual Saving individual readings To do so: A measurement has been taken. The display will now appear as shown in figure 17. Press » The display will now appear as shown in figure 18. Press to enter a name for the saved reading and to finish the measuring process. -
Page 21: Saving Several Readings (A Measurement Series) At The Same Time
Saving several readings (a measurement series) at the same time Take several readings of the same material (see "5. The measuring process"). Press after each measurement. » The display will now appear as shown in figure 21. The marked number shows the number of readings that have already been saved. -
Page 22: Printing Measured Values
BMA-2 Operating Manual » The display will show the following information: Name Name of the measurement series (editable) Bulk density [kg/m³] (average) (optional) Dry weight (atro)/m³ [kg/m³] (average) (optional) Temperature (average) Moisture content (average) Printing measured values To do so: The integrated printer and a paper roll is required (figure 24). - Page 23 5.5.2 Printing already saved readings To do so: You must have taken and saved one or several readings. Press Select Print Logs (figure 28). To do so, press and confirm by pressing Select Last Log (figure 29) to print the last recorded measurement series.
-
Page 24: Calculation Of Calorific Value
BMA-2 Operating Manual Calculation of calorific value To do so: To carry out a calorific value calculation using the humimeter BMA-2, the “Standard calorific value” parameter must be set in accordance with these instructions. After measuring the material, the calculated calorific value in MJ/m³ appears instead of the Atro/m³... -
Page 25: Viewing Individual Readings
• To return to the Atro/m³ value, the calorific value must be changed back to 0.00 kWh/kg (figure 38). • The device then automatically switches back to the atroweight display (figure 32). Viewing individual readings To do so: You must have saved a reading (e.g. 1 log). The display will now show Press Select the required reading. -
Page 26: Deleting All Measured Values (Data Log)
BMA-2 Operating Manual Deleting all measured values (data log) To do so: You must have taken and saved one or several readings. Press Select Edit Logs (figure 43). To do so, press and confirm by pressing Select Clear Logs (figure 44). To do so, press and confirm by pressing »... -
Page 27: Product Types
Product types Measuring Product name Product type range Woodchips "6.4.1 Wood chips" 5 % - 70 % Coarse chips "6.4.2 Coarse wood chips" 5 % - 70 % Softwood chips "6.4.3 Softwood chips" 5 % - 70 % Softwood coarse chips "6.4.4 Softwood coarse chips"... -
Page 28: Definition Of Calorific Value
BMA-2 Operating Manual Definition of calorific value The calorific value, or heating value, is a physical quantity that indicates how much heat is released when a particular fuel is burned. They are usually measured in units such as kilojoules per kilogram (kJ/kg) or megajoules per cubic meter (MJ/m³). - Page 29 The humimeter BMA-2 determines the water content in the material and corrects the calorific value from the literature by the water content contained. This means that the humimeter BMA-2 calculates the corrected calorific value on the basis of the water content and the determined bulk density and outputs this calorific value in the unit MJ/ m³.
- Page 30 10.8% » and a bulk density of 245kg/m³. From this, your humimeter BMA-2 calculates an adequate estimate of the calorific value of 4161MJ/m³. Conversion to MJ/kg: 4161 MJ/m³ divided by 245kg/m³ (Schüttdichte) Conversion to kWh/m³:...
-
Page 31: Definition Of Wood Chips Types (Norm En Iso 17225-1)
(according to EN ISO 18134-2). Schaller GmbH will be happy to advise you on the selection of the right calibration curve. Please send a picture of your wood chips, placing a measuring tape to the material, to support@schaller-gmbh.at. - Page 32 BMA-2 Operating Manual 6.4.3 Softwood chips For wood chips with fine fraction, mainly (more than two thirds) consisting of soft- wood (spruce, fir, pine, larch). The fine fraction mainly derives from barks, small branches and bushes. For softwood chips sizes from P16 to P45. See example pictures and 53.
- Page 33 Example pictures wood chips Page 33...
- Page 34 BMA-2 Operating Manual Example pictures coarse wood chips Page 34...
- Page 35 Example pictures softwood chips Page 35...
- Page 36 BMA-2 Operating Manual Example pictures softwood coarse chips Page 36...
- Page 37 Example pictures fine wood chips Page 37...
-
Page 38: Notes For The Measurement Of Wood Shavings
For determining the bulk density according to norm EN 14961 a round bucket is used. As the humimeter BMA-2 device uses a rectangular measuring chamber, a compensa- tion factor is stored in the device. This compensation factor has been optimised for wood chips and therefore can differ when measuring other material types. -
Page 39: Using The Logmemorizer Program
Using the LogMemorizer program To do so: The device is provided with USB interface, and the USB stick with LogMemo- rizer software and USB cable are available. Otherwise, you can also install the software at humimeter.com/software or by scanning the QR code. Installing/Opening the program Insert the USB stick with the LogMemorizer program into the USB port on your computer or... - Page 40 • Before using the LogMemorizer program, the USB COM port must be configured as follows under the menu item Settings (figure 60). » Device: Select the COM port to which you have connected the humimeter BMA-2 with the USB cable (in this example COM7) »...
-
Page 41: Exporting Measuring Values To A Computer
LogMemorizer must be installed. And you must have taken and saved one or several moisture readings. Options: You can export moisture readings from the humimeter BMA-2 and initiate the export at your computer. Exporting moisture readings from the humimeter BMA-2 Connect the humimeter BMA-2 to your computer using the supplied USB cable. - Page 42 Import most recent manual log (for importing the most recent manually saved logs). Name Import all manual logs Import most recent manual » The measuring values saved on the humimeter BMA-2 will now be sent to your computer. Page 42...
-
Page 43: Checking The Device's Status
Checking the device's status Press Select Status. To do so, press and confirm by pressing » The display will then show the status indicator humimeter. » The display will show the following information: Name Serial number Software version Battery status Memory status Confirm by presssing Press... -
Page 44: Configuring The Device
BMA-2 Operating Manual Configuring the device Turning on Bluetooth The information on Bluetooth is provided in a separate operating manual. Adjust the date/time Press Select Options. To do so, press and confirm by pressing Select Date/Time. To do so, press and confirm by pressing »... -
Page 45: Selecting A Language
Selecting a language Press Select Options. To do so, press and confirm by pressing Select Language. To do so, press and confirm by pressing Navigate to the required language. To do so, press and confirm by pressing » The settings have been saved. Press to leave the Options menu. -
Page 46: Deactivating Options
BMA-2 Operating Manual » The settings have been saved. » The °C/°F, BL On Time, Auto Off Time, Materialcalib., Password, Reset options are now activated. Press to leave the Options menu. Press to leave the main menu. Deactivating options Once the device has been switched restarted, the °C/°F, BL On Time, Auto Off Time,... -
Page 47: Reducing The Device's Power Consumption
Reducing the device's power consumption 9.7.1 Configuring the display illumination time To do so: All of the options must be activated (see "9.4 Activating options"). Press Select Options. To do so, press and confirm by pressing Select BL On Time. To do so, press and confirm by pressing Select the required display illumination period (30 seconds/2 minutes/5 minu- tes/10 minutes). -
Page 48: Configuring The Material Calibration Function
BMA-2 Operating Manual Configuring the material calibration function The type calibration function is described in a separate operating manual. Changing the password To do so: All of the options must be activated (see "9.4 Activating options"). Press Select Options. To do so, press and confirm by pressing Select Password. -
Page 49: Resetting The Device To Its Factory Settings
9.10 Resetting the device to its factory settings To do so: All of the options must be activated (see "9.4 Activating options"). Press Select Options. To do so, press and confirm by pressing Select Reset. To do so, press and confirm by pressing »... -
Page 50: Cleaning The Device
BMA-2 Operating Manual 10.2 Cleaning the device ATTENTION Do not clean with fluids Water or cleaning fluid getting inside the device can destroy the device. ► Only clean with dry materials. ATTENTION Damage due to improper cleaning Damage to the golden contacts on the weighing plate (figure 74) can destroy the device. -
Page 51: Replacing The Printer Paper Roll
10.3 Replacing the printer paper roll To do so: The integrated printer and a paper roll is required. Both are included in the equipment pack- ages: Data package or ATRO package. Lift the tab of the printer all the way up (figure 76). -
Page 52: Faults
BMA-2 Operating Manual 11. Faults If the measures listed below fail to remedy any faults or if the device has faults not listed here, please contact Schaller GmbH. Fault Cause Remedy Measuring error The temperature of the ma- The temperature of the... - Page 53 Fault Cause Remedy Measuring chamber is not Put the filled measuring in the device while taking a chamber into the device. Press to confirm the measurement error message. Measuring chamber empty Put the filled measuring while taking a measurement chamber into the device. Press to confirm the error message.
-
Page 54: Device Information
BMA-2 Operating Manual 14. Device information 14.1 EC declaration of conformity _______________ KONFORMITÄTSERKLÄRUNG DECLARATION OF CONFORMITY Name/ Adresse des Herstellers: Schaller Messtechnik GmbH Max-Schaller-Straße 99 Name/ address of manufacturer: A – 8181 St. Ruprecht Produktbezeichnung: humimeter Product designation: BMA ; BMA2... - Page 55 EN ISO 12100:2011 Allgemeine Gestaltungsleitsätze - Risikobeurteilung und EN ISO 12100:2013 Risikominderung Safety of machinery - General principles for design - Risk as- sessment and risk reduction EN ISO 13857:2020-04 Sicherheit von Maschinen - Sicherheitsabstände gegen das Erreichen von Gefahrstellen mit den oberen Gliedmaßen und unteren Gliedmaßen Safety of machinery - Safety distances to prevent hazard zones being reached by upper and lower limbs...
- Page 56 BMA-2 Operating Manual _______________ DECLARATION OF CONFORMITY Schaller Messtechnik GmbH Name/ address of manufacturer: Max-Schaller-Straße 99 A – 8181 St. Ruprecht Product designation: humimeter BMA ; BMA2 Type designation: Product description Measuring instrument for determining the water content in...
- Page 57 EN ISO 12100:2011 Safety of machinery - General principles for design - Risk EN ISO 12100:2013 asassessment and risk reduction EN ISO 13857:2020-04 Safety of machinery - Safety distances to prevent hazard zones being reached by upper and lower limbs DIN EN ISO 13854:2020-01 Safety of machinery - Minimum gaps to avoid crushing of parts replaced...
-
Page 58: Troubleshooting
BMA-2 Operating Manual 12. Troubleshooting 12.1 Cleaning the contacts of the measuring chamber To do so: The automatic calibration is not successful and the exclamation mark on the display does not go away. The contacts of the measuring chamber are polluted. -
Page 59: Transportation, Storage And Disposal
13. Transportation, storage and disposal 13.1 Transporting the device ATTENTION Damage due to improper transport The device can be damaged or ruined by a dispatch with various parcel services or by post. ► Only ship the device in its original packaging. ►... -
Page 60: Equipment Packages
BMA-2 Operating Manual 14.2 Equipment packages In addition to the standard version without any accessories, the device is available in three further, different equipment variants: Data package • LogMemorizer measuring data recording and analysing software and USB cable • Integrated printer ATRO package •... -
Page 61: Notes
15. Notes Page 61... - Page 62 BMA-2 Operating Manual Page 62...
- Page 63 Page 63...
- Page 64 Schaller Messtechnik develops, produces and sells professional moisture meters and turnkey solutions. Schaller Messtechnik GmbH Max-Schaller-Straße 99, A - 8181 St. Ruprecht an der Raab Tel +43 (0)3178 - 28899 , Fax +43 (0)3178 - 28899 - 901 info@humimeter.com, www.humimeter.com...
Need help?
Do you have a question about the humimeter BMA-2 and is the answer not in the manual?
Questions and answers