Advertisement
Heater
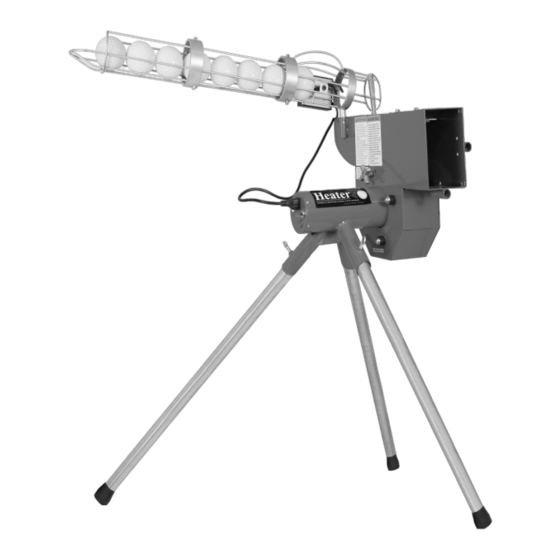
Heavy Duty 12" Softball Pitching Machine
®
Applicable for Machine Only (HTR6000SBNBF)
or Machine With Ball Feeder (HTR6000SB)
www.HeaterSports.com
Model No's.
HTR6000SBNBF or
HTR6000SB
Serial No.
Write the serial number in the
space above for reference.
ACTIVATE YOUR
WARRANTY
To register your product and
activate your warranty, call
1-800-492-9334
CUSTOMER CARE
For customer service inquiries,
please call our toll free line
at 1-800-492-9334.
CAUTION
Read all precautions and in-
structions in this manual be-
fore using this product. Keep
this manual for
future reference.
Instructions Date: 07/2022
Version: 00001
DO NOT RETURN TO STORE, CALL 1-800-492-9334
OWNER'S MANUAL
*Ball Feeder Shown For Model# HTR6000SB
1
Advertisement
Table of Contents

Related Manuals for Heater Sports HTR6000SBNBF


Summary of Contents for Heater Sports HTR6000SBNBF
- Page 1 OWNER'S MANUAL Heater Heavy Duty 12" Softball Pitching Machine ® Applicable for Machine Only (HTR6000SBNBF) or Machine With Ball Feeder (HTR6000SB) www.HeaterSports.com Model No’s. *Ball Feeder Shown For Model# HTR6000SB HTR6000SBNBF or HTR6000SB Serial No. Write the serial number in the space above for reference.
- Page 2 HOWEVER, THE ACCURACY OF THE MACHINE DEPENDS ON THE QUALITY, HARDNESS AND TYPE OF BALLS YOU USE IN THIS MACHINE! HEATER SPORTS RECOMMENDS USING HEATER PITCHING MACHINE BALLS IN THE MACHINE. THESE BALLS HAVE BEEN PRECISELY CRAFTED TO PROVIDE YOU WITH HOURS OF ACCURATE, TROUBLE FREE BATTING AND FIELDING PRACTICE.
- Page 3 PARTS *Replacement Parts Available by Calling Heater Sports Leg Assembly (9 Total) Housing (A) Bottom Leg (B): 3x Middle Leg (C): 3x Top Leg (D): 3x Ball feeder: Motor Section (E) Ball feeder: Middle Section (F) Ball feeder: End Section (G)
- Page 4 LEG ASSEMBLY STEP 1: Slide leg sections together (See illustration). Lock the sections together by making sure the push pins line-up with each adjoining hole and lock into place. Bottom Section B Top Section D Middle Section C Follow Step 1 to assemble all three legs for the pitching machine. After assembling Pivot Arm and Housing, slide the 3 leg sections into the Housing (A) and secure with the Thumbscrews (Part i).
- Page 5 PRE-OPERATION Ensure The Hub & Tire Black Lines Align & Check Air Pressure In Pitching Machine Tires. WARNING: MAKE SURE MACHINE IS UNPLUGGED AND THE TIRES ARE NOT SPINNING DURING THESE OPERATIONS! Pre-Operation #1 Locate Allen Wrench (provided in package) and unscrew (3) three wheel cover screws.
- Page 6 OPERATION CAUTION! USE HEATER PITCHING MACHINE BALLS FOR THE MOST ACCURATE PITCH POSSIBLE. PITCHING MACHINES THAT USE A WHEEL TO THROW BALLS WILL NOT THROW REAL BALLS AS ACCURATE BECAUSE OF THE SEAMS ON THE BALL. IMPORTANT: THIS PRODUCT IS TO BE USED BY ADULTS ONLY. MAKE SURE MACHINE IS TURNED OFF BEFORE ASSEMBLY! KEEP HANDS AND ALL BODY PARTS AWAY FROM BALL EXIT! SERIOUS HAND AND BODILY INJURY MAY RESULT IF USED INCORRECTLY!
- Page 7 Speeds At 40’ Thank you for purchasing the Heater Softball Pitching Machine. If you have any questions or comments on how Heater Sports can improve the Deuce Pitching Machine, please call our 24 hour customer service hot line at (800) 492-9334.
Need help?
Do you have a question about the HTR6000SBNBF and is the answer not in the manual?
Questions and answers