Advertisement
Quick Links
Perfect Pitch Mechanical Pitching Machines
Applicable for Perfect Pitch 45 MPH (HC129) & 50 MPH (PP149)
www.HeaterSports.com
Model No's. HC129 & PP149
Serial No.
Write the serial number in the
space above for reference.
ACTIVATE YOUR
WARRANTY
To register your product and
activate your warranty, call
1-800-492-9334
CUSTOMER CARE
For customer service inquiries,
please call our toll free line
at 1-800-492-9334.
CAUTION
Read all precautions and instruc-
tions in this manual before using
this product. Keep this manual for
future reference.
Instructions Date: 12/2018
Version: 00001
DO NOT RETURN TO STORE, CALL 1-800-492-9334
OWNER'S MANUAL
Advertisement

Related Manuals for Heater Sports HC129


Summary of Contents for Heater Sports HC129
- Page 1 OWNER'S MANUAL Perfect Pitch Mechanical Pitching Machines Applicable for Perfect Pitch 45 MPH (HC129) & 50 MPH (PP149) www.HeaterSports.com Model No’s. HC129 & PP149 Serial No. Write the serial number in the space above for reference. ACTIVATE YOUR WARRANTY To register your product and...
- Page 2 • TO AVOID INJURY, DISCONNECT SPRING WHEN NOT IN USE. To extend the life of your spring and to ensure no in- jury can occur when not in use, always disconnect the spring from the foot pedal. In addition, Heater Sports recommends replacing your spring every season to ensure you get the most accurate pitching and best performance.
-
Page 3: Assembly Parts
ASSEMBLY PARTS Part B: Part A: Bottom Frame Assembly Top Frame Assembly Part C: Part D: Front Leg Back Leg Part E: Part F: Ball Release Arm Foot Pedal Part H: Part G: Throwing Arm Assembly Ball Protector Part I: Part K: Part J: Spring Attachment Assembly... - Page 4 HARDWARE (Actual Sizes Shown) *Use This Page To Measure Hardware* Part L: (Longest): Throwing Arm Bolt 1x (M10 x 140, 1.50 Pitch) Part M: (Middle): Release Arm Bolt 1x (M10 x 120, 1.50 Pitch) Part AF: Front Base Bolt 1x Part N: (Shortest): Foot Pedal Bolt 1x (M8 x 45, 1.25 Pitch) (M10 x 110, 1.50 Pitch)
- Page 5 ASSEMBLY INSTRUCTIONS Spacers Front Part A Part K Long Tube Shorter Side Part B Part K Part K Longer Side Part D Part C Shorter Side Pole Pole Secure Hardware Very Tight! Slide Part A into Part B - making sure the shorter plastic spacer on A is in front and the small horizontal tube on B is also in front.
- Page 6 AB AB Part G Part H Part J Attach Part G Ball Protector to Release Handle by inserting Q Locate Part H Throwing Arm Assembly and assemble to frame by securing with Hardware shown in image. IMPORTANT: WHEN screws through the pole and the Protector. Secure with X washers and AB acorn nuts.
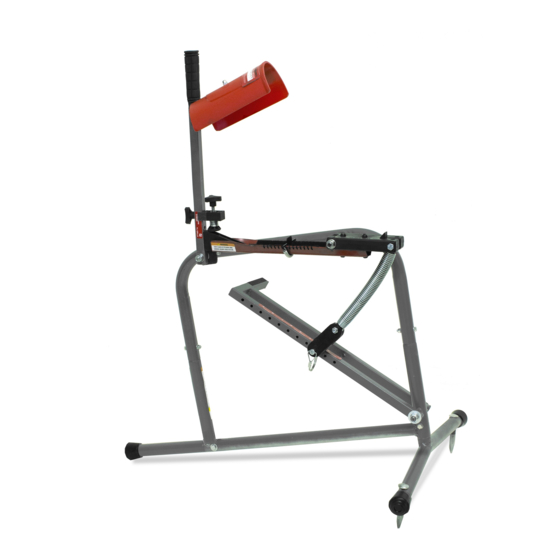
- Page 7 ASSEMBLED PRODUCT IMAGE Speed Chart Release Arm Plastic Ball Protector Handle Grip Throwing Arm Insert Release Arm Throwing Arm Pitch Height Adjustment Tab Strike Zone Adjustment Metal U-Frame Pitch Type Adjustment Holes Throwing Arm Release Arm Mounting Hardware Mounting Hardware Spring Throwing Arm Plastic Mounting...
- Page 8 OPERATIONS MANUAL Step 1: If using machine on grass, dirt, or soft ground, secure included Ground Stakes to front leg for added stability. If using indoors or on solid surface, remove ground stakes and if needed, use sandbags (sold separately) to add weight to the machine.
- Page 9 Place Ball On Top of Step 3: Set Throwing Arm & Load a Ball Pull Release Handle Back to Push Release Handle forward to allow Throwing Arm to be set in lock the Throwing Arm in place. position. Then, place a ball on Throwing Arm.
-
Page 10: Guarantee & Warranty
Guarantee & Warranty: Heater Sports is happy to extend to you a 30 Day Money-Back Guarantee + 1 Year Parts and Labor Warranty on your Perfect Pitch Mechanical Combo Pitching machine.
Need help?
Do you have a question about the HC129 and is the answer not in the manual?
Questions and answers