Table of Contents
Advertisement
Quick Links
Advertisement
Table of Contents

Subscribe to Our Youtube Channel
Related Manuals for Nidek Medical PM-700


Summary of Contents for Nidek Medical PM-700
- Page 1 PD METER PM-700 OPERATOR’S MANUAL...
- Page 2 Original instructions NIDEK CO., LTD. : 34-14 Maehama, Hiroishi-cho, Gamagori, Aichi 443-0038, JAPAN (Manufacturer) Telephone: +81-533-67-6611 URL: https://www.nidek.com/ NIDEK INC. : 2040 Corporate Court, San Jose, CA 95131, U.S.A. (United States Agent) Telephone: +1-800-223-9044 (USA Only) URL: https://usa.nidek.com/ NIDEK S.A. : Europarc, 13 rue Auguste Perret, 94042 Créteil, FRANCE (EU Authorized Representative) Telephone: +33 1 49 80 97 97...
- Page 3 Before Use This Operator's Manual contains information necessary for the operation of the NIDEK PD Meter PM-700. This manual includes operating procedures, safety precautions, specifications, and information about accessories and mainte- nance. This manual is necessary for proper use. Especially, the safety precautions and operating procedures must be thoroughly understood prior to the operation of the device.
-
Page 4: Table Of Contents
Table of Contents 1. SAFETY PRECAUTIONS ....... 1 1.1 For Safe Use - - - - - - - - - - - - - - - - - - - - - - - - - - - - - - - - - - - - - - - - - - - - - - - - - - -1 1.2 Safety Precautions - - - - - - - - - - - - - - - - - - - - - - - - - - - - - - - - - - - - - - - - - - - - - -1... - Page 5 5. SPECIFICATIONS AND TECHNICAL INFORMATION ..35 5.1 Specifications - - - - - - - - - - - - - - - - - - - - - - - - - - - - - - - - - - - - - - - - - - - - - - - - - 35 5.2 EMC (Electromagnetic Compatibility) - - - - - - - - - - - - - - - - - - - - - - - - - - - - - - - 37 6.
-
Page 7: Safety Precautions
SAFETY PRECAUTIONS For Safe Use For safe use of this device, read this manual. Cautions for safety and operating procedures must be thoroughly understood before using this device. CAUTION! U.S. Federal Law restricts this device to sale, distribution, and use by or on the order of a licensed eye care practitioner. -
Page 8: Usage Precautions
Doing so may result in an electric shock or device malfunction. No components other than the battery in the PM-700 can be replaced by the user. • Do not store the device in a place where it may get wet. - Page 9 If the measuring window is soiled, proper measurement value may not be obtained. • Hold the PM-700 and measure the pupillary distance so that the device is not tilted against patient's face. If the device is tilted, proper measurement value may not be obtained.
- Page 10 The surface may be ruined. • Do not use old and new batteries or batteries for other model together. The PM-700 may not work normally or it may cause a device malfunction or damage the periphery due to leakage. • Do not use the device past its service life.
-
Page 11: Labels And Symbols
Indicates that the operator is advised to refer to the related instructions in the operator's manual. “ Before Use” (page 2) Indicates that the PM-700 is classified as a device with a Type B applied part. The applied parts are the nose pad and forehead arm. “2.2 Device Configuration”... - Page 12 SAFETY PRECAUTIONS: Labels and Symbols...
-
Page 13: Before Use
BEFORE USE Device Outline The PD meter model PM-700 (referred to as “device” in this manual) is a pupillary distance meter improved with a built-in computer and LCD digital display. Intended Use The PD meter model PM-700 is intended to measure the pupillary distance for proper wear of the spectacle lenses. - Page 14 BEFORE USE: Device Outline When obtaining the pupillary distance for a vertex distance other than 12 mm, convert the value with the following formula. WD − VD × PD = PD ∞ WD + 13 PD: Pupillary distance (mm) PD ∞ : PD value (mm) when the working distance is set to ∞ WD: Working distance (mm) VD: Vertex distance (mm)
-
Page 15: Device Configuration
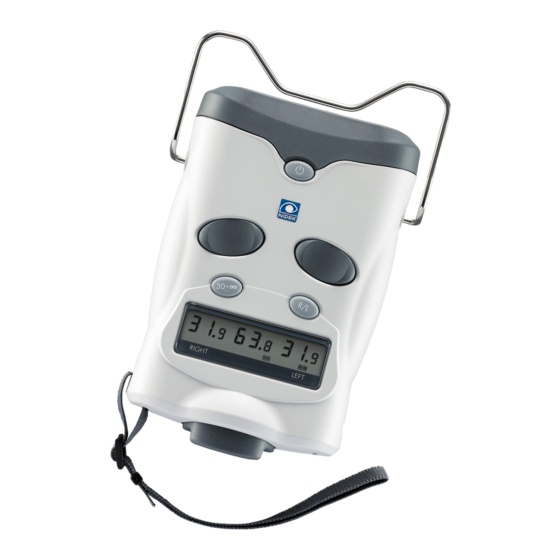
BEFORE USE: Device Configuration Device Configuration Eyepiece The examiner looks at the patient’s eyes through this eyepiece. Patient's right eye Patient's left eye Number Name Explanation Vertical line displayed aligned on the patient's eye Hairline Move to the right and left over the eye to align with the corneal reflection point. - Page 16 BEFORE USE: Device Configuration Display Displays measured PD data (right eye PD, binocular PD, left eye PD). PD: Pupillary Distance In addition to the measured value, the following are indicated. Battery replacement indicator…… BATT BATT Working distance………………… Measurement mode……………… Binocular PD (pupillary distance) Left eye PD Right eye PD Battery replacement...
- Page 17 BEFORE USE: Device Configuration Left PD measurement button Moves the hairline (vertical line) displayed on the patient's left eye. Pressing the right side of the button moves the hairline towards the temple. Pressing the left side of the button moves the hairline towards the nose. R/L button Used to occlude either side of the patient's eyes.
-
Page 18: Packed Contents
BEFORE USE: Packed Contents Packed Contents The following are included in the standard configuration. Check the contents before use. Parts name Quantity Appearance Alkaline AA battery (LR6) 2 units Nose pad (spare) 1 unit Hand strap 1 unit Operator's manual 1 unit... -
Page 19: Before First Use
BEFORE USE: Before First Use Before First Use Before using the device, attach the following parts and conduct the following settings. See “2.4.1 Attaching hand strap” (page 13) or “2.4.2 Attaching neck Attaching strap strap (optional)” (page 15). Attaching batteries See “4.3 Replacing Batteries”... - Page 20 BEFORE USE: Before First Use Pass the end of the strap through the strap hole from the side. There are strap holes on the right and left sides of the main body. Pass the strap through the desired hole. Bend the strap and pass it through the holder.
-
Page 21: Attaching Neck Strap (Optional)
BEFORE USE: Before First Use 2.4.2 Attaching neck strap (optional) To attach the neck strap (optional), follow the procedures below. When using the device wearing its strap around the neck, attach the neck strap instead of the hand strap. - Page 22 BEFORE USE: Before First Use Bend the strap and pass it through the holder. Pass the strap through the buckle. (inside of the buckle) Adjust the buckle position to adjust the strap length. Take up any slack and check that there is no play in the strap.
-
Page 23: Setting Measurement Increments And Indication Switching
BEFORE USE: Before First Use 2.4.3 Setting measurement increments and indication switching To set the measurement increments and indication switching, follow the procedures below. For details of measurement increments and indication switching, “● Measurement increments” (page 18) and “● Indication switching” (page 18). With the device is turned off, press while pressing... - Page 24 BEFORE USE: Before First Use With the desired settings displayed, press and hold for two seconds to save the settings and turn off the device. • When the device is turned off by the Auto-off function, the settings are not saved. ●...
-
Page 25: Operating Procedures
OPERATING PROCEDURES Button Operation Operations of each button are as follows: Press the Power button to turn on the device. Power button Press and hold this button for two seconds to turn off the device. Each pressing changes the working distance. Distance setting button Working distance Used to occlude either side of the patient’s eyes. - Page 26 OPERATING PROCEDURES: Button Operation • If is pressed to move the hairline outside the measurement range, the hairline cannot be moved further and the followings are displayed. Black side bars blink on both sides of the patient's eye. • [The hairline on the left eye is outside the measurement range] Blink The monocular PD field in the display blinks.
-
Page 27: For Proper Measurement
OPERATING PROCEDURES: For Proper Measurement For Proper Measurement For proper measurement: Place the nose pad against the patient's nose • As the PD value is measured with reference to the bridge of the patient’s nose, be sure to place the nose pad against the patient’s nose. Hold the device securely so that the device is not tilted against the patient's face. -
Page 28: Startup And Shutdown
OPERATING PROCEDURES: Startup and Shutdown Startup and Shutdown The device startup, Auto-off function, and device shutdown are explained. 3.3.1 Device startup and check before use Press to turn on the device. Perform the following checks before use. Check that is not indicated on the display. -
Page 29: Auto-Off Function
OPERATING PROCEDURES: Startup and Shutdown 3.3.3 Auto-off function To prevent battery drain due to the user forgetting to turn it off, the device is equipped with the Auto-off function. This function turns off the fixation target after 15 seconds of idle time, and automatically turns off the power after 3 minutes of idle time. -
Page 30: Measurement Method
OPERATING PROCEDURES: Measurement Method Measurement Method To measure the PD (pupillary distance), follow the procedures below. Monocular and binocular mea- surements are explained separately. 3.4.1 Measurement without eye occlusion The procedure below explains the PD measurement without occlusion of the eyes. CAUTION •... - Page 31 It is not necessary that the reflection point be in the center of the measuring window. If the PM-700 is moved to align the corneal reflection point in the center of the measuring window, the patient’s nose may be come off the nose pad.
- Page 32 OPERATING PROCEDURES: Measurement Method Look at the patient’s right eye through the eyepiece. to align the hairline with the corneal reflection point on the patient's right eye. “3.1 Button Operation” (page 19) “● Measurement increments” (page 18) to align the hairlines with corneal reflection point on the patient's left eye in the same manner.
-
Page 33: Measurement With One Eye Occluded
OPERATING PROCEDURES: Measurement Method 3.4.2 Measurement with one eye occluded The procedure below explains the PD measurement with one eye occluded. CAUTION • Before measuring each patient, clean the nose pad and forehead arm with a cloth dipped in alcohol for disinfection. - Page 34 OPERATING PROCEDURES: Measurement Method Press to occlude the right eye. Hairline Corneal reflection point Patient's left eye L is indicated on the display Look at the patient’s left eye through the eyepiece (the eye on the right as viewed from the examiner). Use to align the hairlines with corneal reflection point on the patient's left eye.
-
Page 35: Maintenance
MAINTENANCE Troubleshooting In the event that the device does not work correctly, correct the problem according to the following table before contacting NIDEK or your authorized distributor. Symptom Remedy • The batteries may be drained. The display does not turn on Replace them and check whether the display is turned on. -
Page 36: Cleaning
MAINTENANCE: Cleaning Cleaning To clean the device exterior, nose pad, forehead arm, and measuring window, follow the procedures below. 4.2.1 Cleaning the exterior When the exterior display, or eyepiece cover of the device become dirty, wipe with a dry and soft cloth. -
Page 37: Cleaning The Forehead Arm
MAINTENANCE: Cleaning 4.2.3 Cleaning the forehead arm CAUTION • Before measuring each patient, clean the forehead arm with a cloth dipped in alcohol for disinfec- tion. Clean the forehead arm using a cloth dipped in alco- hol for disinfection. Forehead arm 4.2.4 Cleaning the measuring window Check the measuring windows before each measurement. -
Page 38: Replacing Batteries
MAINTENANCE: Replacing Batteries Replacing Batteries To replace the batteries, follow the procedures below. When batteries run out, is indicated on the display. When is indicated, replace the BATT BATT BATT BATT batteries with new ones. CAUTION • Do not use old and new batteries or batteries of different types together. The device may not work normally or it may cause a device malfunction or damage the periphery due to leakage. - Page 39 MAINTENANCE: Replacing Batteries Remove the used batteries. Attach the new batteries. Attach the battery cover back in place.
-
Page 40: List Of Consumables
MAINTENANCE: List of Consumables List of Consumables Part name Part number 804-16-00012 Alkaline AA battery (LR6) (2 units) For use battery, see “4.3 Replacing Batteries” (page 32). Nose pad 35111-M101 Hand strap 35241-M023... -
Page 41: Specifications And Technical Information
SPECIFICATIONS AND TECHNICAL INFORMATION Specifications Specifications • Measurement item Pupillary distance value • Display method LCD digital display • Viewing distance ∞ • Distance setting range 8 steps in 30 cm to ∞ (30 cm, 35 cm, 40 cm, 50 cm, 65 cm, 1 m, 2 m, and •... - Page 42 SPECIFICATIONS AND TECHNICAL INFORMATION: Specifications • Environmental conditions Temperature -10 to + 55ºC (14 to 131ºF) (storage condition without Humidity 10 to 95% (non-condensing) packing) Atmospheric 700 to 1,060 hPa • Environmental conditions Temperature -30 to + 70ºC (-22 to 158ºF) (transport and storage con- Humidity 10 to 95% (non-condensing)
-
Page 43: Emc (Electromagnetic Compatibility)
SPECIFICATIONS AND TECHNICAL INFORMATION: EMC (Electromagnetic Compatibility) EMC (Electromagnetic Compatibility) The device is suitable for use in stores and hospitals except for near active HF surgical equipment and in an RF shielded room with an ME system for magnetic resonance imaging, where the intensity of electromagnetic disturbances is high. - Page 44 SPECIFICATIONS AND TECHNICAL INFORMATION: EMC (Electromagnetic Compatibility) Guidance and manufacturer's declaration - electromagnetic emissions The device is intended for use in the electromagnetic environment specified below. The customer or the user of the device should assure that it is used in such an environment. RF emissions CISPR 11 Group 1 The device uses RF energy only for its internal function.
- Page 45 SPECIFICATIONS AND TECHNICAL INFORMATION: EMC (Electromagnetic Compatibility) Guidance and manufacturer's declaration - electromagnetic immunity The device is intended for use in the electromagnetic environment specified below. The customer or the user of the device should assure that it is used in such an environment. Immunity test IEC 60601 test level Compliance level...
- Page 46 SPECIFICATIONS AND TECHNICAL INFORMATION: EMC (Electromagnetic Compatibility)
-
Page 47: Index
INDEX Auto-off function ......23 Check before use ......22 Display . - Page 48 INDEX:...
Need help?
Do you have a question about the PM-700 and is the answer not in the manual?
Questions and answers