Table of Contents
Advertisement
Quick Links
Advertisement
Table of Contents

Related Manuals for Nidek Medical LM-7


Summary of Contents for Nidek Medical LM-7
- Page 1 1707141668223 承認済 AUTO LENSMETER LM - 7/LM-7P OPERATOR’S MANUAL Uncontrolled copy when printed.
- Page 2 1707141668223 承認済 Original instructions NIDEK CO., LTD. : 34-14, Maehama, Hiroishi Gamagori, Aichi 443-0038, JAPAN (Manufacturer) Telephone: +81-533-67-6611 Facsimile: +81-533-67-6610 NIDEK CO., LTD. : 3F Sumitomo Fudosan Hongo Bldg., 3-22-5 Hongo, (Tokyo Office) Bunkyo-Ku, Tokyo 113-0033, JAPAN Telephone: +81-3-5844-2641 Facsimile: +81-3-5844-2642 NIDEK INC.
-
Page 3: Before Use
Before Use This operator’s manual includes operating procedures, safety precautions, and specifications for the NIDEK AUTO LENSME- TER, LM-7/LM-7P. Be sure to read the operator’s manual prior to use of the device to understand the safety precautions and operating procedures thor- oughly. -
Page 4: Table Of Contents
1707141668223 承認済 Table of Contents 1 SAFETY PRECAUTIONS - - - 5 1.1 Before Use, Read this Manual - - - 5 1.2 Usage Precautions - - - 6 1.3 Labels and Symbols - - - 9 2 BEFORE USE - - - 11 2.1 Device Outline - - - 11 2.2 Device Configuration - - - 12 2.3 Screen Configuration - - - 15... - Page 5 1707141668223 承認済 4.1.4 Connecting the foot switch - - - 72 4.1.5 Connecting the barcode scanner / magnetic card reader - - - 73 4.2 Parameter Settings - - - 75 4.2.1 Parameter setting table - - - 75 4.2.2 Entering shop name for printing - - - 84 4.2.3 License information - - - 85...
- Page 6 1707141668223 承認済 Uncontrolled copy when printed.
-
Page 7: Safety Precautions
1707141668223 承認済 SAFETY PRECAUTIONS Before Use, Read this Manual BEFORE USE, READ THIS MANUAL. Be sure to read the operator’s manual prior to operation of the device to understand the safety pre- cautions and operating procedures thoroughly. Keep this manual handy for reference. CAUTION! United States Federal law restricts this device to sale by or on the order of a physician or other licensed eye care practitioner. -
Page 8: Usage Precautions
1707141668223 承認済 1. SAFETY PRECAUTIONS : Usage Precautions Usage Precautions Before use CAUTION • Do not use the device for other than the intended purpose. NIDEK does not assume any responsibility for accidents or malfunctions caused by misuse. • Never modify the device or touch the internal structure of the device. Electric shock or malfunction may result. -
Page 9: During Use
1707141668223 承認済 1. SAFETY PRECAUTIONS : Usage Precautions During use CAUTION • Immediately replace the power cord if the internal wires are exposed, the power turns on or off when the power cord is moved, or the cord or plug is too hot. Should the device fail, disconnect the power cord from the power outlet and contact NIDEK or your authorized distributor without touching the interior of the device. - Page 10 1707141668223 承認済 1. SAFETY PRECAUTIONS : Usage Precautions Maintenance CAUTION • Only service personnel trained by NIDEK are allowed to repair and service the device. NIDEK assumes no responsibility for any adverse events resulting from improper servicing. • When performing maintenance work, secure a sufficient maintenance space. •...
-
Page 11: Labels And Symbols
1707141668223 承認済 1. SAFETY PRECAUTIONS : Labels and Symbols Labels and Symbols ■ To call attention to users, labels and indications are provided on the device. If labels are peeling off, characters are fading, or otherwise becoming illegible, contact NIDEK or your authorized distributor. Power is turned on. - Page 12 1707141668223 承認済 1. SAFETY PRECAUTIONS : Labels and Symbols Uncontrolled copy when printed.
-
Page 13: Before Use
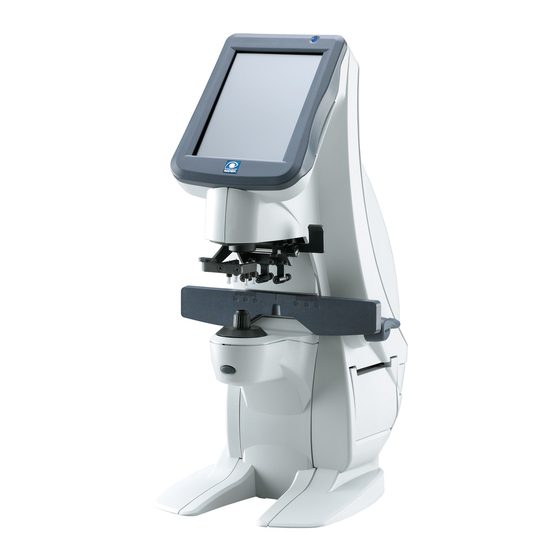
1707141668223 承認済 BEFORE USE Device Outline The NIDEK AUTO LENSMETER LM-7/LM-7P measures the optical performance of spectacle lenses such as single vision, bifocal (trifocal), and progressive power lenses or contact lenses. Product name Type LM-7 Not equipped with a printer... -
Page 14: Device Configuration
1707141668223 承認済 2. BEFORE USE : Device Configuration Device Configuration Pilot lamp Indicates whether the device is turned on or off. Illuminated Power is turned on. Not illuminated Power is turned off. Fast blinking (twice/second) Indicates that extended pressing of a button is recognized by the device. Slow blinking (once/second) Display auto off function •... - Page 15 1707141668223 承認済 2. BEFORE USE : Device Configuration Nosepiece A lens to be measured is placed on the nosepiece. This is the base point for measurements. When measuring contact lenses, replace the standard nosepiece with the provided one for contact lenses.
- Page 16 1707141668223 承認済 2. BEFORE USE : Device Configuration LAN cable port (optional) Port for Ethernet LAN. Communication port RS-232C compatible port used for communication. The AR, ARK, RT, computer, or such is connected here. USB port (device) USB port for transferring measured data to a computer. This port is in compliance with USB 2.0.
-
Page 17: Screen Configuration
1707141668223 承認済 2. BEFORE USE : Screen Configuration Screen Configuration 2.3.1 Measurement screen ■ The following measurement screens are available: auto measurement screen, normal measurement screen, progressive power lens measurement screen, and contact lens measurement screen. The fig- ure below shows the auto measurement screen that automatically measures lenses. Each measure- ment screen consists of the measurement area and measured results display area Parameter button... - Page 18 1707141668223 承認済 2. BEFORE USE : Screen Configuration CYL +/- switching button Switches the cylinder reading between positive (+) and negative (-). Pressing the button again returns to the reading set by the parameter. Pressing any button other than the increment button, auto read button, parameter button, and read button also returns to the reading set by the parameter.
- Page 19 1707141668223 承認済 2. BEFORE USE : Screen Configuration ♦ Measurement area Operations are explained using mainly the measurement area of the screen. Measurement screen display Indicates which measurement is being taken. Display Description Normal measurement Measurement of single vision lenses or bifocal (trifocal) lenses Progressive power lens measurement Contact lens measurement Auto measurement...
- Page 20 1707141668223 承認済 2. BEFORE USE : Screen Configuration Axis bar The thick line displayed on the protractor of the alignment circle indicates the axis. Target Indicates the optical center of a lens to be measured. The target shape changes depending on the Target parameter setting and alignment level. Display Description Normal target...
- Page 21 1707141668223 承認済 2. BEFORE USE : Screen Configuration ♦ Measured results display area R/L measurement select button Indicates the single measurement or right/left measurement . Pressing the button switches from the single state to the R/L state Display Description Measurement is not performed yet. (white) While measurement is being performed, the corresponding button blinks in (green)
- Page 22 1707141668223 承認済 2. BEFORE USE : Screen Configuration Eye Care card button Indicates the Eye Care card state. Extended pressing of this button clears the data on the card. Display Description The Eye Care card is not inserted. (white) The Eye Care card is inserted. (blue) The Eye Care card is being accessed.
-
Page 23: Other Screens
1707141668223 承認済 2. BEFORE USE : Screen Configuration 2.3.2 Other screens Normal measurement screen Progressive power lens measurement screen Screen for measuring single vision lenses or bifocal (tri- Screen for measuring progressive lenses focal) lenses “3.6 Progressive Power Lens Measurement” (page ... - Page 24 1707141668223 承認済 2. BEFORE USE : Screen Configuration UV transmittance screen Scale mode screen Screen on which UV transmittance measured data is dis- Screen for easily measuring the PD and LPD/RPD val- played ues by aligning the marked lenses to the scale displayed on the screen ...
-
Page 25: Packed Contents
1707141668223 承認済 2. BEFORE USE : Packed Contents Packed Contents ■ The following are included in the standard configuration. Check the contents before use. Part name Quantity Appearance Main body 1 unit Power cord 1 unit Dust cover 1 unit Nosepiece for contact lenses 1 unit Operator’s manual... -
Page 26: Before First Use
1707141668223 承認済 2. BEFORE USE : Before First Use Before First Use 2.5.1 Cable connection and startup Place the device on a stable table. Lay the device on its side gently. Connect the power cord to the power inlet. Connect peripheral equipment as necessary. ... - Page 27 1707141668223 承認済 2. BEFORE USE : Before First Use Confirm that the measurement screen is dis- played. The measurement screen displayed when power is turned on can be set with the Initial screen parameter. “4.2 Parameter Settings” (page 75) •...
-
Page 28: Date And Time Setting
1707141668223 承認済 2. BEFORE USE : Before First Use 2.5.2 Date and time setting ■ On the parameter screen, set the date and time, and the order of display for them to be printed. Press the parameter button Select the order of year, month, and day to be printed. -
Page 29: Operating Procedure
1707141668223 承認済 OPERATING PROCEDURE Operation Flow Turning on the device “3.2 Preparation for Measurement” (page 28) Turn on power to the device and change the parameter settings as necessary. Measurement “3.3 Lens Setting” (page 32) “3.4 Single Vision Lens Measurement” (page 35) “3.5 Bifocal and Trifocal Lens Measurement”... -
Page 30: Preparation For Measurement
1707141668223 承認済 3. OPERATING PROCEDURE : Preparation for Measurement Preparation for Measurement Perform checks before use. “♦ Checklist before use” (page 29) Turn on the power switch. The title screen is displayed. Wait until the screen changes. After initialization, the measurement screen is displayed. •... - Page 31 1707141668223 承認済 3. OPERATING PROCEDURE : Preparation for Measurement ♦ Checklist before use Items (before turning on power) The power cord is connected to the power inlet and outlet securely. The cables of the connected equipment are connected securely. The main body is clean. The protective glass is clean.
- Page 32 1707141668223 承認済 3. OPERATING PROCEDURE : Preparation for Measurement ♦ Measurement screen when power is turned on Depending on the settings of the Initial screen and Contact measurement parameters and the type of the attached nosepiece, the measurement screen displayed after initialization differs. ●...
- Page 33 1707141668223 承認済 3. OPERATING PROCEDURE : Preparation for Measurement ♦ Details of target The target form displayed on the measurement screen can be selected by the Target parameter. ● Target parameter setting Details of target Setting The target indicates the distance and direction from the nosepiece center. The direction and movement distance are constant regardless of lens refractive power.
-
Page 34: Lens Setting
1707141668223 承認済 3. OPERATING PROCEDURE : Lens Setting Lens Setting • Before setting a lens, confirm that no dust or debris is adhered to the tip of the nosepiece or lens holder. The lens may be damaged. ♦ Uncut lenses Set a lens on the nosepiece. - Page 35 1707141668223 承認済 3. OPERATING PROCEDURE : Lens Setting ♦ Mounted lenses • When measuring glasses or processed lenses, remove any dust or processing waste adhered to the lens before measuring Foreign matters are adhered to the nosepiece or lens holder resulting in lens damage. Set mounted lenses on the nosepiece.
- Page 36 1707141668223 承認済 3. OPERATING PROCEDURE : Lens Setting ♦ Contact lenses Replace the nosepiece with the one for contact lenses. The top of the nosepiece for contact lenses is smaller than the standard one. Set a contact lens. Place a contact lens on the nosepiece with the convex side facing up.
-
Page 37: Single Vision Lens Measurement
1707141668223 承認済 3. OPERATING PROCEDURE : Single Vision Lens Measurement Single Vision Lens Measurement Single vision lenses are measured on the auto measurement screen or normal measurement screen. Specify the lens side if necessary. Press the R/L measurement select button to switch to The selected button blinks in green to indicate that the corresponding lens is being measured. - Page 38 1707141668223 承認済 3. OPERATING PROCEDURE : Single Vision Lens Measurement ● Locking in measured data with the auto read function When the Auto read S or Auto read R/L parameter is set to “ (cross)” or “ (large cross)”, measured data is automatically locked in after the target is aligned as well as when the read but- ton is pressed.
- Page 39 1707141668223 承認済 3. OPERATING PROCEDURE : Single Vision Lens Measurement ♦ Selecting the prism indication To display the prism value, set the Prism parameter to “P-B” or “BU/D BI/O”. When the Prism parameter is set to “Off”, the prism value is not displayed. When marking with the prism prescription, follow the prescription.
-
Page 40: Bifocal And Trifocal Lens Measurement
1707141668223 承認済 3. OPERATING PROCEDURE : Bifocal and Trifocal Lens Measurement Bifocal and Trifocal Lens Measurement Bifocal lenses (or trifocal lenses) can be measured successively in the order of distance portion near portion (for trifocal lenses, distance portion intermediate portion near por- tion Above lenses are measured on the auto measurement screen or normal measurement screen. - Page 41 1707141668223 承認済 3. OPERATING PROCEDURE : Bifocal and Trifocal Lens Measurement When the target changes from (cross), press the read button. The distance power is locked in. • In measurement of the distance portion, auto read works depending on the setting of the Auto read S or Auto read R/L parameter.
- Page 42 1707141668223 承認済 3. OPERATING PROCEDURE : Bifocal and Trifocal Lens Measurement ❖ Only for trifocal lenses, perform Steps 6 and 7 to measure the near add power (2nd add power). Bring the near portion onto the center of the nosepiece. The near add power (Add2: 2nd add power) is displayed.
- Page 43 1707141668223 承認済 3. OPERATING PROCEDURE : Bifocal and Trifocal Lens Measurement ♦ Measuring add power more accurately Measurement error occurs due to the lens thickness between the segment and nosepiece. Measure the add power in the way to correct the error. It is especially effective when the base lens is thick. Set the distance portion of the lens with the con- cave side facing up.
-
Page 44: Progressive Power Lens Measurement
1707141668223 承認済 3. OPERATING PROCEDURE : Progressive Power Lens Measurement Progressive Power Lens Measurement 3.6.1 Uncut lens measurement Measure a lens at the marks of the distance portion and near portion printed on the lens. Perform measurement in the same manner as “3.5 Bifocal and Trifocal Lens Measurement” (page 38). Distance power measuring position Near power measuring position Horizontal reference line... - Page 45 1707141668223 承認済 3. OPERATING PROCEDURE : Progressive Power Lens Measurement Set a lens. “3.3 Lens Setting” (page 32) ❖ The following is the procedure for measuring the right-eye lens. Measure the distance power. Bring the intermediate portion (progressive zone) onto the nosepiece.
- Page 46 1707141668223 承認済 3. OPERATING PROCEDURE : Progressive Power Lens Measurement • When the Distance auto read parameter is set to “Off”, press the read button when the target changes (cross) and the measured data stabilizes. • For a lens whose distance portion cannot be detected correctly, bring the distance portion onto the center of the nosepiece, then press the read button.
- Page 47 1707141668223 承認済 3. OPERATING PROCEDURE : Progressive Power Lens Measurement When the target changes from (cross) and the measured data stabilizes, the measured data is automatically locked in. • When the Near auto read parameter is set to “Off”, press the read button when the target changes to (cross) and the measured data stabilizes.
- Page 48 1707141668223 承認済 3. OPERATING PROCEDURE : Progressive Power Lens Measurement ♦ Screen change in auto measurement When the lens on the nosepiece is detected as a progres- sive power lens on the auto measurement screen (normal measurement), the screen changes to the progressive power lens measurement screen (auto measurement) automatically.
- Page 49 1707141668223 承認済 3. OPERATING PROCEDURE : Progressive Power Lens Measurement ♦ Progressive power lenses for vertically narrow frames When the height of the processed lens is small and near portion is not intact, the display changes to alert that the correct near power has not been measured.
- Page 50 1707141668223 承認済 3. OPERATING PROCEDURE : Progressive Power Lens Measurement ● When auto read does not function properly Measure the point that is closest to the near portion and perform auto read. Measure the distance portion of the lens with the auto read function until the target changes from (cross).
-
Page 51: Prism Power Measurement Of Lenses For Strabismus And Phoria
1707141668223 承認済 3. OPERATING PROCEDURE : Prism Power Measurement of Lenses for Strabismus and Phoria Prism Power Measurement of Lenses for Strabismus and Phoria This section describes the method to measure prism power of mounted lenses for strabismus and phoria. Select the method for displaying measured prism values by the Prism parameter in advance. - Page 52 1707141668223 承認済 3. OPERATING PROCEDURE : Prism Power Measurement of Lenses for Strabismus and Phoria Press the read button. The measured data is locked in. • If “Measurement error” appears, the mark may obstruct the measuring beam. Move the lens slightly. Measure the other lens if necessary (in the R/L state).
-
Page 53: Contact Lens Measurement
1707141668223 承認済 3. OPERATING PROCEDURE : Contact Lens Measurement Contact Lens Measurement Press the periphery of the alignment circle to dis- play the contact lens measurement screen. Specify the lens side if necessary. Press the R/L measurement select button switch to The selected button blinks in green to indicate that the corresponding lens is being measured. -
Page 54: Uv Transmittance Measurement
1707141668223 承認済 3. OPERATING PROCEDURE : UV Transmittance Measurement Measure the other lens if necessary (in the R/L state). Switch the R/L measurement select button to Follow the same steps as the first lens. Press the print button to print the measured results (or perform data transfer or writing to the Eye Care card). - Page 55 1707141668223 承認済 3. OPERATING PROCEDURE : UV Transmittance Measurement Simple Compare The UV transmittance measured result (%) is dis- The screen changes to the UV transmittance played. screen and the measured result is displayed. ● Buttons on the UV transmittance screen Button Operation Corrects UV transmittance to 100%.
- Page 56 1707141668223 承認済 3. OPERATING PROCEDURE : UV Transmittance Measurement ● Comparative measurement of UV transmittance By measuring another lens, UV transmittance can be com- pared. After replacing the lens and bringing the optical cen- ter onto the nosepiece, press the compare measure- ment button The measured results of the two lenses are displayed on the UV comparison screen simultaneously.
-
Page 57: Measurement Using Scale Mode Function
1707141668223 承認済 3. OPERATING PROCEDURE : Measurement Using Scale Mode Function 3.10 Measurement Using Scale Mode Function The values of the LPD/RPD, PD, and such can be measured easily by aligning the marked glasses to the scale displayed on the screen. CAUTION •... - Page 58 1707141668223 承認済 3. OPERATING PROCEDURE : Measurement Using Scale Mode Function ● When measuring PD and LPD/RPD Change the background color with the background switch- ing button if necessary. Using the up button and down button align the scale to the markings. Using the left button and right button align the vertical lines to the center markings on the...
-
Page 59: Marking
1707141668223 承認済 3. OPERATING PROCEDURE : Marking 3.11 Marking 3.11.1 Marking at optical center Marking is performed to indicate the optical center position and axis direction. • To measure PD of the mounted lenses, mark the right and left lenses at the optical center, and mea- sure the distance between the center markings. -
Page 60: Marking For Prism Prescription
1707141668223 承認済 3. OPERATING PROCEDURE : Marking Mark the lens. Push down the marking lever to be level. Lower the marking lever to mark the lens. Three points are marked in a line parallel to the lens table. • Lower the marking lever slowly and lightly. The tips of the ink cartridge may be damaged. - Page 61 1707141668223 承認済 3. OPERATING PROCEDURE : Marking ♦ When only marking lenses Display the prism entry screen. Press and hold around the center of the target and press the prism icon. Enter prism prescription. Specify the lens side if necessary. Press the R/L measurement select button to switch to The selected button blinks in green to indicate that the corresponding lens is being measured.
- Page 62 1707141668223 承認済 3. OPERATING PROCEDURE : Marking • Polar coordinates display (∆θ) Absolute prism value 5.25 Enter prism prescription by absolute prism value (∆: Prism). Base direction Enter prism prescription by prism base direction (°: Base). • Rectangular coordinates display (XY) Before entering a value, enter a letter from “U/D”...
- Page 63 1707141668223 承認済 3. OPERATING PROCEDURE : Marking ● For lenses having cylindrical power While seeing the axis value, rotate the lens until the prescribed axis value is displayed. When auto read is set to any other than “Off”, the mea- sured data is automatically locked in after the target is aligned.
-
Page 64: Printing
1707141668223 承認済 3. OPERATING PROCEDURE : Printing 3.12 Printing Press the print button to print measured data. • Print the data after confirming that the measured data is locked in. If the print button is pressed while the measured data is not locked in, the data when the button is pressed is locked in and printed. - Page 65 1707141668223 承認済 3. OPERATING PROCEDURE : Printing Sample printout LM -7P • When the QR code parameter is set to “On” • When the PD layout parameter is set to “On” Uncontrolled copy when printed.
-
Page 66: Saving Data To Eye Care Card
1707141668223 承認済 3. OPERATING PROCEDURE : Saving Data to Eye Care Card 3.13 Saving Data to Eye Care Card The measured data is saved to the Eye Care card to transfer the LM data to the connected equipment. • Each data of sphere, cylinder, axis, add, and prism for right and left lenses is saved. •... - Page 67 1707141668223 承認済 3. OPERATING PROCEDURE : Saving Data to Eye Care Card ♦ Erasing data on Eye Care card This is the method to erase all the data on the Eye Care card. After inserting the Eye Care card, press and hold the Eye Care card button A beep sounds and the pilot lamp blinks.
-
Page 68: After Use
1707141668223 承認済 3. OPERATING PROCEDURE : After Use 3.14 After Use Turn the device off Turn off the power switch while any of the measurement screens is displayed. • Turning off power while parameter settings are being changed on the parameter screen, the settings may not be saved. -
Page 69: Connection And Settings
Operation when Peripheral Devices are Connected ■ The LM-7/LM-7P can transmit data to the peripheral devices. In addition, measured results can be printed with the printer of the peripheral devices. Connect the peripheral devices to the communication ports of the LM-7/LM-7P and set the parameters. -
Page 70: Connecting Optional Cables
1707141668223 承認済 4. CONNECTION AND SETTINGS : Operation when Peripheral Devices are Connected Connecting device Connection Function Used in place of the read button Foot switch RS-232C port “4.1.4 Connecting the foot switch” (optional) (page 72) Barcode scanner Entry of patient ID USB port ... - Page 71 1707141668223 承認済 4. CONNECTION AND SETTINGS : Operation when Peripheral Devices are Connected Attach the rear cover. Attach the rear cover in the reverse order of removal. Draw each cable through the indentation at the bottom of the cover. Uncontrolled copy when printed.
-
Page 72: Connecting Ar/Ark/Rkt
• For the setting procedure, refer to the operator's manual for the connected device. • When printing with the AR, ARK, or RKT, the font is different from that printed with the LM-7/LM- • The Print density, Paper cut, Auto cutter, Economy print, QR code, and PD layout parameters are not supported. -
Page 73: Connecting Rt (Refractor) Or Computer
Connect the RT (or a computer) and the LM-7/LM-7P with the communication cable (optional). • Connecting to a computer using USB Connect the optional USB cable between the USB port of the LM-7/LM-7P and that of a com- puter. Install the USB driver included with the optional USB cable to the computer. -
Page 74: Connecting The Foot Switch
“4.1.1 Connecting optional cables” (page 68) Set the LAN parameter to “LAN”. “4.2 Parameter Settings” (page 75) Consult the network administrator regarding parameter setting of the LM-7/LM-7P and computer. • For LAN communication settings and connection, consult NIDEK or your communication system personnel. ♦... -
Page 75: Connecting The Barcode Scanner / Magnetic Card Reader
1707141668223 承認済 4. CONNECTION AND SETTINGS : Operation when Peripheral Devices are Connected 4.1.5 Connecting the barcode scanner / magnetic card reader ● Barcode scanner operation Hold the barcode scanner window over a barcode and press the trigger button The scanner window lights up in red and reads the bar- code. - Page 76 • When reading the patient ID is attempted, the glasses icon is not displayed. • For the ID, alphanumeric characters and symbols (other than \, {, |, }) can be used. Other control codes are not recognized by the LM-7/LM-7P. All unrecognized symbols are con- verted to “~”.
-
Page 77: Parameter Settings
1707141668223 承認済 4. CONNECTION AND SETTINGS : Parameter Settings Parameter Settings Parameters include settings related to display, measurement, printing, communication, UV transmit- tance measurement, and such. Press the parameter button Display the page that has the parameter to be set. Using the page change button , display the page that has the parameter to be changed. - Page 78 1707141668223 承認済 4. CONNECTION AND SETTINGS : Parameter Settings Parameter Setting contents Abbe select A: , B: , C: , Com Using Abbe number for lens material, measurement value error that occurs during high-refrac- tive lens measurement is corrected. Abbe number used for correction is selected from A, B, C or Com.
- Page 79 On: Printing is performed. Transmission of measured data to the external equipment is per- formed at the same time. AR print: Measured data of the LM-7/LM-7P is printed with the printer of the connected AR, ARK, or RKT. Transmission of measured data to the external equipment is performed at the same time.
- Page 80 1707141668223 承認済 4. CONNECTION AND SETTINGS : Parameter Settings Parameter Setting contents Print number Off, On: (0001) Selects whether to print the print number. Extended pressing of the value of “On” displays the numeric keypad. Enter a value (1 to 9999).
- Page 81 1707141668223 承認済 4. CONNECTION AND SETTINGS : Parameter Settings Parameter Setting contents Guide Off, On Selects whether to display the guide for precise alignment of the target. Beep Off, Low, Middle, High Selects tones of beeps that sound when a button is pressed or auto read is performed. Auto off Off, 1, 3, 5, 10, 15, 30, 60(minute) Enables or disables the display auto off function.
- Page 82 1707141668223 承認済 4. CONNECTION AND SETTINGS : Parameter Settings Parameter Setting contents Read beginning of reader Operator:1, Patient:1 Sets the position to start reading of ID transferred from a reader. Settings for operator and patient are available. Pressing the item displays the numeric keypad. Enter a value (1 to 255). Enter a value so that the total of “Read length of reader”...
- Page 83 Even when the setting is “On” or “Off”, whether or not to transmit measured prism data can be toggled with the prism ON/OFF button. Source Sets the port number for the source (LM-7/LM-7P). Pressing the item displays the numeric keypad. Enter a value (0 to 255). Enter different num- bers for “Source” and “Destination”.
- Page 84 1707141668223 承認済 4. CONNECTION AND SETTINGS : Parameter Settings Parameter Setting contents Network Off, On, Sending only Selects whether to use the network. Off: The device does not use the network. On: The device always opens the ports and stands by to send and receive data. Sending only: The device opens the ports only when sending data.
- Page 85 1707141668223 承認済 4. CONNECTION AND SETTINGS : Parameter Settings Parameter Setting contents Security Mode Open, WEP(128bit:ASCII), WEP(128bit:HEX), WEP(64bit:ASCII), WEP(64bit:HEX), WPA, WPA2, WPA/WPA2 Selects security mode. Security Key ex.) 0000 Sets security key. Pressing the item displays the keyboard. Enter the security key of the communication destina- tion.
-
Page 86: Entering Shop Name For Printing
4. CONNECTION AND SETTINGS : Parameter Settings 4.2.2 Entering shop name for printing Change the comment to be printed (the default setting is “NIDEK LM-7(P)”). The comment can be entered in two lines with 24 characters per line. Press the parameter button Press the shop name print button Enter a shop name or such. -
Page 87: License Information
1707141668223 承認済 4. CONNECTION AND SETTINGS : Parameter Settings Button Description Discards the entered setting and returns to the parameter screen. • Depending on the connected device, printed characters may differ from those displayed on the screen. This is prone to occur in symbols such as “#”, “$”, “@”, “[” and “]”. Perform printing to check. 4.2.3 License information Pressing the information button... - Page 88 1707141668223 承認済 4. CONNECTION AND SETTINGS : Parameter Settings Uncontrolled copy when printed.
-
Page 89: Maintenance
1707141668223 承認済 MAINTENANCE Troubleshooting ■ In the event that the device does not work correctly, attempt to correct the problem according to the following table before contacting NIDEK or your authorized distributor. Symptom Remedy The LCD does not turn on. •... -
Page 90: Error Messages And Remedies
1707141668223 承認済 5. MAINTENANCE : Error Messages and Remedies Error Messages and Remedies ■ If any error message in the following table appears on the screen, follow the instructions below. If the problem persists, contact NIDEK or your authorized distributor. Symptom Remedy •... - Page 91 1707141668223 承認済 5. MAINTENANCE : Error Messages and Remedies Symptom Remedy • Communication with external equipment is not performed properly. • Check the communication cable. Communication error • Confirm that the connected device is turned on. • Confirm that the parameters related to communication are cor- rectly set.
-
Page 92: Touch Screen Calibration
1707141668223 承認済 5. MAINTENANCE : Touch Screen Calibration Touch Screen Calibration If the position touched on the screen and the response position do not match, perform the touch screen calibration. While pressing the read button, turn on power switch. Continue pressing the read button until the calibration screen is displayed. -
Page 93: Printer Paper Replacement
1707141668223 承認済 5. MAINTENANCE : Printer Paper Replacement Printer Paper Replacement When a red line appears on the edge of the printer paper, it means that the paper is running short. Replace it with the new printer paper. • Do not run the printer while the printer paper is not loaded. •... -
Page 94: Ink Refilling
1707141668223 承認済 5. MAINTENANCE : Ink Refilling Ink Refilling 5.5.1 Ink cartridge When markings become faint, replace the ink cartridge. While pressing the tip of the ink cartridge with a finger, remove the C-ring It is recommended to remove the C-ring with tweezers so as not to lose it. When the C-ring is removed, the spring and cartridge come off. -
Page 95: Lens Table Adjustment
1707141668223 承認済 5. MAINTENANCE : Lens Table Adjustment Lens Table Adjustment Adjust the feel of the lens table lever movement. If the lever feels too heavy or too light during use, perform the following adjustment. Remove the lens table lever Pull it out straight. -
Page 96: Cleaning
1707141668223 承認済 5. MAINTENANCE : Cleaning Cleaning 5.7.1 Device exterior When the cover or panel of the device becomes soiled, clean it with a soft cloth. For persistent stains, wipe them away with a cloth soaked in a neutral detergent and wrung well. Finally wipe them with a dry and soft cloth. -
Page 97: Printer
1707141668223 承認済 5. MAINTENANCE : Cleaning 5.7.3 Printer After repeated usage, the paper slot of the auto cutter of the printer may become soiled with paper residue. If the residue settles, malfunction of the auto cutter may result. Open the printer cover and remove the printer paper. ... -
Page 98: List Of Consumables And Replacement Parts
1707141668223 承認済 5. MAINTENANCE : List of Consumables and Replacement Parts List of Consumables and Replacement Parts Part name (part No.) Appearance Note Printer paper Width 58 mm, Length 25 m (8062000001) Ink cartridge / red Red ink, 3 units, with C-ring (31001-3371) Ink cartridge / blue Blue ink, 3 units, with C-ring... -
Page 99: Specifications And Technical Information
1707141668223 承認済 SPECIFICATIONS AND TECHNICAL INFORMATION Specifications Measurement items • Spherical power (spectacle -25.00 to +25.00 D, 0.01/ 0.06/ 0.12/ 0.25 D increments lenses) Measurement range (D) Accuracy (D) < 0 > 0 ±0.06 ≥ -5 ≤ +5 < -5 >... - Page 100 • Dimensions 200 (W) × 240 (D) × 410 (H) mm • Mass 3.7 kg (LM-7) / 4 kg (LM-7P) • Power source AC 100 to 240 V (±10%), 50/60 Hz Universal power supply cord is equipped (transformer is not neces- sary).
- Page 101 1707141668223 承認済 6. SPECIFICATIONS AND TECHNICAL INFORMATION : Specifications Environmental conditions • Environmental conditions (during Temperature: -10 to 55ºC (14 to 131°F) storage, packed condition) Humidity: 10 to 85% (non-condensing) Atmospheric pressure: 700 to 1,060 hPa • Environmental conditions (during Temperature: -30 to +60ºC (14 to 131°F) transport, packed condition) Humidity: 10 to 85% (non-condensing)
-
Page 102: List Of Terms And Abbreviations
1707141668223 承認済 6. SPECIFICATIONS AND TECHNICAL INFORMATION : List of Terms and Abbreviations List of Terms and Abbreviations The following terms and abbreviations are used in reference to the device and in the Operator’s Man- ual. Terms Spherical equivalent refractive power SPH (S) Spherical power CYL (C) - Page 103 1707141668223 承認済 6. SPECIFICATIONS AND TECHNICAL INFORMATION : List of Terms and Abbreviations Abbreviations Radio Frequency Universal Serial Bus WLAN Wireless Local Area Network Uncontrolled copy when printed.
-
Page 104: Emc (Electromagnetic Compatibility)
1707141668223 承認済 6. SPECIFICATIONS AND TECHNICAL INFORMATION : EMC (Electromagnetic Compatibility) EMC (Electromagnetic Compatibility) The device complies with the International Electrotechnical Commission standards (IEC 60601-1- 2:2007) for electromagnetic compatibility. WARNING • Use the specified accessories, optional accessories, and cables. Otherwise increased emissions or decreased immunity of the device may result. •... - Page 105 1707141668223 承認済 6. SPECIFICATIONS AND TECHNICAL INFORMATION : EMC (Electromagnetic Compatibility) Guidance and manufacturer's declaration - electromagnetic emissions The device is intended for use in the electromagnetic environment specified below. The customer or the user of the device should assure that it is used in such an environment. a i l omagnetic environment - guidance The device uses RF energy only for its internal function.
- Page 106 1707141668223 承認済 6. SPECIFICATIONS AND TECHNICAL INFORMATION : EMC (Electromagnetic Compatibility) Guidance and manufacturer's declaration - electromagnetic immunity The device is intended for use in the electromagnetic environment specified below. The customer or the user of the device should assure that it is used in such an environment. Immunity test IEC 60601 test level Compliance level...
- Page 107 1707141668223 承認済 are reserved by NIDEK or the owner of the Third-Party- IMPORTANT—READ CAREFULLY Software. The license granted herein will not be intended as, or construed to be, any assignment of the rights of THIS AGREEMENT APPLIES TO THE NIDEK SOFT- NIDEK or the owner of the Third-Party-Software.
- Page 108 1707141668223 承認済 Agreement with immediate effect. Upon termination of provisions of this Agreement will continue in full force this Agreement due to the breach of this Agreement, and effect. NIDEK reserves all the rights to claim damages resulting 11. SURVIVAL from such breach.
Need help?
Do you have a question about the LM-7 and is the answer not in the manual?
Questions and answers
Part number for NIDEK LM-7 LED screen unit