Table of Contents
Advertisement
Quick Links
V1.0_en
05.11.2019
Messtechnik / humimeter.com
Analytic balance
Operating Manual
Moisture analyser G110
Analytic balance for determination of moisture
78,0 °F | 6,16 % | 456 kg/m
| -27,3 td | 0,64 aw | 51,9 %r.H. | 14,8 % abs | 100,4 g/m
| 09 m/s | 4,90 Ugl | 163 ym | 23,2 °C | 78,8°F | 6,21% |424 kg/m
3
2
Climate
Food
Bionenergy
Material
Buildings
Paper / Board
Schaller GmbH
Max-Schaller-Straße 99, A - 8181 St. Ruprecht an der Raab
Tel +43 (0)3178 - 28899 , Fax +43 (0)3178 - 28899 - 901
Any technical changes reserved. Pictures do not show
possible changes that have been made on different models.
info@humimeter.com, www.humimeter.com
Advertisement
Table of Contents

Subscribe to Our Youtube Channel
Related Manuals for Schaller G110


Summary of Contents for Schaller G110
- Page 1 Buildings Paper / Board Schaller GmbH Max-Schaller-Straße 99, A - 8181 St. Ruprecht an der Raab Tel +43 (0)3178 - 28899 , Fax +43 (0)3178 - 28899 - 901 Any technical changes reserved. Pictures do not show possible changes that have been made on different models.
-
Page 2: Table Of Contents
Table of contents 1 Technical data ....................3 2 Description of the device ................... 4 2.1 Basic device .....................4 2.2 Display ......................5 2.3 Keypad ......................5 3 General information ................... 6 3.1 Publication declaration ..................6 3.2 Proper use ......................6 3.3 Improper use ....................6 3.4 Warranty ......................6 3.5 Monitoring of measuring devices ..............7 4 Safety information ..................... -
Page 3: Technical Data
100 g (F2) Interface RS232 Display Dimensions 240 x 365 x 180 mm Net weight 4.8 kg Power supply 230V AC 50Hz Scope of delivery Analytic balance G110, sample pan, mains cable, 100 g calibration weight, operating manual Page 3... -
Page 4: Description Of The Device
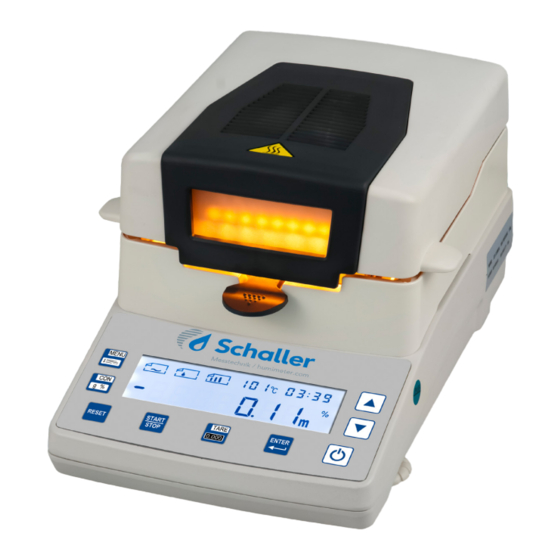
2 Description of the device 2.1 Basic device Description Heating hood Heating lamp Heat protection plate Sample pan Wind shield Insertion aid LCD display Keypad Height-adjustable foot Description RS-232 interface Bubble level Power supply socket 11 12 Page 4... -
Page 5: Display
2.2 Display Symbol Description Heat-up mode Standard Heat-up mode Quick Heat-up mode Slow Measuring / Stop mode Drying temperature Drying time Percentage dry weight / dry matter % Percentage moisture Grammes 2.3 Keypad Function ON/OFF Power on / off START / STOP Start / stop measurement TARE Tare / Leave settings... -
Page 6: General Information
Schaller GmbH. Subject to technical and documentary changes. All rights reserved. The opera- ting manual has been compiled with due care. Schaller GmbH accepts no lia- bility for omissions or errors. The determination of valid measurement results, conclusions and measures derived therefrom are the sole responsibility of the user. -
Page 7: Monitoring Of Measuring Devices
The interval and the method of this check must be defined by the responsi- ble user of the balance. Test weights are available from Schaller GmbH. A test weight of 100 g is included in the scope of delivery. -
Page 8: Safety Information
4 Safety information 4.1 Symbols used in this manual The symbols used have the following meanings: General safety symbol: Non-observance can cause personal injury and/or damage to the device. Warning of hot surface: Non-observance can cause burns. Fire or explosion: Spontaneously flammable substances, highly flammable gaseous substances, moisture-sensitive substances or flammable liquids. - Page 9 mage to the instrument or other material damage. • The moisture analyser should be used only for the drying of aqueous substances. • Never make any modifications or design changes to the equipment. Always use original spare parts and accessories. •...
-
Page 10: On Receipt Of Your Device
Danger! • Do not leave the packaging material careless. It could become a dangerous toy for children. • The device is not a toy and should not be handled by children. • This device can be dangerous if it is used by untrained persons or used improperly. -
Page 11: Assembling The Analytic Balance
5.3 Assembling the analytic balance Unpack the delivered parts aud assemble them as illustrated. 1.) Start with the heat protection plate (1). 2.) Insert the wind shield (2) in the way the notch in the side wall faces the user. 3.) Place the handle of the insertion aid (3) in the notch of the wind shield (2). -
Page 12: Levelling The Analytic Balance
5.4 Levelling the analytic balance In order to obtain accurate and repeatable measuring results, it is important to align the balance accurately using the level indicator and the two setting wheels. Turn the foot screws until the air bubble of the water balance is in the prescribed circle. -
Page 13: Preparation
6 Preparation 6.1 Preparation of sample Always prepare only one sample for the measurement. This prevents the sample from exchanging moisture with the ambient air. In case several samples have to be taken at the same time, put them into airtight containers. Before the sample is spread on the aluminium pan, the empty aluminium pan should be placed on the balance and the balance should be tared (display of 0.000 g). -
Page 14: Preparation Of Analytic Balance
6.3 Preparation of analytic balance Switch on the balance at least 30 minutes before starting a measurement. This ensures that the balance is at operating temperature. Before each measurement, check that the sample pan is empty and remove any kind of pollution if present. 7 Operation / Measuring procedure 7.1 Switching the device on Press the „ON/OFF“... -
Page 15: Specifying The Heat-Up Mode
7.2.1 Specifying the heat-up mode After the selection of the memory location, the drop icon will flash in the upper side of the display. Here you can select one out of three heat-up speeds. Standard heat-up mode This is the default mode which is suitable for most sample types. In this heat-up mode, 120 °C are reached after approx. - Page 16 7.2.2 Specifying measurement / stop mode After the selection of the heat-up mode, the bar icon will flash in the upper side of the display. Here you can select between three measurement /stop modes. Constant measuring value In this measurement / stop mode, the measurement is stopped automatically when the measuring value is constant over a certain period of time.
-
Page 17: Setting The Drying Temperature
7.2.3 Setting the drying temperature After selecting the measurement / stop mode, the temperature indication will flash in the upper side of the display. Here you can set the drying temperature using the arrow keys „UP“ and „DOWN“. The first setting can be made in steps of 10 %. After confirming with the „ENTER“... -
Page 18: Measurement
7.3 Measurement Prepare the sample and place it in the drying chamber. Select the correct drying program for your sample as described. Start the measurement by pressing the „START“ key. After the measurement, the measured values will be available until they are deleted. - Page 19 To do so, press and hold the „RESET“ key for approx. 6 seconds. The display shows „-CAL-“. After the “-CAL-” indication, “100.00 g” will flash. Now place the 100 g calibration weight in the middle of the weighing platform. The indication will change from “100.00 g” to “=====”. When the indication changes from “=====”...
-
Page 20: Troubleshooting
7.5 Troubleshooting Error code Error cause Possible solution Put more than 1 g of the sample on Err 1 Sample weight below 1 g the balance and start the measurement. Err 2 Temperature setting below +40 °C Restart the balance. Measuring time setting below Err 3 Restart the balance. -
Page 21: Limitation Of Liability
Any technical modifications reserved. Dealers and employees of Schaller GmbH are not authorised to grant changes or additional warranty periods beyond the warranty, neither verbally nor in writing. 10 Disposing of the device... -
Page 22: Notes
11 Notes Page 22... - Page 23 Page 23...
- Page 24 Messtechnik / humimeter.com Schaller GmbH Max-Schaller-Straße 99, A - 8181 St. Ruprecht an der Raab Tel +43 (0)3178 - 28899 , Fax +43 (0)3178 - 28899 - 901 info@humimeter.com, www.humimeter.com...
Need help?
Do you have a question about the G110 and is the answer not in the manual?
Questions and answers