Advertisement
Quick Links
POWERFUL SOLUTIONS. GLOBAL FORCE.
L1679
Rev. E
To Protect Your Warranty, Use Only ENERPAC Hydraulic Oil.
Enerpac recommends that all kit components be installed to insure optimum performance of the repaired product.
1.0 Remove Swing Clamp from Hydraulic System
1. Shut down operation and release hydraulic pressure
at the power source and holding valve (if used).
2. Disconnect the hydraulic line from the swing clamp.
Wipe off excess oil.
3. Detach the swing clamp from its mounting by
removing two bolts.
2.0 Disassemble the Swing Clamp
1. Remove one retaining ring from the fulcrum pin and
pull pin out to free the clamping arm.
2. Remove clamping arm and spring from swivel fulcrum.
Mark the position of the spring on the fulcrum for
future reference.
3. Loosen set screw enough to remove cover.
WARNING: Cover is installed under slight spring
pressure. Remove cover carefully to avoid injury.
4. Unscrew end plug and remove o-ring. Tap body
lightly to remove plunger. Remove retaining ring,
washer, plunger spring, o-ring, and back-up ring from
the plunger. Discard o-ring and back-up ring.
5. Remove closure disc from the swivel fulcrum by
tapping sharply on the fulcrum until the disc comes
off. Remove swivel fulcrum through hole at bottom of
swing clamp body.
6. Unscrew plunger housing from the swing clamp
body. (For ASC-100: Remove snap ring from the
plunger housing.) Remove plunger housing, internal
spring, external spring, clamp plunger, and spring
washer from the body.
7. Remove retaining ring to free check valve assembly,
return spring, and o-ring. Do not discard retaining
ring.
8. Remove felt ring (ASC-100 only), o-rings, and back-up
rings and discard.
.
03/11
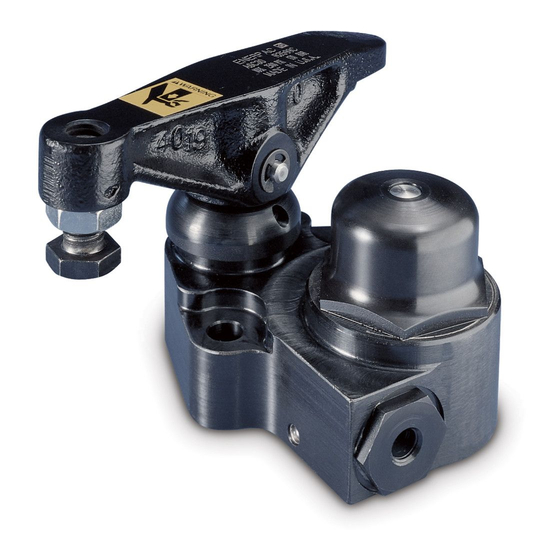
Repair Parts Sheet
ASC-30 and ASC-100
Swing Clamp
ASC-30 – For Date Codes Beginning with the Letter "S"
ASC-100 – For Date Codes Beginning with the Letter "W"
3.0 Clean and Inspect the Parts
1. Use OSHA approved degreasing solvent to clean the
parts thoroughly. Blow them dry with clean moisture-
free air and place them on a lint-free area
2. Inspect all parts for wear. Replace if necessary.
3. Replace the felt ring, o-rings, and back-up rings with
new ones from the Repair Kit.
4.0 Re-Assemble the Swing Clamp
1. Re-assemble the unit. It may require slight hammering
when installing the closure disc.
2. Use new parts from the Enerpac Repair Kit. Use all
parts in the Repair Kit. DO NOT reinstall used seals.
3. Be sure all parts to be assembled are clean. Do not
allow debris or contaminants to enter the unit.
See notes on page 2.
Advertisement

Related Manuals for Enerpac ASC-30


Summary of Contents for Enerpac ASC-30
- Page 1 ASC-100 – For Date Codes Beginning with the Letter “W” To Protect Your Warranty, Use Only ENERPAC Hydraulic Oil. Enerpac recommends that all kit components be installed to insure optimum performance of the repaired product. 1.0 Remove Swing Clamp from Hydraulic System 1.
- Page 2 NOTES: 1. Operating pressure is 1200 to 2500 psi. 2. ASC-30 only: Use thread sealant on plunger housing threads (Item 24). ASC-30 - Side View Cutaway ASC-100 - Side View Cutaway ASC-30 - Top View Cutaway ASC-100 - Top View Cutaway...
- Page 3 Repair Parts List Item Model ASC-30 Model ASC-100 Qty. Description 401809 401499 Retaining Ring 401816 401807 Plunger ★ B1110564 ★ B1113564 Back-Up Washer ★ B1008503 ★ B1011503 O-ring 401483 Washer 401815 DA1985044 Retaining Ring 401465 403046 End Plug ★ B1908503 ★...
- Page 4 Rep. office Enerpac For the location of your nearest authorized T +86 10 845 36166 Russian Federation Enerpac Integrated Solutions B.V. Enerpac Service Center, visit us at F +86 10 845 36220 Admirala Makarova Street 8 Opaalstraat 44 www.enerpac.com sales-cn@enerpac.com...
Need help?
Do you have a question about the ASC-30 and is the answer not in the manual?
Questions and answers