clage GERMAN POOL FXS3 User Manual
Remote control kit
Hide thumbs
Also See for GERMAN POOL FXS3:
- Operating and installation instructions (24 pages) ,
- Operating and installation instructions (28 pages)
Chapters
Table of Contents

Subscribe to Our Youtube Channel
Related Manuals for clage GERMAN POOL FXS3


Summary of Contents for clage GERMAN POOL FXS3
- Page 1 Remote Control Kit FXS3 Online Warranty Registration Please read these instructions and warranty information carefully before use and keep them handy for future reference. U S E R M A N U A L FXS3-M-22(6) Printed in Germany...
-
Page 2: Safety Instructions
Safety Instructions • This remote control may only be installed and started up for the first time by an authorized specialized company. Responsibility for compli- ance with the applicable standards and installation regulations rests entirely on the company installing the appliance. We cannot accept any liability for damage and losses due to noncompliance with these instructions. - Page 3 Safety Instructions • When the remote control is not to be used in the long term, remove the batteries. • Do not expose the remote control to moisture. • Keep the remote control and wall bracket away from credit cards or other cards with magnetic strips.
-
Page 4: 目錄 安全守則
安全守則 • 本遙控器必須由獲授權的專業公司進行安裝及首次啟動。安裝 公司負責依據相應的標準及安裝條例來安裝此熱水器。本公司 不承擔任何因未遵守安裝指示而引起的傷害或損失責任。啟動 遙控裝置前,請詳細閱讀本手冊。 • 本熱水器和遙控器操作方便合理。每次啟動熱水器,將沿用上 次的溫度設定。請確認沒有因疏忽大意而設定過高溫度的情 況。我們建議啟動溫度限制功能(參見熱水器使用手冊)。 • 電池電量不足可能導致洩漏和遙控器損壞。因此,一旦顯示屏 電池信號燈點亮,或者按鍵後無反應,請立即更換電池。 • 如遙控器長期不使用,請取出電池。 • 切勿將遙控器暴露於潮濕環境。... - Page 5 安全守則 • 遙控器和掛接背板不可太靠近信用卡等附磁條的物品,否則內 嵌磁鐵可能會破壞卡片磁條。 • 凡在有適當監督或指導下,3歲或以上兒童及身體、感官或心理 障礙者或經驗及知識不足者,亦可使用本款遙控器。應對兒童 進行妥善照管,避免其隨意觸碰遙控器。禁止兒童在未經適當 監督的情況下清潔或保養設備。...
-
Page 6: 目錄 安全守則
安全守則 • 本遙控器必須由獲授權的專業公司進行安裝及首次啟動。安裝 公司負責依據相應的標準及安裝條例來安裝此熱水器。本公司 不承擔任何因未遵守安裝指示而引起的傷害或損失責任。啟動 遙控裝置前,請詳細閱讀本手冊。 • 本熱水器和遙控器操作方便合理。每次啟動熱水器,將沿用上 次的溫度設定。請確認沒有因疏忽大意而設定過高溫度的情 況。我們建議啟動溫度限制功能(參見熱水器使用手冊)。 • 電池電量不足可能導致洩漏和遙控器損壞。因此,一旦顯示屏 電池信號燈點亮,或者按鍵後無反應,請立即更換電池。 • 如遙控器長期不使用,請取出電池。 • 切勿將遙控器暴露於潮濕環境。... - Page 7 安全守則 • 遙控器和掛接背板不可太靠近信用卡等附磁條的物品,否則內 嵌磁鐵可能會破壞卡片磁條。 • 凡在有適當監督或指導下,3歲或以上兒童及身體、感官或心 理障礙者或經驗及知識不足者,亦可使用本款遙控器。應對兒 童進行妥善照管,避免其隨意觸碰遙控器。禁止兒童在未經適 當監督的情況下清潔或保養設備。...
-
Page 8: Table Of Contents
Table of Contents Safety Instructions ..................1. Description Of Appliance ................ 2. Dimensions ....................3. Technical Specification ................4. Installation ....................5. Initial Operation ..................6. Handling ....................7. Displayed Information ................8. Communication Of The Remote Control ..........9. Battery Replacement ................10. -
Page 9: Description Of Appliance
1. Description Of Appliance • The FXS 3 remote control set consists of the FX 3 remote control and the FXE 3 radio adapter. The FX 3 remote control allows a convenient operation of the instantaneous water heater even if the heater is installed under a sink or in a secondary room. An energy-efficient and adequate choice of the water temperature is furthermore possible under these conditions with the FX 3 remote control. -
Page 10: Dimensions
2. Dimensions Dimensions (in mm) P.10... -
Page 11: Technical Specification
3. Technical Specification Model FXS 3 Operating voltage Type of battery 2 × AAA Alkaline Protection Rating IP 20 Transmission range 10 metres incl. barrier Transmission power ≤ 8 mW Radio frequency range 2.4 – 2.4385 GHz Signal Transmission Undirected Approvals Europe EN 300 328 / CE NOTE: 1) Do not use rechargeable batteries. -
Page 12: Installation
4. Installation 1. Mounting the Wall Bracket NOTE: Before attaching the wall bracket to the wall, ensure that the remote control has radio contact to the instantaneous water heater from its designated position. • The wall bracket of the remote control can either be attached securely with the included adhesive tape, after stripping off the protection film (as shown in fig. - Page 13 4. Installation 2. Mounting the Bluetooth Adapter (as shown in fig.3) Attention! • Before assembling the Bluetooth adapter, disconnect the instantaneous water heater from the mains supply! • The adapter antenna is very fragile! Please be careful when mounting it. Figure 3 P.13...
- Page 14 4. Installation Step 1 Step 2 Step 3 Remove the electronics cover Release the PCB from the Connect the Bluetooth adapter. catch and lift it slightly (Pay attention to the proper position of the connector!) P.14...
- Page 15 4. Installation Scan QR code to watch adaptor installation video Step 4 Step 5 Snap the PCB back into place Attach the electronics cover. Adaptor installation completed. P.15...
-
Page 16: Initial Operation
5. Initial Operation 1. Make sure that the power supply to the instantaneous water heater is switched on (fuse) and that the display (if available) of the instantaneous water heater shows the latest set value. 2. After inserting the batteries, the remote control briefly displays all symbols. Then “8A” and the percentage of battery charge are displayed and the display changes to the PIN entry “P1”... - Page 17 5. Initial Operation Note: • If registration is unsuccessful, the display shows “E1”. The remote control quits the registration process and switches to standby mode. Repeat the registration process by pressing any button on the remote control. • If the registration is still unsuccessful after a number of trials, check the pinning position of the radio adapter.
-
Page 18: Handling
6. Handling The remote control is equipped with the following functions: 1. Temperature Buttons You can set the required temperature gradually to a lower or higher value using the two buttons Note: If the temperature display is set to “--” with button, the instantaneous water heater switches off the heating function. - Page 19 6. Handling 3. Restart and Battery Capacity Press and hold for approx. 5 seconds to restart the remote control. All symbols are briefly, followed by the battery display. displayed 4. Info menu Press and hold the programme keys for about 5 seconds to open the info menu. Press briefly to navigate back and forth in the displays.
-
Page 20: Displayed Information
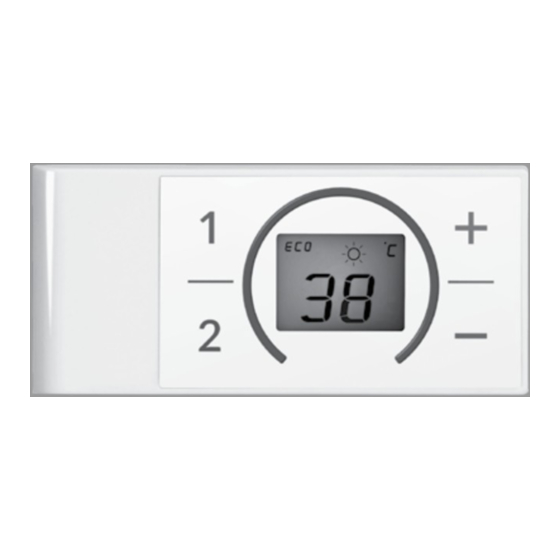
7. Displayed Information The representation corresponds to the temperature display of the instantaneous water heater display after a keystroke on the remote control. The description of the function can be found in the manual of the instantaneous water heater. Radio Communication This radio symbol is displayed on the remote control, if a button is pressed or the initial operation is in process. -
Page 21: Communication Of The Remote Control
8. Communication Of The Remote Control • The remote control contacts the instantaneous water heater in regular intervals. In case of a temperature change at the instantaneous water heater or a water tapping without a previous key press on the remote control, the updated information on the display of the remote control may be shown with a slight delay. -
Page 22: Battery Replacement
9. Battery Replacement Replace the batteries with new AAA-batteries when the battery symbol flashes up. • Do not use rechargeable batteries! • Non-rechargeable batteries are not to be recharged. • Different types of batteries or new and used batteries are not to be mixed. •... -
Page 23: Troubleshooting And Service
10. Troubleshooting And Service The following table will help you to determine and rectify the reasons for possible problems. Problem Cause Solution Remote control is not registered Register again, remove and insert Display: “E1” and at the instantaneous water heater the batteries again. - Page 24 目錄 ....................... 安全守則 ....................遙控器簡介 ......................尺寸 ....................技術規格 ......................安裝 ....................初始操作 ....................使用方法 ..................遙控顯示資訊 ....................遙控器接收 ....................電池更換 .................. 故障排除與維修 ....................保用條款 P.24...
-
Page 25: 遙控器簡介
1. 遙控器簡介 • FXS3遙控器套裝由FX3遙控器和FXE3無線電適配器組成。FX3遙控器能確保即熱式電熱水器即 使安裝在水槽下方或隔壁房間仍可方便操作。在此情況下,可通過FX3遙控器設定不同的熱水 溫度,以達至最佳節能效果。 • 遙控器會以藍芽與即熱式電熱水器連結。此技術確保當熱水器安裝在難以觸及的位置時,數據 傳輸也會能精準無誤。 • 將遙控器連接即熱式熱水器,需安裝所提供的無線電適配器(DSN型號除外)。 P.25... - Page 26 2. 尺寸 單位: 毫米 P.26...
-
Page 27: 技術規格
3. 技術規格 FX S3 型號 工作電壓 2 × AAA 鹼性 電池類型 IP 20 防護級別 傳輸範圍 無障礙10米,有障礙10米 ≤ 8 mW 傳輸功率 2.4 – 2.4385 GHz 射頻範圍 射頻 全方位 Europe EN 300 328 / CE 認證 注意:1)不得使用充電電池。 • 所有資料僅供參考,如有錯漏以廠方生產的規格為準。產品規格及設計如有變更, 恕不另行通知。 • 中英文版本如有出入,一概以英文版為準。 • 本產品使用說明書以www.germanpool.com網上版為最新版本。 P.27... - Page 28 4. 安裝 1.掛接背板安裝 • 將掛接背板裝於牆上之前,請確定遙控器的安裝位 置能讓即熱式電熱水器接收到其無線電訊號。 • 遙控器掛接背板可以用隨附的雙面膠貼,撕掉保護 膜(如圖1所示),貼在光滑的平面上(如瓷磚) Ø ,也可用固定銷( 4mm)和螺絲固定(如圖2所 示)。 圖1:用雙面膠貼安裝 • 用雙面膠貼固定時,由於這種膠貼粘性超強,貼 上後無法進行位置的調整。因此,粘貼時要注意水 平對齊。 • 遙控器是以磁性吸附在掛接背板上。 圖2:可選擇用固定銷和螺絲安裝 P.28...
- Page 29 4. 安裝 2.安裝藍芽適配器(圖3) 注意! • 安裝藍芽適配器前,必須關掉 即熱式熱水器的電源! • 請小心安裝適配器,避免損 壞產品。 圖3 P.29...
- Page 30 4. 安裝 步驟 1 步驟 2 步驟 3 打開電子組件蓋面 按下PCB扣位並輕輕提起PCB 穩妥插入適配器 (注意連接器的正確位置) P.30...
- Page 31 4. 安裝 掃描二維碼觀看 適配器安裝影片 步驟 5 步驟 4 裝回電子組件蓋面,適配器 將PCB推入扣緊 安裝完成 P.31...
-
Page 32: 初始操作
5. 初始操作 1. 確定熱水器電源處於接通狀態(保險絲) ,且熱水器的顯示屏(如適用)顯示最新的設定值。 2. 裝入電池後,遙控器上所有標誌會短暫亮起,然後顯示「 8A 」及電量%,並顯示 「 P1」示意輸入密碼。 3. 輸入藍芽密碼(即熱式熱水器銘牌左下角BLE後的數值)頭四個數字,按 確認。 4. 按 及 更改當前數位密碼。按 前進到下個數位。更改第四個數位「P4」後,按 ,密 碼輸入完成。 5. 輸入密碼後,遙控器自動連接到即熱式熱水器,註冊程序期間,顯示屏顯示「D1」 。如果 無線電範圍內有多於一部即熱式熱水器,顯示屏會顯示「d2…d3…」,代表天線範圍內有多於 一部即熱式熱水器。整個過程可能需時一分鐘,為加快註冊,請將遙控器直接放在需要註冊的 熱水器前方。 6. 連接成功後,遙控器顯示當前設定值。 P.32... - Page 33 5. 初始操作 注意! •如果註冊不成功,顯示屏顯示「E1」。遙控器退出註冊程序,進入待機模式。按遙控器任何 按鍵重新註冊。 •如遙控器未註冊或者無線電連接未成功,熱水器將加熱至之前設定的水溫。 •更換電池後,無須重新註冊。 •如果重覆多次仍未能成功註冊,請檢查藍芽適配器是否安插妥當。 •如果即熱式熱水器發出提示聲,代表軟件正在更新。 重新註冊遙控器 要將遙控器註冊至另一部即熱即熱水器,同時長按遙控器上的4顆按鍵5秒,重新進行「初始 操作」模式。重覆步驟3-6連接新的熱水器。 P.33...
-
Page 34: 使用方法
6. 使用方法 遙控器具有以下功能: 1. 溫度鍵 您可以通過 和 鍵逐步降低或提高水溫。 注:如果用 鍵將溫度設定至「--」,熱水器將停止加熱。 2. 程式鍵 通過兩個程式鍵 和 ,可以讓用家在無須重覆地按 和 鍵的情況下,快速選擇預設水 溫。 程式鍵 的出廠設定溫度為35℃,程式鍵 的出廠設定溫度為48℃。用家可以為程式鍵重 新設定自己想要的溫度: .通過 和 選擇想要的溫度。 .長按程式鍵 或 約2秒,儲存當前溫度。 3. 重啟遙控器及電量顯示 同時長按 和 約5秒,重啟遙控器。遙控器顯示屏短暫顯示所有標誌,然後顯示電池電量。 P.34... - Page 35 6. 使用方法 4. 信息選單 同時長按程式鍵 及 約5秒進入選單。短按 或 選擇項目。再次同時長按 及 約5秒退 出選單。 選單顯示: 信息選單 最高功率(kW) 當前電量(%) 校準值 當前錯誤狀態 訊號強度(%) 入水溫度(℃) 軟件版本數值1 出水溫度(℃) 軟件版本數值2 可選擇最高水溫(℃) 軟件版本數值3 當前水流量(升/分鐘) 密碼第1及2位數值 當前耗電量(kW) 密碼第3及4位數值 當前耗電量(%) P.35...
-
Page 36: 遙控顯示資訊
7. 遙控顯示資訊 按任何鍵一次,遙控器顯示屏顯示與即熱式熱水器溫度顯示屏一致的畫面。功能說明可在即熱式 電熱水器使用手冊中查找。 無線接收 按任何鍵或初始操作進行時,無線接收標誌 會出現在遙控器的屏幕上。 電池 當遙控器電池無電時,電池標誌 會亮起。請盡快更換新的電池(參閱「電池更換」部分)。 ECO節能模式 標誌表示熱水器以節能模式運作,即當刻的能源消耗率是依據節能模式的溫度和水流決定。 功率極限 若即熱式電熱水器在最高功率運行的情況下不足以將水加熱至所需溫度,顯示屏將顯示 標誌。 使用預熱來水 若入水溫度高於設定的出水溫度,熱水器將不會加熱。這種情況下加熱系統關閉,FX3顯示屏顯示 標誌。 P.36... -
Page 37: 遙控器接收
8. 遙控器接收 • 遙控器會定期與即熱式熱水器進行連接。如果熱水器上的溫度改變,或沒有在遙控器上按鍵而 打開水龍頭,遙控器顯示屏上的更新信息可能會稍有延遲地顯示出來。 • 如果無線連接未成功,熱水器將加熱至之前設定的水溫。 P.37... -
Page 38: 電池更換
9. 電池更換 電池標誌 亮起時,須更換新的3A電池。 • 不可使用充電電池! • 非充電電池不可充電。 • 不同類型的電池,或新舊電池,不可混用。 • 安裝電池時,請留意電池方向。 廢棄處置 電池可能含有對環境有害的物質。因此,廢棄電池必須在專門的收集點處理,不得與普通家庭生活 垃圾混放。 當遙控器達到使用壽命時,電池必須與設備分開處理。 P.38... -
Page 39: 故障排除與維修
10. 故障排除與維修 下表有助用家確定可能的故障原因並予以排除。 故障 原因 排除方法 遙控器未註冊 重新註冊,拆出電池再裝入 顯示:「E1」,熱水器 將遙控器稍為靠近熱水器,再次 對遙控器無反應 超出傳輸範圍 按鍵 顯示:「D1」 正在註冊 將遙控器近距離對正熱水器前方 電池電量不足 裝入兩節新的3A電池 「 」標誌亮起 另一個遙控器或Smart Control應用 溫度無故改變 只註冊所需的遙控器 程式正連接到熱水器 等待數分鐘後重新註冊(參考第5 顯示「E2」 多次錯誤輸入密碼 章) ,重新輸入正確密碼 更換新電池。如果多次重覆出現此代 顯示「E9」 連接錯誤 碼,請聯絡客戶服務及維修中心 維修必須由授權專業技術員進行。 如果問題仍無法排除,請聯繫德國寶客戶服務及維修中心。 P.39... - Page 40 目錄 安全守則 ..........................遙控器簡介 ........................尺寸 ..........................技術規格 ........................安裝 ..........................初始操作 ........................使用方法 ........................遙控顯示資訊 ......................遙控器接收 ......................... 電池更換 ........................故障排除與維修 ....................保用條款 ........................P.40...
-
Page 41: 遙控器簡介
1. 遙控器簡介 • FXS3遙控器套裝由FX3遙控器和FXE3無線電適配器組成。FX3遙控器能確保即熱式電熱水器 即使安裝在水槽下方或隔壁房間仍可方便操作。在此情況下,可通過FX3遙控器設定不同的熱 水溫度,以達至最佳節能效果。 • 遙控器會以藍芽與即熱式電熱水器連結。此技術確保當熱水器安裝在難以觸及的位置時,數據 傳輸也會能精準無誤。 • 將遙控器連接即熱式熱水器,需安裝所提供的無線電適配器(DSN型號除外)。 P.41... - Page 42 2. 尺寸 單位: 毫米 P.42...
-
Page 43: 技術規格
3. 技術規格 型號 FX S3 工作電壓 3 V 電池類型 2 × AAA 鹼性 防護級別 IP 20 傳輸範圍 無障礙10米,有障礙10米 ≤ 8 mW 傳輸功率 射頻範圍 2.4 – 2.4385 GHz 射頻 全方位 認證 Europe EN 300 328 / CE 注意:1)不得使用充電電池。 • 所有資料僅供參考,如有錯漏以廠方生產的規格為準。產品規格及設計如有變更, 恕不另行通知。 • 中英文版本如有出入,一概以英文版為準。 • 本產品使用說明書以www.germanpool.com網上版為最新版本。 P.43... - Page 44 4. 安裝 1.掛接背板安裝 • 將掛接背板裝於牆上之前,請確定遙控器的安裝位 置能讓即熱式電熱水器接收到其無線電訊號。 • 遙控器掛接背板可以用隨附的雙面膠貼,撕掉保護 膜(如圖1所示),貼在光滑的平面上(如瓷磚) Ø ,也可用固定銷( 4mm)和螺絲固定(如圖2 所示)。 圖1:用雙面膠貼安裝 • 用雙面膠貼固定時,由於這種膠貼粘性超強,貼 上後無法進行位置的調整。因此,粘貼時要注意水 平對齊。 • 遙控器是以磁性吸附在掛接背板上。 圖2:可選擇用固定銷和螺絲安裝 P.44...
- Page 45 4. 安裝 2.安裝藍芽適配器(圖3) 注意! • 安裝藍芽適配器前,必須關掉 即熱式熱水器的電源! • 請小心安裝適配器,避免損 壞產品。 圖3 P.45...
- Page 46 4. 安裝 步驟 1 步驟 2 步驟 3 打開電子組件蓋面 按下PCB扣位並輕輕提起PCB 穩妥插入適配器 (注意連接器的正確位置) P.46...
- Page 47 4. 安裝 掃描二維碼觀看 適配器安裝影片 步驟 5 步驟 4 裝回電子組件蓋面,適配器 將PCB推入扣緊 安裝完成 P.47...
-
Page 48: 初始操作
5. 初始操作 1. 確定熱水器電源處於接通狀態(保險絲) ,且熱水器的顯示屏(如適用)顯示最新的設定值。 2. 裝入電池後,遙控器上所有標誌會短暫亮起,然後顯示「8A」及電量%,並顯示「P1」示 意輸入密碼。 3. 輸入藍芽密碼(即熱式熱水器銘牌左下角BLE後的數值)頭四個數字,按 確認。 4. 按 及 更改當前數位密碼。按 前進到下個數位。更改第四個數位「P4」後,按 ,密碼輸入完成。 5. 輸入密碼後,遙控器自動連接到即熱式熱水器,註冊程序期間,顯示屏顯示「D1」 。如果 無線電範圍內有多於一部即熱式熱水器,顯示屏會顯示「d2…d3…」,代表天線範圍內 有多於一部即熱式熱水器。整個過程可能需時一分鐘,為加快註冊,請將遙控器直接放在 需要註冊的熱水器前方。 6. 連接成功後,遙控器顯示當前設定值。 P.48... - Page 49 5. 初始操作 注意! •如果註冊不成功,顯示屏顯示「E1」。遙控器退出註冊程序,進入待機模式。按遙控 器任何按鍵重新註冊。 •如遙控器未註冊或者無線電連接未成功,熱水器將加熱至之前設定的水溫。 •更換電池後,無須重新註冊。 •如果重覆多次仍未能成功註冊,請檢查藍芽適配器是否安插妥當。 •如果即熱式熱水器發出提示聲,代表軟件正在更新。 重置遙控器 要將遙控器註冊至另一部即熱即熱水器,同時長按遙控器上的4顆按鍵5秒,重置遙控器及重 新進行「初始操作」模式。 P.49...
-
Page 50: 使用方法
6. 使用方法 遙控器具有以下功能: 1. 溫度鍵 您可以通過 和 鍵逐步降低或提高水溫。 注:如果用 鍵將溫度設定至「--」,熱水器將停止加熱。 2. 程式鍵 通過兩個程式鍵 和 ,可以讓用家在無須重覆地按 和 鍵的情況下,快速選擇預設 水溫。 程式鍵 的出廠設定溫度為35℃,程式鍵 的出廠設定溫度為48℃。用家可以為程式鍵 重新設定自己想要的溫度: .通過 和 選擇想要的溫度。 .長按程式鍵 或 約2秒,儲存當前溫度。 3. 重啟遙控器及電量顯示 同時長按 和 約5秒,重啟遙控器。遙控器顯示屏短暫顯示所有標誌,然後顯示電池電量。 P.50... - Page 51 6. 使用方法 4. 信息選單 同時長按程式鍵 及 約5秒進入選單。短按 或 選擇項目。再次同時長按 及 約 5秒退出選單。 選單顯示: 信息選單 最高功率(kW) 當前電量(%) 校準值 當前錯誤狀態 訊號強度(%) 入水溫度(℃) 軟件版本數值1 出水溫度(℃) 軟件版本數值2 可選擇最高水溫(℃) 軟件版本數值3 當前水流量(升/分鐘) 密碼第1及2位數值 當前耗電量(kW) 密碼第3及4位數值 當前耗電量(%) P.51...
-
Page 52: 遙控顯示資訊
7. 遙控顯示資訊 按任何鍵一次,遙控器顯示屏顯示與即熱式熱水器溫度顯示屏一致的畫面。功能說明可在即熱式 電熱水器使用手冊中查找。 無線接收 按任何鍵或初始操作進行時,無線接收標誌 會出現在遙控器的屏幕上。 電池 當遙控器電池無電時,電池標誌 會亮起。請盡快更換新的電池(參閱「電池更換」部分)。 ECO節能模式 標誌表示熱水器以節能模式運作,即當刻的能源消耗率是依據節能模式的溫度和水流決定。 功率極限 若即熱式電熱水器在最高功率運行的情況下不足以將水加熱至所需溫度,顯示屏將顯示 標誌。 使用預熱來水 若入水溫度高於設定的出水溫度,熱水器將不會加熱。這種情況下加熱系統關閉,FX3顯示屏顯示 標誌。 P.52... -
Page 53: 遙控器接收
8. 遙控器接收 • 遙控器會定期與即熱式熱水器進行連接。如果熱水器上的溫度改變,或沒有在遙控器上按鍵而 打開水龍頭,遙控器顯示屏上的更新信息可能會稍有延遲地顯示出來。 • 如果無線連接未成功,熱水器將加熱至之前設定的水溫。 P.53... -
Page 54: 電池更換
9. 電池更換 電池標誌 亮起時,須更換新的3A電池。 • 不可使用充電電池! • 非充電電池不可充電。 • 不同類型的電池,或新舊電池,不可混用。 • 安裝電池時,請留意電池方向。 廢棄處置 電池可能含有對環境有害的物質。因此,廢棄電池必須在專門的收集點處理,不得與普通家庭生活 垃圾混放。 當遙控器達到使用壽命時,電池必須與設備分開處理。 P.54... -
Page 55: 故障排除與維修
10. 故障排除與維修 下表有助用家確定可能的故障原因並予以排除。 故障 原因 排除方法 遙控器未註冊 重新註冊,拆出電池再裝入 顯示:「E1」,熱水器 將遙控器稍為靠近熱水器,再次 對遙控器無反應 超出傳輸範圍 按鍵 顯示:「D1」 正在註冊 將遙控器近距離對正熱水器前方 電池電量不足 裝入兩節新的3A電池 「 」標誌亮起 另一個遙控器或Smart Control應 溫度無故改變 只註冊所需的遙控器 用程式正連接到熱水器 等待數分鐘後重新註冊(參考第5 顯示「E2」 多次錯誤輸入密碼 章) ,重新輸入正確密碼 更換新電池。如果多次重覆出現此代 顯示「E9」 連接錯誤 碼,請聯絡客戶服務及維修中心 維修必須由授權專業技術員進行。 如果問題仍無法排除,請聯繫德國寶客戶服務及維修中心。 P.55... -
Page 56: Warranty Terms & Conditions
Warranty Terms & Conditions 保用條款 Under normal operations, the product will gurantee a 1-year full 此保用提供德國寶產品之機件在正常使用下壹年保用 warranty provided by German Pool (effective from the date of (自購買日起計算)。 purchase). * This warranty is not valid until customer registration information * 貴戶須在購機十天內,以下列其中一種方式向本公司 is received by our Service Centre within 10 days of purchase 登記資料,保用手續方正式生效﹕... - Page 57 1. Customer who fails to present original purchase invoice will 1. 未能出示購買發票正本者,將不獲免費維修服務。 not be eligible for free warranty service. 2. 用戶應依照說明書的指示操作。本保用並不包括﹕ 2. Customer should always follow the operating instructions. This warranty does not apply to: - 上門安裝、檢驗、維修或更換零件之人工以及 - labour costs for on-site installation, check-up, repair, 一切運輸費用﹔...
- Page 58 Warranty Terms & Conditions 保用条款 Under normal operations, the product will receive a 1-year full 此保用提供德国宝产品之机件在正常使用下一年保用 warranty provided by German Pool (effective starting from the (自购买日起计算)。 date of purchase). * This warranty is not valid until Customer registration information 贵户须在购机十天内,以下列其中一种方式向本公司 is received by our Service Centre within 10 days of purchase 登记资料,保用手续方正式生效﹕...
- Page 59 1. Customer who fails to present original purchase invoice will 1. 未能出示购买发票正本者,将不获免费维修服务。 be disqualified for free warranty. 2. 用户应依照说明书的指示操作。本保用并不包括﹕ 2. Customer should always follow the operating instructions. This warranty does not apply to: - 上门安装、检验、维修或更换零件之人工以及 、 - labour costs for on-site installation, check-up, repair, 一切运输费用﹔...
- Page 60 G e r m a n P o o l ( H o n g K o n g ) L i m i t e d Hong Kong China Macau Room 113. Newport Centre Phase II. 116 Ma Tau 8th, Xinxiang Road, Wusha Industrial Park, 1 Andar A, Edf.
Need help?
Do you have a question about the GERMAN POOL FXS3 and is the answer not in the manual?
Questions and answers