dji Ronin-SC Quick Start Manual
Hide thumbs
Also See for Ronin-SC:
- Quick start manual (107 pages) ,
- User manual (30 pages) ,
- Product information (10 pages)
Table of Contents
Advertisement
Available languages
Available languages
Quick Links
Advertisement
Table of Contents

Related Manuals for dji Ronin-SC


Summary of Contents for dji Ronin-SC
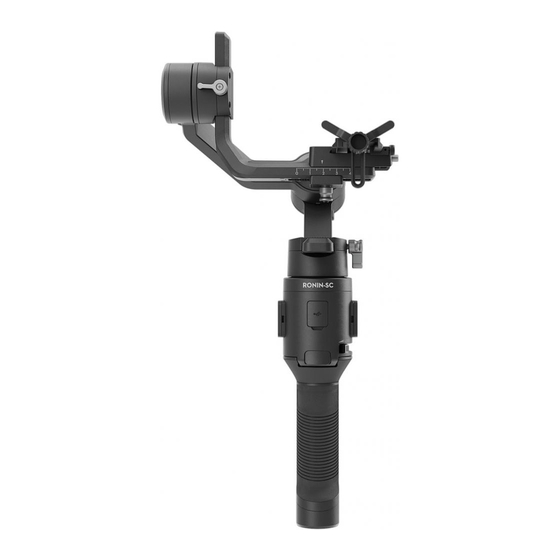
- Page 1 Ronin‐SC Quick Start Guide 2019.04 Ronin‐SC Overview 1. Tilt Motor 2. Tilt Axis Lock 3. Camera Control/Accessories Port (USB‐C) 4. Roll Motor 5. Roll Axis Lock 6. Pan Motor 7. Pan Axis Lock 8. Profile LED Indicators 9. Joystick 10. Camera Control Button 11. M Button ...
-
Page 2: Getting Started
18. Safety Lock 19. Camera Mounting Base 20. Power Port (USB‐C) 21. Trigger 22. Power Button Getting Started A.Download the DJI RONIN Appand watch the tutorials. Search for “Ronin” in the App Store or Google Play and follow the instructions to install the app. Watch the tutorials on the official DJI websites. https://www.dji.com/ronin‐sc B.Charge the battery. Charge the grip using the provided power cable and USB adapter (not included) through the power port. Press and hold the power button to turn on/off Ronin‐SC. Press the battery level ... -
Page 3: Mounting The Grip
Mounting the Grip The three axes of the gimbal are locked by default. Toggle the lock to the unlocked positions and adjust the gimbal to the positon as shown, and then lock the gimbal again. The Ronin‐SC’s ports are not waterproof. Ensure to protect them from dust and water during use to avoid damage. Attaching the Tripod ... -
Page 4: Mounting The Camera
Mounting the Camera Before mounting the camera, make sure it is prepared ahead of time. Remove the lens cap and make sure the camera's battery and memory card are already inserted. 1. Attach the riser plate (if needed) to the bottom of the camera using a flathead screwdriver or coin. 2. Attach the camera dovetail plate and lens support. The arrow and camera lens direction should be consistent. For the best results during setup, use the lens support whenever possible. 3. Loosen the knob on the bottom of the camera mounting base and then slide the camera into it. Tighten the knob when the camera is in the middle of the base. ... - Page 5 bottom heavy. c. Loosen the knob on the tilt motor and adjust the camera balance until the camera stays still without tilting up or down. d. Tighten the knob. 2. Balancing Depth for the Tilt Axis a. Rotate the tilt axis so that the camera lens is pointing forward. Check if the camera is top or bottom heavy. b. Loosen the knob under the camera mounting base and then adjust the camera balance until the camera stays still when rotating the tilt axis 45° upwards or downwards. c. Tighten the knob. The slider on the dovetail plate is used to record the balance positon, tighten the slider when it closed to the mounting base. 3. Balancing the Roll Axis a. Lock the tilt axis and then unlock the roll axis. Check the direction in which the roll motor swings. b. Loosen the knob on the camera mounting base, and then adjust the base positon until the camera stays still. c. Tighten the knob. If the camera moves forward by accident, move the camera backward until the slider is closed to the mounting base. ...
-
Page 6: Operation
4. Balancing the Pan Axis a. Unlock the three axes. Grab the grip, tilt Ronin‐SC sideways, and check for movement along the pan axis. b. Loosen the knob on the pan motor. Adjust the camera balance until the camera stays still when rotating the pan axis 45°while lifting the grip. c. Tighten the knob. Operation After installation, activation and balancing, Ronin‐SC can be used instantly after Auto Tune. There are two ways to perform Auto Tune. 1. Launch the Ronin app, go to the Motor page, and select Auto Tune. 2. Press and hold Ronin‐SC’s M button and trigger simultaneously for four seconds to start Auto Tune. ... -
Page 7: Specification
Joystick: push the joystick up or down to control the movement of the tilt axis, and push it left or right to control the movement of the pan axis. Go to the Joystick page of the Ronin app to adjust the parameters for the pan, tilt and, roll axes. Camera Control Button: after connecting the camera control port and camera, press halfway to auto focus, as you would for the shutter button on cameras. Press once to start/stop recording. Press and hold to take a photo. Please refer to Ronin‐SC product page (http://www.dji.com/ronin‐sc) for most updated Camera Compatibility List. Trigger: press and hold the trigger to enter Lock mode. Press twice to recenter the gimbal. Press three times to turn the gimbal 180° so that the camera faces you. Specification Weight Gimbal: Approx. 830 g Grip: Approx.258 g Tripod: Approx.160 g Dimensions Gimbal folded: 220×200×75 mm ... - Page 8 Ronin‐SC 퀵스타트가이드 2019.04 Ronin‐SC 개요 23. 틸트모터 24. 틸트축잠금장치 25. 카메라제어포트/액세서리전원포트(USB‐C) 26. 롤모터 27. 롤축잠금장치 28. 팬모터 29. 팬축잠금장치 30. 프로필 LED 표시기 31. 조이스틱 32. 카메라제어버튼 33. M 버튼 ...
- Page 9 38. 8 핀 39. M4 장착구멍 40. 안전잠금장치 41. 카메라마운팅플레이트 42. USB‐C 포트 43. 트리거 44. 전원버튼 시작 모바일앱을다운로드하고튜토리얼영상을시청합니다. A.DJI RONIN App Store 나 Google Play 에서 "Ronin"을검색하고지침에따라앱을설치합니다. DJI 공식웹사이트에있는튜토리얼영상을시청합니다. https://www.dji.com/ronin‐sc B.배터리를충전합니다. 제공된 케이블로 전원어댑터를(별매) 짐벌의 USB‐C USB USB‐C 포트에연결하여그립을충전합니다.짐벌전원버튼을길게눌러짐발을켜고끕니다. ...
- Page 10 그립장착 의전원/데이터포트와커넥터에는방수기능이없습니다. Ronin‐SC 손상을방지하기위해사용중에먼지나물에노출되지않도록주의하십시오. 확장그립연결 카메라장착 카메라를장착하기전에미리준비하십시오. 렌즈캡을분리하고카메라의배터리와메모리카드가삽입되어있는지확인합니다. ...
- Page 11 4. 일자드라이버또는동전을사용하여라이저플레이트를카메라의하단에장착합니다. 5. 카메라더브테일플레이트와렌즈서포트를장착합니다 6. 카메라를카메라마운팅베이스에밀어넣습니다. Ronin‐SC 활성화 5. 짐벌전원버튼을길게눌러짐발을켜고끕니다. 6. 모바일기기에서 를활성화하고 앱을실행합니다. Bluetooth Ronin Ronin‐SC 를선택하고기본 Bluetooth 암호인 12345678 을입력합니다. 7. 인터넷에연결한다음화면의지시에따라 Ronin‐SC 를처음으로활성화합니다. 8. 활성화후짐벌의전원버튼을두번탭하여진행하기전에모터를연결합니다. 균형조정 5. 수직틸트균형조정 e. 카메라렌즈가위를향하도록틸트축을돌립니다. 롤축이수평이되도록틸트축모터를고정하고카메라의상단또는하단이무거운지확인 합니다. 틸트모터의노브를풀어서카메라가위아래로틸트회전하지않고정지상태를유지할때...
- Page 12 6. 틸트축에대한깊이균형조정 d. 카메라렌즈가전방을향하도록틸트축을돌립니다 e. 틸트축을위또는아래로 45 도회전할때카메라가정지상태를유지할때까지카메라의균형을조정합니다. 노브를조입니다. 7. 롤축균형조정 d. 틸트축을잠급니다.롤축의잠금을풉니다. e. 롤축손잡이을풀고카메라균형를카메라가고정될때까지조정합니다. 노브를조입니다. 8. 팬축균형조정 ...
- Page 13 d. 그립을잡고 Ronin‐SC 를측면으로기울인다음팬축을따라움직임을확인합니다. e. 팬모터의노브를풉니다. 그립을올린상태에서팬축을 45° 회전할때카메라가정지상태를유지할때까지카메라의균형을조정합니다. 노브를조입니다. 조작 Auto Tune: Ronin 앱을실행하고 Motor 페이지로이동하여 Auto Tune 을선택합니다. 또는 Ronin‐SC 의 M 버튼과트리거를 4 초동안동시에눌러 Auto Tune 을시작할수도있습니다. 버튼기능 버튼: 사용자프로필을선택하려면한번누릅니다, M M 버튼을길게탭하여스포츠모드로진입합니다. 조이스틱: ...
- Page 14 사양 무게짐벌만: Approx. 830 g 그립: Approx.258 g 삼각대: Approx.160 g 크기접힌: 220×200×75 mm 펼치기: 370×165×150 mm 입력전원모델: RB2‐2450 mAh‐7.2 V 유형: 18650 LiPo 2S 용량: 2450 mAh 에너지: 17.64 Wh 작동전류정전류:0.2 A 작동온도 ‐4° to 113° F (‐20° to 45° C) ...
- Page 15 Ronin‐SC 快速入門指南 2019.04 認識 Ronin‐SC 45. 俯仰軸電機 46. 俯仰軸鎖 47. 相機控制/配件介面(USB‐C) 48. 橫滾軸電機 49. 橫滾軸鎖 50. 平移軸電機 51. 平移軸鎖 52. 配置指示燈 53. 搖杆 54. 相機控制按鍵 ...
- Page 16 61. M4 螺紋孔 62. 安全鎖 63. 相機安裝底座 64. 充電介面(USB‐C) 65. 模式切換按鍵 66. 電源按鍵 準備 A 下載 RONIN App 和觀看教學視頻 請在軟體商店或使用移動設備掃描二維碼下載。請在 DJI 官網觀看 Ronin‐SC 教學視頻。 https://www.dji.com/ronin‐sc B 充電 使用標配 USB‐C 線和 USB 充電器(用戶自備)給雲台充電。長按雲台電源按鍵開啟/關閉雲 台。短按電量查看按鍵,電量指示燈指示當前電量。 推薦使用規格為 5V/2A 的 USB 充電器。 ...
- Page 17 安裝手柄 雲台在出廠時鎖定在折疊狀態,安裝時請將三軸解鎖,並調整至上圖狀態後重新鎖 定,方便下一步操作。 Ronin‐SC 的電源/ 資料介面不防水,使用期間請注意防水、防塵,以免造成損壞。 安裝三腳架 安裝相機 安裝相機之前,確保相機已做好拍攝準備,鏡頭蓋已移除,電池及記憶體卡已安裝。 ...
- Page 18 1. 根據相機大小,視情況安裝墊高模組(使用一字螺絲刀或硬幣等工具) 。 2. 安裝相機底部安裝板和鏡頭固定支架(底部安裝板箭頭所指方向應與鏡頭方向一致,鏡 頭固定支架可幫助獲得更好的拍攝效果) 。 3. 擰松相機安裝底座底部旋鈕,將相機嵌入相機安裝底座,到達中間位置時擰緊旋鈕。 啟動 首次使用 Ronin‐SC 需連接 Ronin App 啟動。啟動步驟如下: 1. 長按電源按鍵開啟雲台。 2. 開啟移動設備藍牙功能。 3. 運行 Ronin App,在設備清單中選擇 Ronin‐SC 後輸入預設密碼 12345678,按提示啟動。 啟動過程中需連接網路。 4. 啟動雲台後,電機仍處於休眠狀態。請按兩下雲台電源按鍵以啟動電機,再進行操作。 平衡調節 拍攝前需要對雲台相機進行平衡調節。Ronin App 內置調平教學,可連接 Ronin‐SC 後按步驟 調平。調平步驟也可獨立進行(不需連接 Ronin App) 。 1. ...
- Page 19 2. 俯仰軸的前後平衡調節 a. 使相機鏡頭水準朝前,判斷相機重心偏向。 b. 擰松安裝底座底部旋鈕,前後調節相機位置。 c. 鎖緊旋鈕。使相機向上或向上傾斜 45°,若相機能穩定停留,表示已調節平衡。使相機安 裝板側邊的記憶塊緊貼安裝底座後擰緊,可記錄相機俯仰軸平衡位置、 3. 橫滾軸的平衡調節 a. 鎖定俯仰軸,解鎖橫滾軸,然後判斷相機重心偏向。 b. 擰松安裝底座旋鈕,左右調節相機位置。 c. 擰緊旋鈕。使相機向左或向右傾斜,若相機能穩定停留,表示已調節平衡。若調節橫滾 軸過程中相機前後位置改變,可通過記憶塊找回俯仰軸平衡位置。 ...
- Page 20 將三軸全部解鎖。握住雲台向前側斜,觀察相機在平移軸旋轉方向。 b. 擰松平移軸旋鈕,拉伸平移軸力臂調整相機位置。 c. 擰緊旋鈕,若雲台平移軸在任意角度都能保持靜止不動,表示已調節平衡。 使用 經過安裝、啟動以及調平後,Ronin‐SC 經過自動校準即可使用。自動校準有兩種方式: 1. 運行 Ronin App 進入電機設置頁面,選擇自動校準。 2. 同時按住雲台 M 按鍵與模式切換按鍵 4s。配置指示燈綠燈閃爍表示開始校準。 按鍵功能 M 按鍵:短按切換配置參數;長按 M 按鍵進入運動模式。 搖杆:上下推動搖杆控制俯仰軸運動,左右推動搖杆控制平移軸運動 (默認設置) 。進入 Ronin App 搖杆設置介面,可設置搖杆參數與配置通道。 相機控制按鍵:使用相機控制線連接雲台相機控制介面與相機後,半按壓相機控制按鍵自動 對焦;按壓相機控制按鍵開始或停止錄影;長按相機控制按鍵拍照。請訪問 http://www.dji.com/ronin‐s 瞭解相機相容列表以及支持功能。 模式切換按鍵:長按進入鎖定模式;按兩下雲台回中;三擊雲台進入自拍模式。 ...
- Page 21 規格參數 重量雲台:約 830 g 手柄:約 258 g 三腳架:約 160 g 尺寸雲台折疊:220×200×75 mm 工作狀態:370×165×150 mm 手柄內置電池型號:RB2‐2450 mAh‐7.2 V 類型:18650 LiPo 2S 容量:2450 mAh 能量:17.64 Wh 工作電流靜態電流:0.2 A 工作環境溫度 ‐20℃至 45℃ ...
-
Page 22: Compliance Information
Compliance Information FCC Compliance Notice This device complies with Part 15 of the FCC Rules. Operation is subject to the following two conditions: (1) This device may not cause harmful interference, and (2) This device must accept any interference received, including interference that may cause undesired operation. Any changes or modifications not expressly approved by the party responsible for compliance could void the user’s authority to operate the equipment. - Page 23 NCC Warning Message 低功率電波輻射性電機管理辦法 第十二條經型式認證合格之低功率射頻電機,非經許可,公司、商號或使用者均不得擅自變 更頻率、加大功率或變更原設計之特性及功能。 第十四條低功率射頻電機之使用不得影響飛航安全及干擾合法通信 ; 經發現有干擾現象時, 應改善至無干擾時方得繼續使用。前項合法通信,指依電信法規定作業之無線電通信。低功 率射頻電機須忍受合法通信或工業、科學及醫療用電波輻射性電機設備之干擾。 EU Compliance Statement: SZ DJI Osmo Technology Co., Ltd. hereby declares that this device is in compliance with the essential requirements and other relevant provisions of the Directive 2014/53/EU. A copy of the EU Declaration of Conformity is available online at www.dji.com/euro‐compliance EU contact address: DJI GmbH, Industriestrasse 12, 97618, Niederlauer, Germany Declaración de cumplimiento UE: SZ DJI Osmo Technology Co., Ltd. por la presente declara que este dispositivo cumple los requisitos básicos y el resto de provisiones relevantes de la Directiva 2014/53/EU Hay disponible online una copia de la Declaración de ...
- Page 24 : DJI GmbH, I ndustriestras sse 12, 97618 8, Niederlaue r, Germany Decl laração de co onformidade e da UE: A SZ Z DJI Osmo T Technology C Co., Ltd. decla ara, através d deste docu umento, que este dispos itivo está em m conformida ade ...
- Page 25 Envi ronmentally friendly dispo osal Old electrical ap pliances mus st not be disp posed of toge ether with th he residual w waste, but hav ve to be d isposed of se eparately. Th e disposal at the commun nal collecting g point via pr rivate pers ons is for free e. The owner r of old applia ances is respo onsible to bri ng the applia ances to th hese collecti ng points or r to similar c collection ...
- Page 26 Milie euvriendelijk afvoeren Oude e elektrische apparaten m mogen niet wo orden wegge egooid samen n met het restafval, m maar moeten n afzonderlij k worden a afgevoerd. ...
Need help?
Do you have a question about the Ronin-SC and is the answer not in the manual?
Questions and answers