Kärcher BV 5/1 Bp Quick Start Manual
Hide thumbs
Also See for BV 5/1 Bp:
- User manual (252 pages) ,
- Original instructions manual (248 pages) ,
- Manual (32 pages)
Advertisement
Table of Contents
BV 5/1 Bp Quick Start Guide
1
1
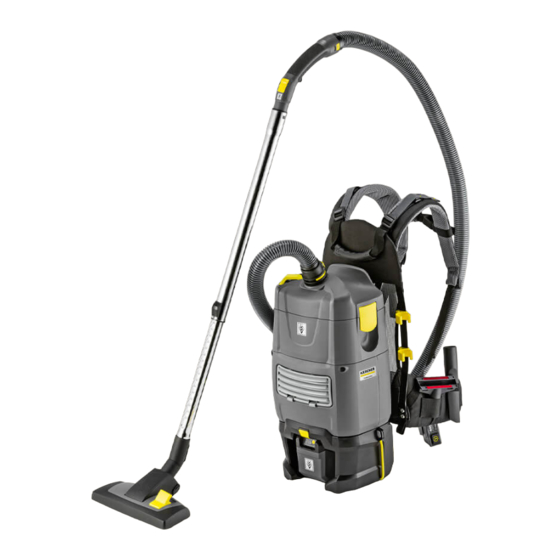
1 – The BV 5/1 Bp
vacuum should be
carried using the handle
at the top of the
harness. The floor tool
should be parked
correctly when not in
use as pictured above.
4
5
Kärcher Service Contact;03-366 1907, stating machine, serial number, fault description, site contact details
2
2 – To remove the
battery press the
yellow button and pull
the battery out.
To insert, simply slide
battery down into the
housing ensuring that it
locks into position
6
3
3 – The tube is extendable
for different use
requirements, extend or
collapse by simply
operating the locking
mechanism on the tube as
shown above.
4 – The operator needs to select the
correct position of the floor tool,
image 1 shows the change over
lever which switches the floor tool
between hard floor and carpet
vacuuming. (brushes extended or
retracted).
5 – The on off switch is located on
The Harness, the lights show how
much battery charge remains.
6 - Once it is turned on the machine
can switch between eco mode and
full power mode using the blue
button.
Advertisement
Table of Contents

Subscribe to Our Youtube Channel
Related Manuals for Kärcher BV 5/1 Bp


Summary of Contents for Kärcher BV 5/1 Bp
- Page 1 BV 5/1 Bp Quick Start Guide 1 – The BV 5/1 Bp 2 – To remove the 3 – The tube is extendable vacuum should be battery press the for different use carried using the handle yellow button and pull...
- Page 2 BV 5/1 BP Quick Start Guide 1 – The harness should be worn comfortably tight, it should sit high up on the back and hips, the harness is equipped with several adjustment points to ensure maximum comfort and productivity can be achieved.
- Page 3 BV 5/1 Bp Routine Maintenance To gain access to the filters and bag, the operator must first turn off the machine then, 1- Remove the hose by pressing the yellow bottom in and pull the hose out . 2 – Lift out the 2 yellow clips on either side of the machine to remove the lid.
Need help?
Do you have a question about the BV 5/1 Bp and is the answer not in the manual?
Questions and answers