BIXOLON XM7-30 Series User Manual
Hide thumbs
Also See for XM7-30 Series:
- Connection manual (14 pages) ,
- Installation manual (4 pages) ,
- Manual (48 pages)
Table of Contents
Advertisement
Quick Links
Advertisement
Table of Contents

Subscribe to Our Youtube Channel
Related Manuals for BIXOLON XM7-30 Series


Summary of Contents for BIXOLON XM7-30 Series
- Page 1 User’s Manual XM7-30 Series MOBILE PRINTER Ver. 1.00 http://www.bixolon.com...
-
Page 2: Table Of Contents
XM7-30 Series Table of Contents Copyright ..........................4 WARNING & CAUTION ....................... 7 Manual Introduction......................10 Product Introduction ....................... 11 1. Preparation ........................12 1-1 Components ........................12 1-2 Front Part Names ......................13 1-3 Rear Part Names ......................13 1-4 LCD Menu Names ...................... - Page 3 XM7-30 Series 4. Self-Test ......................... 33 4-1 Self-Test Instructions ...................... 33 4-2 Self-Test Sample ......................34 5. Cleaning ......................... 36 6. Appendix ........................37 6-1 Printer Specifications ...................... 37 Ver. 1.00 - 3 -...
-
Page 4: Copyright
It is strictly prohibited to copy, store, and transmit the whole or any part of the manual and any property of the product without the prior written approval of BIXOLON Co., Ltd. The information contained herein is designed only for use with this BIXOLON product. - Page 5 XM7-30 Series Compliance information This device complies with Part 15 of the FCC Rules. Operation is subject to the following two conditions: (1) This device may not cause harmful interference, and (2) This device must accept any interference received, including interference that may cause undesired operation.
- Page 6 XM7-30 Series Waste Electrical and Electric Equipment (WEEE) This marking shown on the product or its literature, indicates that is should not be disposed with other household wastes at the end of its working life, To prevent possible harm to the environment or human health from uncontrolled waste disposal, please separate this from other types of wastes and recycle it responsibly to promote the sustainable reuse of material resources.
-
Page 7: Warning & Caution
Do not connect multiple products to a Only use authentic products from single or faulty power outlet. BIXOLON. The company will not Use only grounded power outlets that provide post-sale support for meet the industry standard. - Page 8 Do not place heavy product, please contact the original objects, liquids, or metals on the place of purchase or through product. This could cause damage to BIXOLON website’s product repair the product or a fire. page (http://www.bixolon.com). Ver. 1.00 - 8 -...
- Page 9 The battery should only be charged using the adapter of the battery. Do not let metal contact the (+) and or charger provided by Bixolon, and if charging fails (-) terminals of the battery. If the (+) and (-) after the specified charging time (6 hours), stop terminals of the battery are smeared with charging.
-
Page 10: Manual Introduction
XM7-30 Series Manual Introduction The manual provides basic information on the printer and describes how to install, use, and inspect it. To ensure your safety and prevent damage to your property, make sure you read the manual thoroughly before using the machine. -
Page 11: Product Introduction
XM7-30 Series Product Introduction The XM7-30 is a 3-inch thermal mobile label printer which simultaneously connects with Bluetooth and WLAN. Ideal for smart mobility labelling due to its compact, lightweight design with an easy-to-open peeler and LCD. The main features of the printer are as follows 1. -
Page 12: Preparation
XM7-30 Series 1. Preparation 1-1 Components • If any items are missing, contact the place of purchase. • The image may differ from the actual product. Basic items ※ XM7-30 Smart Battery AC/DC Adapter Power Cord Media Disks Printer Belt Strap (for 12 mm (0.47 inch) -
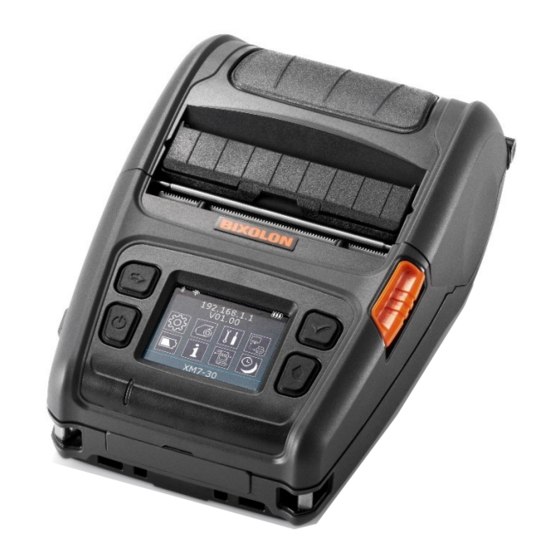
Page 13: Front Part Names
XM7-30 Series 1-2 Front Part Names Media Cover Peeler Menu Move Button Power Button Charge Indication LED Cover Open Button Menu Select Button Shoulder Strap Ring Media Feed Button Outer Terminal Cover 1-3 Rear Part Names Hole for mounting belt strap... -
Page 14: Lcd Menu Names
XM7-30 Series 1-4 LCD Menu Names • You can check printer status and setting information through LCD. 1-4-1 Top icon Icon Description Bluetooth is enabled but not connected to the host device Bluetooth is enabled and connected to the host device... -
Page 15: Main Menu Icon
XM7-30 Series 1-4-2 Main menu icon Icon Description Check / set the status of whole printer 1) Interface 2) Media 3) Sensor 4) Powersave 5) Language Media settings 1) Density 2) Position - Tear off - Print - Direction Tools 1) Hex dump 2) Print printer config →... - Page 16 XM7-30 Series Check printer information 1) Version - Printer, WLAN, Bluetooth 2) Bluetooth 3) WLAN 4) LAN 5) Battery 6) Repair Sensor settings 1) Media type - Auto detection / Rear black mark / Front black mark / Gap - Continueous...
-
Page 17: Installation & Connection
XM7-30 Series 2. Installation & Connection 2-1 Battery Installation 1) Insert the battery in the bottom of the printer, and ensure that you align the battery hook properly. 2) Push the battery into the slot until you hear it snap in place. -
Page 18: Battery Charging
Red LED Blinking or Reinstall Battery • Charge the battery only after disconnecting the power to your device. • Use only genuine products supplied by Bixolon. Otherwise, the product may malfunction or there is a risk of personal injury. Ver. 1.00... -
Page 19: Using Single Battery Charger (Optional)
4) Insert the battery ④ into the cradle ③ a snapping sound is heard. You must use the battery charger provided by BIXOLON to use the singles battery charger. (AC/DC adapter is not available) • Charge the battery only after disconnecting the power to your device. -
Page 20: Using Quad Battery Charger (Optional)
XM7-30 Series 2-2-3 Using Quad Battery Charger (Optional) 2-2-3-1 Connecting the cables 1) Connect the power cord to the Adapter, and connect the Adapter to the power port of the quad battery charger. 2) Plug the power cord into a AC power. - Page 21 XM7-30 Series 2-2-3-2 Charging Battery 1) Insert the battery into the Quad charger as shown in the figure on the left. 2) Gently slide the battery until it reaches the bottom of the charger. 3) Charging starts as soon as the battery is completely inserted.
-
Page 22: Media Installation
XM7-30 Series 2-3 Media Installation 1) Press the Open button to open the media cover. 2) After keeping the media holder wide as shown, in the figure insert the media as shown. (Remove the empty media core.) 3) Check the orientation of the media when inserting it into the printer. - Page 23 XM7-30 Series The specification of the media inner diameter of the standard media disks are 19 mm (0.75 inch). If you are using media with a smaller inner diameter, remove the media disks as shown below and replace it with the supplied 12 mm (0.47 inch) media disks.
-
Page 24: Bluetooth & Wireless Lan Connection
XM7-30 Series 2-4 Bluetooth & Wireless LAN Connection 1) The printer can be connected to devices equipped with Bluetooth communication capacity (PDAs, PCs, etc.). 2) Use the Bluetooth connection function supported by the device to connect to the printer. The NFC tag built into the printer enables automatic pairing with devices. -
Page 25: Interface Cable Connection
USB Type-C port Power port Serial/USB 14pin port (for the cable provided by BIXOLON(optional)) The interface cable that can be connected to the printer is Serial/USB cable provided by BIXOLON(optional) or USB Type-C cable supporting USB2.0. Ver. 1.00 - 25 -... -
Page 26: Fixed Interface Cable Connection
③ as shown in the figure. 4) Connect the interface cable to the USB port of the device (PDAs, PCs, etc.). ③ The fixed interface cable that can be connected to the printer is Serial/USB cable provided by BIXOLON(optional). Ver. 1.00 - 26 -... -
Page 27: Use
XM7-30 Series 3. Use 3-1 Using Peeler 1) Insert the media after open the peeler as shown. 2) Pull out the media after close the peeler as shown. Enable the peeler setting when using the peeler. Refer to “Sensor setting”... -
Page 28: Using Belt Strap
XM7-30 Series 3-2 Using Belt Strap Belt Strap 1) Insert the belt strap screw into the belt strap hole. Coin 2) Use a coin to tighten the belt strap screw as shown in the image. Belt 3) Open the velcro of the belt strap and hook the belt strap to the belt. -
Page 29: Using Shoulder Strap (Optional)
XM7-30 Series 3-3 Using Shoulder Strap (Optional) Please, insert hooks of the strap into each slot as shown in the picture. Ver. 1.00 - 29 -... -
Page 30: Using Fan-Fold Media
XM7-30 Series 3-4 Using Fan-Fold Media 3-4-1 Media Width 3-inch After keeping the media holder wide as shown in the figure, hold the media holder by lifting right guide holder as shown in the figure. 3-4-2 Media Width 3-inch FAN FOLD... -
Page 31: Separate The Fan-Fold Cap
XM7-30 Series 3-4-4 Separate the Fan-Fold Cap When using fan-fold media, remove the fan-fold cap beforehand. Ver. 1.00 - 31 -... -
Page 32: Using Control Button
XM7-30 Series 3-5 Using Control Button 3-5-1 Power Button This button is used to turn the printer on, off, to move to main menu or to operate the action. 1) When the printer is off, press this button for approximately 2 seconds to turn on the power. -
Page 33: Self-Test
XM7-30 Series 4. Self-Test Run the self-test to check the setting information when you are setting up the printer for the first time or if there is a problem. If no issue is found with the printer after running the self-test, examine the other devices or peripherals and software. -
Page 34: Self-Test Sample
XM7-30 Series 4-2 Self-Test Sample BIXOLON XM7-30 CONFIGURATION FIRMWARE VERSION : V01.00 STD 010118 EMULATION : SLCS & BPL-Z & BPL-C PRINT DARKNESS : 0/30 PRINT SPEED : 5 IPS TEAR OFF VALUE : +000 DOT TEAR OPTION : TEAR-OFF... - Page 35 XM7-30 Series (Bluetooth) (Wireless LAN) RF INTERFACE STATUS (BT) RF INTERFACE STATUS (WLAN) BLUETOOTH F/W VER : 2.0.4 WLAN F/W VER : 02.02(4002) MAC ADDRESS MAC ADDRESS FRIENDLY NAME : XM7-30 SYSTEM NAME : XM7-30 MODE : CLASSIC NETWORK MODE : SOFT AP AUTH &...
-
Page 36: Cleaning
• The head may be damaged by static electricity, etc. • Be careful not to scratch the head. • Be sure to use only genuine linerless media supplied by Bixolon. Otherwise, post-sale support may not be available. • Be sure to turn off the power before you proceed with cleaning. -
Page 37: Appendix
XM7-30 Series 6. Appendix 6-1 Printer Specifications Item Description Model XM7-30 Printing Method Direct Thermal Printing Print Speed Up to 127 mm/s (5 ips) Resolution 203 dpi 10 SLCS Resident Bitmap Fonts One SLCS Resident Scalable Font 16 BPL-Z™ Resident Bitmap Fonts Font One BPL-Z™... - Page 38 XM7-30 Series Printer Operating: -15 ~ 50 ℃ (5 ~ 122 ℉) Printer Storage: -30 ~ 70 ℃ (-22 ~ 158 ℉) Temperature Charging: 0 ~ 50 ℃ (32 ~ 122 ℉) * Refer to the temperature conditions on Battery Safety...
- Page 39 XM7-30 Series Revision History Rev. Date Description 1.00 2022-09-05 Ver. 1.00 - 39 -...
Need help?
Do you have a question about the XM7-30 Series and is the answer not in the manual?
Questions and answers