BIXOLON XM7-40 User Manual
Hide thumbs
Also See for XM7-40:
- Installation manual (10 pages) ,
- User manual (38 pages) ,
- Installation manual (4 pages)
Table of Contents
Advertisement
Advertisement
Table of Contents

Related Manuals for BIXOLON XM7-40


Summary of Contents for BIXOLON XM7-40
- Page 1 User’s Manual XM7-40 MOBILE PRINTER Ver. 1.00 http://www.bixolon.com...
- Page 2 XM7-40 Introduction The XM7-40 is a 4-inch thermal mobile label printer which simultaneously connects with Bluetooth and WLAN. Ideal for smart mobility labelling due to its compact, lightweight design with an easy-to-open peeler and LCD. ※ The main features of the printer are as follows 1.
- Page 3 XM7-40 Safety Information Warnings must be heeded carefully in order to prevent serious Warning physical harm. Cautions must be heeded in order to prevent minor injuries, Caution equipment damage, or data loss. Symbol Information DC (Direct current) Warning, Caution Ethernet - 3 - Ver.
-
Page 4: Table Of Contents
XM7-40 Table of Contents 1. Content Confirmation ......................10 2. Product Part Names ......................10 3. Installation & Usage ......................12 3-1 Battery Installation ......................12 3-2 Battery Charging ......................12 3-2-1 Using AC/DC Adapter ..................12 3-2-2 Using Single Battery Charger (Optional) ............. 13 3-2-3 Using Quad Battery Charger (Optional) .............. - Page 5 XM7-40 Manual Information This user’s manual contains basic information for product usage as well as for emergency measures that may be required. ※ The following separate manuals provide more detailed content on various technological issues and areas. 1. Software Manual This manual provides information for development.
- Page 6 XM7-40 Safety Precautions In using the present appliance, please keep the following safety regulations in order to prevent any hazard or material damage. WARNING Violating following instructions can cause serious injury or death. Do not plug several products into one multi-outlet.
- Page 7 XM7-40 CAUTION Violating following instructions can cause slight wound or damage the appliance. Keep the desiccant out of children’s reach. If you observe a strange smoke, odor or noise from the printer, unplug it before taking following • If not, they may eat it.
- Page 8 XM7-40 Battery Safety Warning Please be sure to read this guide prior to use. Warning 1. If the battery is not charged after the charging time, stop charging and contact the seller. 2. Store and use the battery where it will not come into contact with liquid (water, salt water, etc.).
- Page 9 XM7-40 12. Do not disassemble or modify the battery. The battery contains safety and protection devices to prevent danger. It may reduce battery performance and life due to damage, or there may be a risk of overheating, rupturing or igniting.
-
Page 10: Content Confirmation
XM7-40 1. Content Confirmation The following items should all be contained in the printer package. Contact the dealer from which the purchase was made if any item is damaged and/or missing. ※ Basic items Battery Pack XM7-40 AC/DC Adapter Power Cord... -
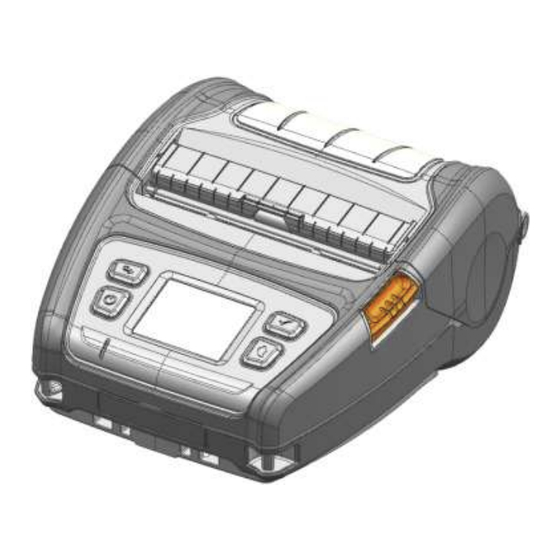
Page 11: Product Part Names
XM7-40 2. Product Part Names • Front Paper Cover Peeler Menu Move Button Power Button Charge Indication LED Cover Open Button Shoulder Strap Ring Menu Select Button Paper Feed Button Outer Terminal Cover • Rear Hole for mounting belt strap... -
Page 12: Installation & Usage
Reinstall Battery The printer may incur serious damage if the AC/DC adapter provided by BIXOLON is not used. BIXOLON is not legally liable for any such damages. Caution (The voltage and electrical current specifications of the printer and battery charger must match.) -
Page 13: Using Single Battery Charger (Optional)
BIXOLON when using a single battery charger. BIXOLON is not legally liable for any such damages. Caution - You must use the battery charger provided by BIXOLON to use the singles battery charger. (AC/DC adapter is not available) 3-2-3 Using Quad Battery Charger (Optional) - Page 14 XM7-40 3-2-3-2 Charging Battery 1) Insert the battery into the Quad charger as shown in the figure on the left. 2) Gently slide the battery until it reaches the bottom of the charger. 3) Charging starts as soon as the battery is completely inserted.
-
Page 15: Media Installation
XM7-40 3-3 Media Installation 1) Press the Open button to open the media cover. 2) After keeping the media holder wide as shown, in the figure insert the media as shown. (Remove the empty media core.) 3) Check the orientation of the media when inserting it into the printer. -
Page 16: Using Peeler
XM7-40 NOTE The specification of the media inner diameter of the standard media disks are 19 mm (0.75 inch). If you are using media with a smaller inner diameter, remove the media disks as shown below and replace it with the supplied 12 mm (0.47 inch) media disks. -
Page 17: Using Belt Strap
XM7-40 3-5 Using Belt Strap 1) Insert the belt strap screw into the belt strap hole. Belt Strap 2) Use a coin to tighten the belt strap screw Coin as shown in the image. 3) Unfasten the belt strap Velcro. -
Page 18: Using Shoulder Strap (Optional)
XM7-40 3-6 Using Shoulder Strap (Optional) Please, insert hooks of the strap into each slot as shown in the picture. - 18 - Ver. 1.00... -
Page 19: Using Fan-Fold Media
XM7-40 3-7 Using Fan-Fold Media 1-1) After keeping the media holder wide as shown in the figure, hold the media holder by lifting right guide holder as shown in the figure. NOTE Use only when you are using 105 mm (4.13 inch) media. -
Page 20: Using Control Panel
XM7-40 3-8 Using Control Panel • Power Button This button is used to turn the printer on, off, to move to main menu or to operate the action. 1) When the printer is off, press this button for approximately 2 seconds to turn on the power. -
Page 21: Recommended Media
XM7-40 3-9 Recommended Medias • Receipt media - TF50KS-E (Media Thickness: 65 μm): Nippon Paper Industries Co., Ltd. - PD 150R (Media Thickness: 75 μm): New Oji Paper Mfg. Co., Ltd. - PD 160R (Media Thickness: 75 μm): New Oji Paper Mfg. Co., Ltd. -
Page 22: Self-Test
4) After the wireless interface information is printed, the self-test is automatically terminated. • Self-Test Sample BIXOLON XM7-40 CONFIGURATION FIRMWARE VERSION : V01.00 STD 010118 EMULATION : SLCS & BPL-Z & BPL-C PRINT DARKNESS... - Page 23 RF INTERFACE STATUS (BT) RF INTERFACE STATUS (WLAN) BLUETOOTH F/W VER : 2.0.4 WLAN F/W VER : 02.02(4002) MAC ADDRESS MAC ADDRESS FRIENDLY NAME : XM7-40 SYSTEM NAME : XM7-40 MODE : CLASSIC NETWORK MODE : SOFT AP AUTH & ENCRYPT : ENABLED FREQUENTY : (PRIORITY)2.4GHZ/5GHZ...
-
Page 24: Lcd Menu
XM7-40 5. LCD Menu You can check printer status and setting information through LCD. • Top icon Icon Description Bluetooth is enabled but not connected to the host device Bluetooth is enabled and connected to the host device Display signal strength of wireless LAN... - Page 25 XM7-40 • Main menu icon Icon Description Check / set the status of whole printer 1) Interface 2) Media 3) Sensor 4) Powersave 5) Language Media settings 1) Density 2) Position - Tear off - Print - Direction Tools 1) Hex dump 2) Print printer config ...
- Page 26 XM7-40 Icon Description Check printer information 1) Version - Printer, WLAN, Bluetooth 2) Bluetooth 3) WLAN 4) LAN 5) Battery 6) Repair Sensor settings 1) Media type - Auto detection / Rear black mark / Gap - Continueous 2) Peeler...
-
Page 27: Peripherals Connection
XM7-40 6. Peripherals Connection This product can communicate with other devices via Bluetooth, Wireless LAN communication and cable. 6-1 Bluetooth, Wireless LAN Connection 1) The printer can be connected to devices equipped with Bluetooth communication capacity (PDAs, PCs, etc.). 2) Use the Bluetooth connection function supported by the device to connect to the printer. -
Page 28: Interface Cable Connection
The interface cable that can be connected to ② the printer is Serial/USB cable provided by BIXOLON(optional) or USB Type-C cable supporting USB2.0. USB Type-C port Power port Serial/USB 14pin port (for the cable provided by BIXOLON(optional)) - 28 - Ver. 1.00... -
Page 29: Fixed Interface Cable Connection
4) Connect the interface cable to the USB port of the device (PDAs, PCs, etc.). ② NOTE The fixed interface cable that can be connected to the printer is Serial/USB cable provided by BIXOLON(optional). ③ - 29 - Ver. 1.00... -
Page 30: Printer Cleaning
Print quality may be degraded or printhead life may be shortened if it is not cleaned periodically. Use only the linerless media that is provided by BIXOLON. Warning Use of unauthorized media voids product warranty. -
Page 31: Appendix
XM7-40 8. Appendix 8-1 Specifications Item Description Printing Method Direct Thermal Printing Print Speed Up to 127 mm/s (5 ips) Resolution 203 dpi 10 SLCS Resident Bitmap Fonts One SLCS Resident Scalable Font 16 BPL-Z™ Resident Bitmap Fonts One BPL-Z™ Resident Scalable Font Font 7 BPL-C™... -
Page 32: Label Types
XM7-40 8-2 Label Types • The labels used on this product are composed of the following materials; • BIXOLON logo label: PC • Rating Label: PET • Other labels: PET, PC - 32 - Ver. 1.00... - Page 33 BIXOLON Co., Ltd. The information contained herein is designed only for use with this BIXOLON product. BIXOLON is not responsible for any direct or indirect damages, arising from or related to use of this information.
- Page 34 XM7-40 Caution Some semiconductor devices are easily damaged by static electricity. You should turn the printer “OFF”, before you connect or remove the cables on the rear side, in order to guard the printer against the static electricity. If the printer is damaged by the static electricity, you should turn the printer “OFF”.
- Page 35 XM7-40 Revision History Rev. Date Page Description 1.00 17.12.19 - 35 - Ver. 1.00...
Need help?
Do you have a question about the XM7-40 and is the answer not in the manual?
Questions and answers